Moisture-Resistant Gypsum Board Finishing with Epoxy Primer Bali
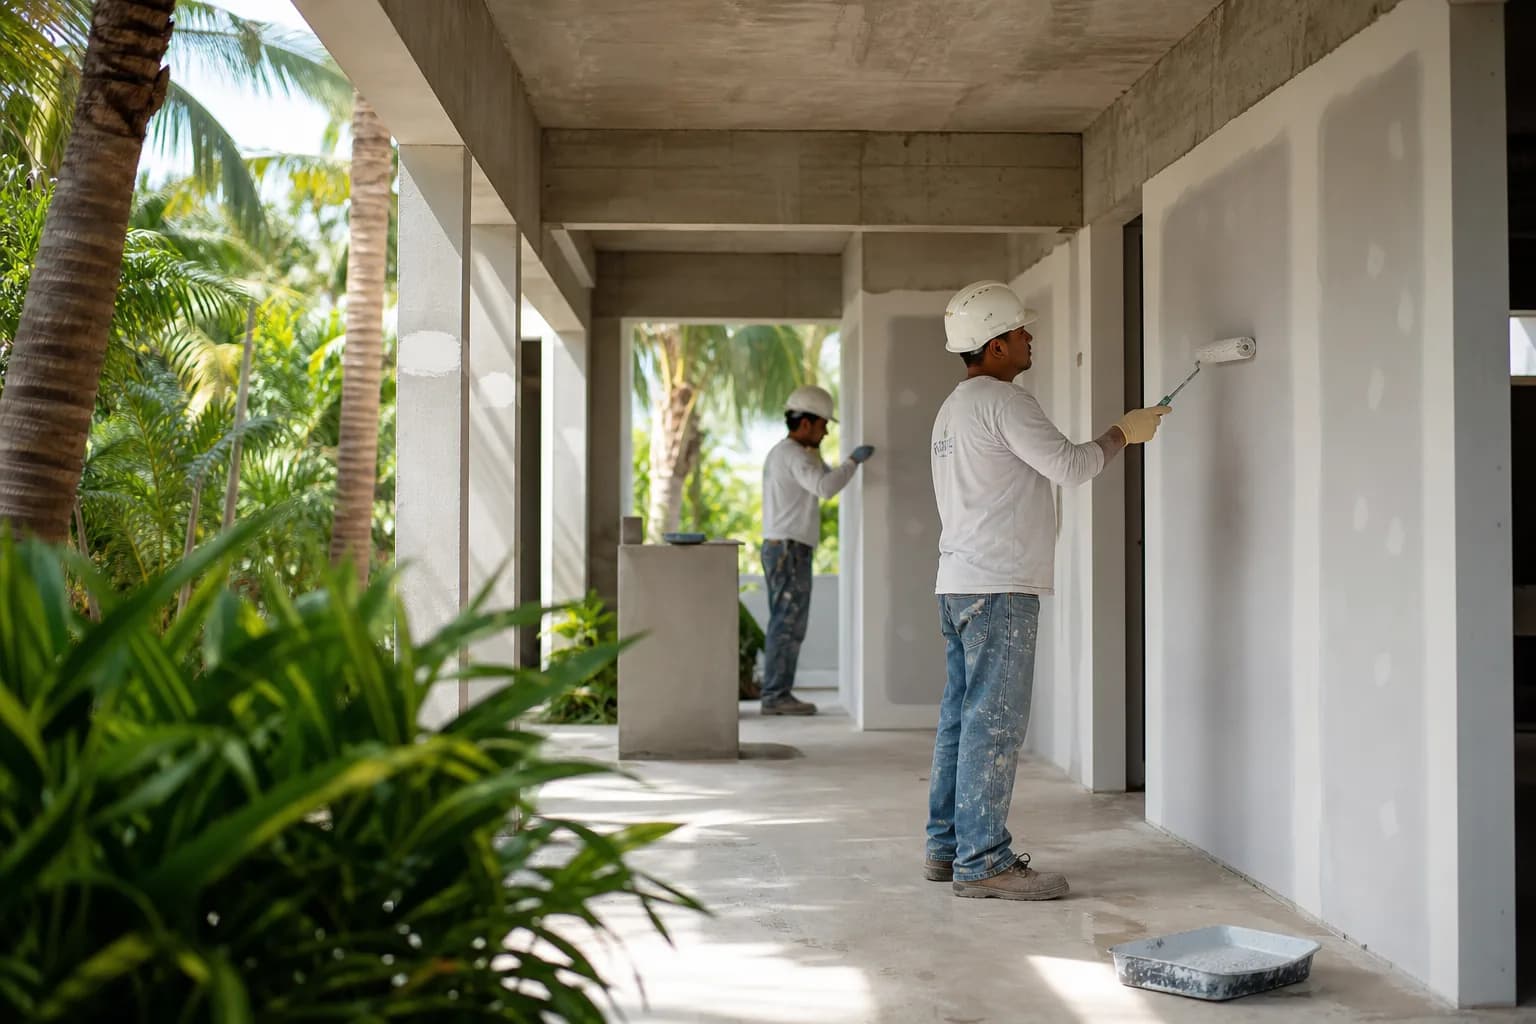
Moisture-Resistant Gypsum Board Finishing with Epoxy Primer Bali: How Teville Delivers Durable Walls in Tropical Humidity
Specific Problem/Question
Bali’s tropical climate—high humidity, salt-laden air near the coast, frequent wet mopping, and intermittent air-conditioning—punishes interior finishes. Standard gypsum board often fails: paint blisters, joints telegraph, corners mold, and cabinetry interfaces swell. The question clients bring to Teville is precise: can moisture‑resistant gypsum board finished with an epoxy primer deliver a stable, cleanable, mold‑defensive surface for bathrooms, kitchens, laundry rooms, and sea-facing rooms in Bali villa construction and renovation? The short answer: yes—if the right materials and methods are executed rigorously.
Technical Deep Dive
Moisture-resistant (MR) gypsum board, often green-faced or with a treated core, is engineered to slow vapor uptake and resist incidental moisture, not prolonged immersion. In Bali, that makes it suitable for “wet-adjacent” zones—bathroom ceilings, vanity walls, WC partitions, kitchen backsplashes behind cabinetry, laundry walls, and AC closets—while true “wet walls” (shower enclosures, splash zones, or any surface under direct water spray) are better built with cement boards or waterproof backer systems. Teville’s first principle is placing the right substrate in the right location, then elevating performance with a moisture-tolerant epoxy primer.
Why epoxy primer? Two reasons: adhesion and moisture control. High-quality epoxy primers exhibit tenacious adhesion to paper-faced gypsum (when properly prepared) and create a dense, low-permeance film that slows moisture diffusion. This stabilizes joint compounds, reduces paint blistering, and discourages mold growth by limiting water ingress. Waterborne epoxies reduce odor and simplify cleanup; 100% solids epoxies build denser films and can tolerate marginal dampness. Product choice is dictated by room function, ventilation quality, and the downstream finish system (e.g., acrylic topcoats or two-component polyurethane).
Compatibility is key. Setting-type joint compounds (powdered, chemically curing) perform better than premixed drying types in humid environments because they’re less reactivated by moisture. Teville specifies setting compounds for joints, external corners, and penetrations, reinforced with standard or fiberglass joint tape as per board manufacturer guidance. Edges, cutouts, and fixture penetrations are sealed with low-modulus elastomeric sealant before priming. Fasteners must be corrosion-resistant—galvanized or coated screws for metal studs; in coastal locations, stainless fasteners for accessories and heavy-duty fixings are prudent to avoid rust bleed-through and staining under epoxy films.
Surface moisture is assessed before epoxy. While MR board faces don’t read like concrete, the adjoining elements do: tiled floors, rendered block, or damp masonry jambs can drive vapor into drywall. Teville combines ambient RH/temperature logging with plastic-sheet checks (ASTM D4263 style) at risk interfaces and non-invasive meters to ensure the assembly is within primer tolerance. In AC-heavy villas, we consider dew point: rapid cooling can create interstitial condensation behind wardrobes or pantries. The epoxy layer on the room face slows inward diffusion, but we also manage HVAC, exhaust, and airflow to prevent hidden moisture traps. Utilities coordination matters: concealed MEP chases are taped, filled, and primed continuously to avoid capillary pathways.
Application nuance in Bali’s heat: pot life of two-part epoxies shortens at 30–32°C. We stage small batches, employ mechanical mixing at low RPM, and condition materials in shaded storage. On gypsum, thin, uniform coats are preferred—heavy films risk surfacing irregularities and roller texture telegraphing under topcoats. Back-rolling ensures wetting into paper fibers and joint edges. Where future repainting is expected, a light silica sand broadcast (100–200 mesh, minimal rate) into the first wet epoxy coat can create a microkey that improves adhesion of waterborne topcoats without noticeable texture once finished.
Topcoat systems: for interior finishing Bali projects, scrub-resistant acrylic or low-sheen 2K polyurethane are common. Epoxy as a finish coat can look plastic and yellow under UV; as a primer, it’s hidden but working. Teville’s standard is epoxy primer + two coats of premium interior acrylic with anti-microbial additives for bathrooms and kitchens; in utility rooms or plant spaces (villa utilities), we may specify epoxy primer + 2K polyurethane for chemical and cleaning resistance. At furniture interfaces—built-in wardrobes, kitchen carcasses, headboards—we epoxy-prime the wall plane before cabinet installation, then scribe cabinetry and final-seal coved joints with paintable sealant to block dust and vapor ingress.
Materials & Standards
Core materials Teville uses for this system include:
- Moisture-resistant gypsum board, 12.5–15 mm, with treated core and moisture-resistant face paper, manufacturer-approved for the room classification.
- Setting-type joint compound (e.g., 45–90 minute set times) for joints, angles, and spot-filling, plus compatible paper or fiberglass tape.
- Epoxy primer, moisture-tolerant and compatible with gypsum. Waterborne or 100% solids options may be deployed based on odor constraints and schedule. Representative technologies include moisture-tolerant epoxies such as the principles behind products like Sikafloor EpoCem Modul (as a moisture-control layer for cementitious substrates; selection and adaptation must follow manufacturer advisories) and dedicated moisture-seal epoxies such as Moisture Seal PRO Epoxy Primer (flooring-oriented; referenced for its moisture barrier properties). Always verify gypsum compatibility and follow data sheets.
- Premium interior acrylic or 2K polyurethane topcoats with anti-microbial and scrub-resistance ratings suitable for bathrooms and kitchens.
- Elastomeric, paintable sealants (low modulus) for perimeter and penetration sealing; corrosion-resistant fasteners for coastal resilience.
Applicable references and quality criteria:
- Gypsum board and jointing: ASTM C1396 (Gypsum Board), ASTM C840 / GA-216 (Application and Finishing of Gypsum Board) as guiding standards.
- Adhesion testing of coatings: pull-off per ASTM D7234 on representative mock-ups when required by QA plans; cross-hatch per ASTM D3359 for comparative checks.
- Water vapor transmission: ASTM E96 for primer film characterization (manufacturer data) to inform vapor drive analysis in AC spaces.
- Moisture evaluation of adjacent cementitious substrates: ASTM D4263 (plastic sheet) and, where relevant, in-slab RH per ASTM F2170 for floors abutting wall assemblies.
Local practice: Teville aligns specifications with manufacturer instructions, Indonesian construction norms, and site-specific environmental data. Product SDS/VOC criteria guide indoor air quality selections. For waterborne epoxies and 2K polyurethanes, we schedule application during low-occupancy windows and ensure forced ventilation to maintain safe work environments.
For product data, see the Indonesian Sika data sheet repository (e.g., Sikafloor EpoCem Modul) and manufacturer primers specifically rated for gypsum. Teville completes compatibility checks and adhesion samples before full deployment.
Step-by-Step Process
Teville’s process for interior finishing Bali projects and renovation Bali scopes prioritizes predictability and durability:
- 1. Survey & risk mapping – Identify wet-adjacent walls, AC closets, laundry, kitchens, sea-facing rooms, and furniture-backed walls. Note nearby masonry or slab edges that may act as moisture sources. Confirm ventilation and exhaust strategies.
- 2. Board selection & framing – Use MR gypsum in suitable zones; cement board where direct water contact exists. Ensure framing is plumb, rigid, and isolated from damp foundations. Select corrosion-resistant fasteners and correctly spaced screw patterns per GA-216.
- 3. Utilities coordination – Finalize villa utilities rough-ins (electrical boxes, plumbing stub-outs, AC linesets, data). Penetrations are kept tight; gaps are foam- or sealant-backed to avoid air/moisture pumping through cavities.
- 4. Joint treatment – Tape all joints; set with setting-type compound. Fill fastener heads flush. Form crisp angles with corner beads where needed. Allow full cure; skim to Level 4 finish for painted walls (Level 5 only if high-gloss is planned).
- 5. Surface conditioning – Lightly sand to uniform smoothness; vacuum and tack-wipe. Seal raw cut edges and penetrations with thin compound or sealant. Verify substrate dryness; conduct spot checks at interfaces (masonry returns, floor-wall junctions).
- 6. Mock-up & adhesion check – Apply a small test area with selected epoxy primer and topcoat. After cure, perform adhesion check (cross-hatch or pull-off if specified). Confirm appearance, sheen, and roller stipple meet expectations.
- 7. Epoxy mixing & application – In Bali temperatures, precondition components in shade. Mechanically mix parts A+B as per TDS, respecting induction time if required. Apply the first coat thin and even (typically 4–6 mils WFT for waterborne, 6–8 mils for 100% solids as specified). Back-roll to ensure penetration and uniform film.
- 8. Optional micro-broadcast – While the first coat is wet, dust a fine silica sand at low rate where enhanced key is desired for future repaints. Vacuum off excess after cure.
- 9. Second coat & edge detailing – Apply a second epoxy coat if specified for moisture-critical walls or where WVT targets require it. Tool perimeter beads and penetrations with paintable sealant to create a continuous barrier.
- 10. Topcoats – After epoxy cure window, apply two coats of premium interior acrylic (bath/kitchen grade) or 2K polyurethane for utility rooms. Control film build to avoid trapping solvent under Bali humidity; maintain airflow and temperature control.
- 11. Furniture installation interface – Install cabinets and wardrobes onto fully cured, epoxy-primed, and topcoated walls. Scribe tight, then apply a fine perimeter sealant bead to prevent moisture-laden air behind casework. Use stainless or coated anchors; avoid puncturing services.
- 12. QA & documentation – Measure wet film with gauges during application; log batch numbers, temps, RH, and cure times. Conduct final appearance inspection under raking light; correct minor defects with spot epoxy and touch-up paint.
Safety: use PPE, ensure ventilation, and comply with SDS. Odor control is coordinated with occupants; sensitive areas are isolated during works. In renovation Bali scenarios, protection is installed for adjacent finishes and furniture.
Costs & Timeline
Budgets vary with room function, product tier, and access. The ranges below are indicative for Bali villa construction and refurbishment, excluding framing and board installation, focusing on finishing (jointing + epoxy primer + paint):
- Standard wet-adjacent rooms (epoxy primer + premium acrylic): mid-range cost driven by two epoxy coats in critical areas and two paint coats. Add for perimeter sealing and utility penetrations management.
- High-exposure or utility spaces (epoxy primer + 2K polyurethane): higher cost due to two-component topcoats, extended curing, and increased protection/ventilation measures.
- Heritage or occupied renovations: add allowances for containment, off-hours work, odor control, and detailed surface remediation.
Timeline guidance (per 100–150 m² of wall/ceiling area, contiguous):
- Jointing and curing: 2–4 days (depending on set compound and humidity).
- Surface prep and mock-up: 0.5–1 day.
- Epoxy primer coats: 1–2 days including recoat windows and QA checks.
- Topcoats: 1–2 days (product dependent and ventilation quality).
- Furniture installation and final sealing: 1–2 days post-cure.
Weather and RH control matter: during monsoon peaks, we allocate extra dehumidification time to avoid blush or cure inhibition for certain epoxies. Teville sequences works to keep programs on schedule without compromising finish quality. For a project-specific estimate, visit our cost estimation form.
FAQ Block
No. Use cement board or a rated waterproof backer in direct-splash zones. MR gypsum with epoxy primer is for wet-adjacent areas (ceilings, vanity walls, WC partitions).
Applied on the room face, epoxy reduces inward vapor drive. Teville addresses ventilation, exhaust, and AC set-points to prevent interstitial condensation. We also seal penetrations and perimeters to avoid air pumping behind walls.
 164 m²7 month(s)from 79.000 USD
TALA TWO
 3127 m²9 month(s)from 177.000 USD
Mukunda
 3173 m²6 month(s)from 125.000 USD
TALA FOUR
 3104 m²11 month(s)from 99.000 USD
TALA 100
 2144 m²11 month(s)from 104.000 USD
Narayana
 3180 m²7 month(s)from 142.000 USD
Vasudeva

Want to calculate?
 4344 m²16 month(s)from 290.000 USD
Radha
 1from 198.000 USD
Private: Haridas Villas
 3124 m²6 month(s)from 123.000 USD
TALA 8
164 m²7 month(s)from 79.000 USDPrivate: Haridas Villas, Tegallalang
 172 m²8 month(s)from 120.000 USD
Keshava
Start With Real Numbers, Not Guesses
Before finalizing your finishing works plan, check realistic cost ranges for your Bali villa project.
Available lands
 7250 m²56 min$ 235714Bali, Tabanan
 585 m²8 min$ 165702Bali, Mengwi
 2200 m²15 min$ 508005Bali, Canggu
 2000 m²15 min$ 261700Bali, Babakan
 260 m²5 min$ 51872Bali, Kedungu
 2200 m²3 min$ 183842Bali, Berawa
 2000 m²15 min$ 523000Bali, Canggu
 2115 m²5 min$ 1139547Bali, Pererenan
 2400 m²7 min$ 496552Bali, Canggu
 1950 m²7 min$ 150092Bali, Tabanan
 660 m²10 min$ 175567Bali, Mengwi
 1100 m²8 min$ 280419Bali, Ungasan
 420 m²15 min$ 41897Bali, Tabanan
 800 m²10 min$ 307882Bali, Tibubeneng
 1430 m²5 min$ 209862Bali, Klungkung
Essential Bali build & buy guides
- Bali villa construction cost per m² in 2026
- How much will your villa cost? Calculator
- Building a villa in Bali: the complete guide
- Buying land in Bali: step-by-step for foreigners
- Bali villa investment: yields, risks, returns
- Leasehold vs freehold: what foreigners can own
- Construction defect liability & 10-year warranty
- Bali building codes and construction standards
Related guides
How to Build a Villa in Bali: The Complete Step-by-Step Process (2026)
Every stage of building a villa in Bali as a foreigner — from securing land and permits to handover — with realistic timelines, costs and the mistakes that derail first-time builders.
5 min read
Marine-Grade Timber Joinery Finishing Corrosion Protection Bali
Discover marine-grade timber joinery finishing and corrosion protection in Bali. Durable coastal timber care, coatings, and maintenance for lasting protection.
8 min read
Why Bali Villa Demand Surged in January 2026: Global Market Analysis
Discover why Bali villa demand exploded in January 2026. Explore geopolitical factors, investor demographics from India, UAE, China, and emerging hotspots like Ubud, Tegallalang, and the northern airport corridor.
9 min read