Porcelain vs Stone Tile in Bali: Humidity Salt Air
# Porcelain vs Natural Stone Tile Installation: Bali Humidity & Salt Air Impact
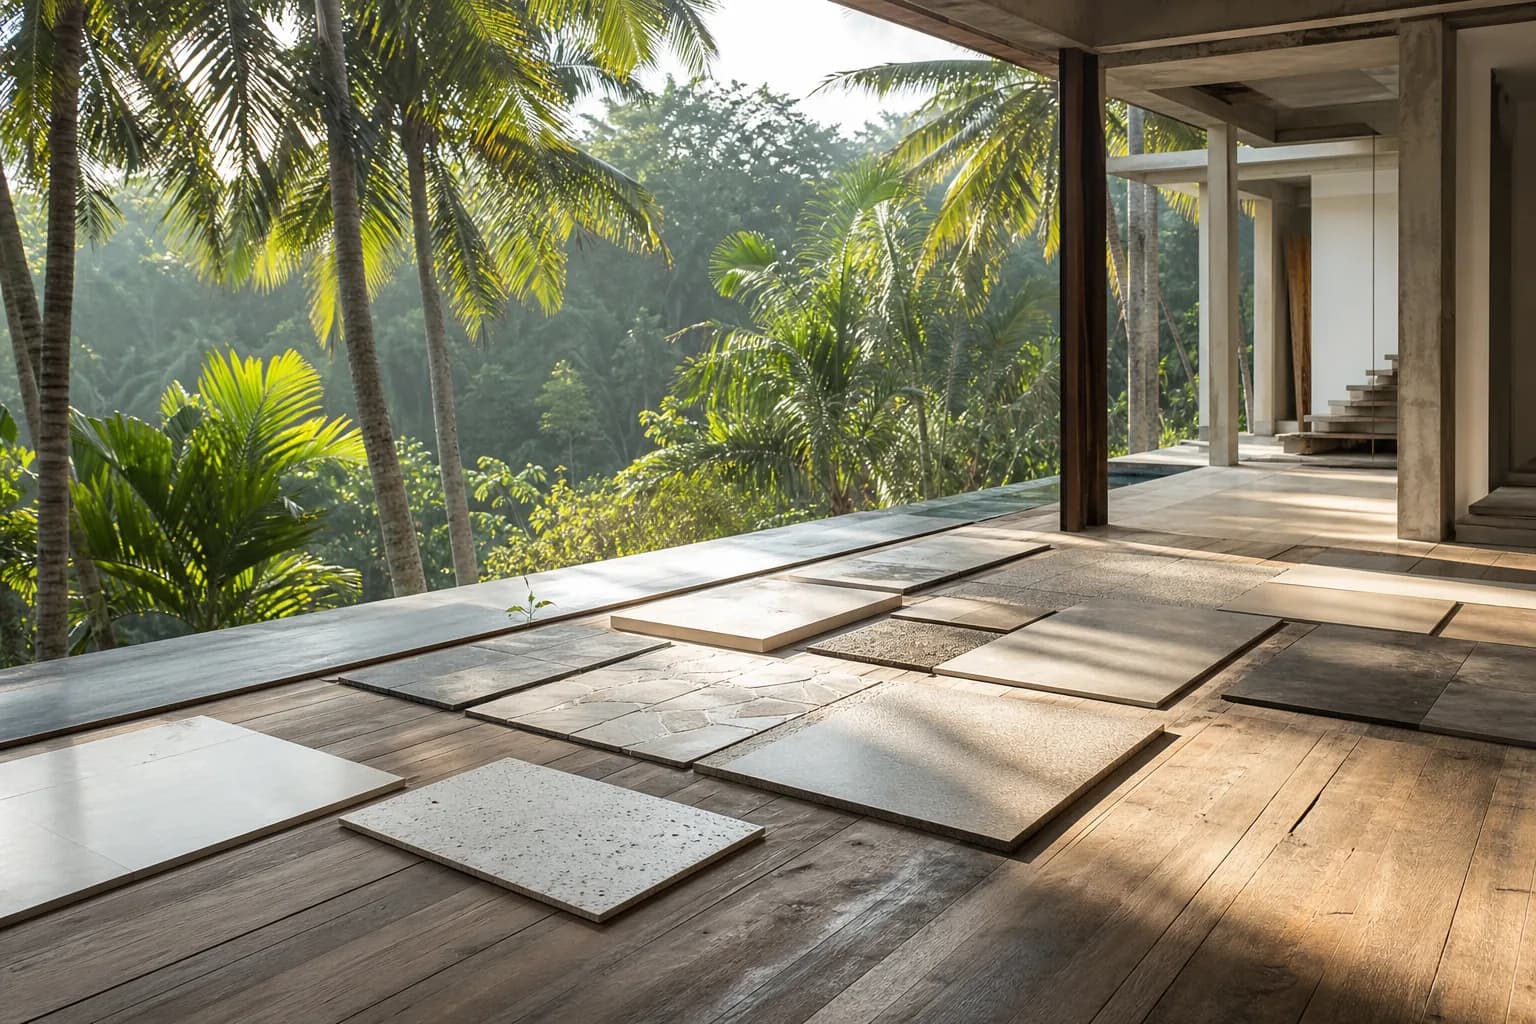
The Critical Flooring Decision for Coastal Bali Properties
Selecting between porcelain and natural stone tiles for your Bali villa construction or renovation Bali project isn’t merely an aesthetic choice—it’s a technical decision that directly impacts long-term durability in one of the world’s most challenging climates. With humidity levels consistently above 75% and salt-laden air penetrating up to 5 kilometers inland from Bali’s coastline, the wrong tile installation can lead to surface deterioration, efflorescence, and structural adhesion failure within 18-24 months. This comprehensive analysis examines the specific installation requirements, material performance characteristics, and finishing techniques that determine whether porcelain or natural stone will maintain its integrity in Bali’s tropical coastal environment through 2026 and beyond.
Technical Performance Analysis: Material Behavior in Tropical Coastal Conditions
Understanding how porcelain and natural stone respond to Bali’s environmental stressors requires examining their fundamental material properties and the specific mechanisms through which humidity and salt air cause deterioration in interior finishing Bali applications.
Porcelain Tile Characteristics in High-Humidity Environments
Porcelain tiles manufactured to ISO 13006 standards exhibit water absorption rates below 0.5%, classifying them as impervious materials. This low porosity creates a barrier against moisture penetration that proves essential in Bali’s climate where relative humidity rarely drops below 70%. The vitrified body structure—achieved through firing temperatures exceeding 1,200°C—produces a homogeneous material with consistent density throughout the tile thickness. This uniformity prevents differential moisture absorption that can cause warping or delamination in coastal installations.
In salt air environments, porcelain’s non-reactive surface resists the hygroscopic nature of salt crystals. Unlike porous materials, porcelain doesn’t absorb airborne sodium chloride particles that attract atmospheric moisture and create continuous wet-dry cycles. This resistance prevents the subsurface salt crystallization that causes spalling and surface degradation in more porous materials. For villa utilities areas like outdoor showers and pool decks where direct salt water contact occurs, through-body porcelain tiles eliminate the concern of surface wear exposing a different-colored substrate.
Natural Stone Performance and Vulnerability Factors
Natural stone encompasses diverse materials with varying porosity levels. Dense granite exhibits absorption rates of 0.2-0.4%, comparable to porcelain, while limestone and sandstone can exceed 5-10% absorption. This variability makes stone selection critical for Bali applications. Basalt and andesite—locally quarried volcanic stones—offer excellent density and cultural authenticity but require proper sealing protocols.
The crystalline structure of natural stone creates microscopic pathways for moisture migration. In Bali’s climate, this capillary action draws humidity into the stone body, where it can dissolve mineral salts naturally present in the material. When this moisture evaporates at the surface, it deposits these salts as efflorescence—the white crystalline residue frequently observed on improperly sealed stone installations. Coastal properties face additional challenges as airborne salt particles penetrate stone pores, accelerating this cycle and potentially causing subflorescence (subsurface crystallization) that generates internal pressure and surface spalling.
However, natural stone offers thermal advantages in tropical climates. Its thermal mass and conductivity create naturally cool surfaces—typically 3-5°C below ambient temperature—enhancing comfort in non-air-conditioned spaces. The material’s breathability also allows moisture vapor transmission, which can benefit certain applications when properly integrated with building envelope design.
Substrate Interaction and Adhesion Challenges
Bali’s construction typically employs concrete substrates that undergo continuous dimensional changes due to thermal expansion and moisture-related movement. The differential expansion coefficients between tile materials and concrete substrates create shear stresses at the adhesive interface. Porcelain’s lower thermal expansion coefficient (approximately 6-8 × 10⁻⁶/°C) more closely matches concrete (10-14 × 10⁻⁶/°C) compared to some natural stones like marble (5-10 × 10⁻⁶/°C depending on composition), reducing stress accumulation.
Salt air accelerates concrete carbonation and chloride penetration, potentially compromising substrate integrity. This environmental factor makes the waterproofing membrane and adhesive selection as critical as the tile choice itself for long-term installation success in Bali villa construction projects.
Material Standards and Specification Requirements
Proper material specification for Bali’s coastal environment requires adherence to international standards while accounting for local environmental factors that exceed typical testing parameters.
Porcelain Tile Specifications
For coastal Bali installations, specify porcelain tiles meeting ISO 13006 Group BIa classification (water absorption ≤0.5%) with minimum breaking strength of 1,300N and surface slip resistance of R11 or higher for wet areas. Rectified edges facilitate narrow grout joints (2-3mm) that minimize grout exposure to environmental degradation. Through-body porcelain eliminates concerns about surface wear in high-traffic areas, while glazed porcelain offers enhanced stain resistance for interior finishing Bali applications in kitchens and bathrooms.
Natural Stone Selection Criteria
Natural stone for Bali coastal environments should exhibit water absorption below 2% (measured per ASTM C97), minimum flexural strength of 10 MPa (ASTM C880), and demonstrated resistance to salt crystallization per EN 12370. Dense granite, honed basalt, and properly selected limestone varieties meet these criteria. Avoid highly figured marbles and soft sedimentary stones in exterior or high-moisture applications. Request petrographic analysis for large-format installations to identify potential weaknesses like clay inclusions or microfractures that accelerate deterioration in humid environments.
Installation Material Standards
Adhesives must meet ISO 13007 C2S2 classification minimum (improved deformability and extended open time) for Bali’s climate. Polymer-modified cementitious adhesives with hydrophobic additives resist moisture-related bond degradation. Epoxy adhesives provide superior chemical resistance for areas with direct salt water exposure but require precise mixing and application expertise. Grouts should meet ISO 13007 CG2WA standards (improved abrasion resistance and reduced water absorption) with antimicrobial additives to prevent biological growth in perpetually damp conditions.
Installation Process: Step-by-Step Technical Protocol
Successful tile installation in Bali’s challenging environment requires meticulous attention to substrate preparation, waterproofing, and finishing details that standard installation practices often overlook.
Phase 1: Substrate Assessment and Preparation (Days 1-2)
Begin with concrete substrate moisture testing using calcium chloride tests or electronic moisture meters. Concrete moisture content should not exceed 4% before tile installation. In Bali’s climate, this often requires extended curing periods or mechanical dehumidification. Assess substrate flatness using a 2-meter straightedge; variations exceeding 3mm over 2 meters require correction through grinding or self-leveling compounds. Remove all curing compounds, sealers, and contaminants that prevent adhesive bonding. Shot-blasting or mechanical scarification creates the optimal surface profile for adhesive mechanical keying.
Phase 2: Waterproofing Membrane Application (Days 3-4)
Apply two-component polyurethane or acrylic-based waterproofing membranes in multiple coats achieving minimum 1.5mm dry film thickness. Extend membranes 150mm up adjacent walls and ensure continuous coverage across substrate joints. Reinforce corners, penetrations, and transitions with alkali-resistant fiberglass mesh embedded in membrane layers. This step proves critical for renovation Bali projects where existing substrate waterproofing may be compromised. Allow full curing (typically 24-48 hours depending on humidity) before proceeding—rushing this phase accounts for 60% of premature tile installation failures in tropical climates.
Phase 3: Tile Layout and Dry-Fitting (Day 5)
Establish reference lines from room center points or architectural features, adjusting to minimize cut tiles at visible edges. For natural stone, perform dry layout to assess color variation and veining patterns, selecting and positioning tiles for optimal aesthetic flow. This planning phase prevents costly errors and material waste. Calculate expansion joint locations—required every 4-5 meters in exterior applications and at transitions between different materials or structural elements. Bali’s temperature fluctuations (24-32°C daily range) necessitate these joints to accommodate thermal movement.
Phase 4: Adhesive Application and Tile Setting (Days 6-10)
Mix polymer-modified adhesive to manufacturer specifications, achieving lump-free consistency. Apply adhesive using notched trowels sized appropriately for tile dimensions—10mm notches for tiles up to 400mm, 12mm for larger formats. Employ back-buttering technique for tiles exceeding 300mm and all natural stone installations to ensure 95%+ coverage and eliminate voids where moisture can accumulate. Work in sections manageable within adhesive open time (typically 20-30 minutes in Bali’s heat).
For porcelain tiles, use slight twisting pressure to achieve full contact. Natural stone requires gentler handling to prevent surface damage and avoid adhesive squeeze-up that can stain porous materials. Maintain consistent joint widths using spacers—minimum 3mm for porcelain, 5mm for natural stone to accommodate dimensional variation. Check lippage continuously with straightedges, adjusting tiles before adhesive sets. For large-format tiles (>600mm), employ suction cup handling tools and lippage control systems to achieve the flat planes essential for quality interior finishing Bali standards.
Phase 5: Grouting and Sealing (Days 12-14)
Allow adhesive to cure fully—minimum 48 hours for floor installations, 72 hours in high-humidity conditions. Remove spacers and clean joints of adhesive residue. For natural stone, apply pre-grouting sealer to prevent grout staining of porous surfaces. Mix epoxy-modified or polymer-enhanced cementitious grout with antimicrobial additives, working material into joints using rubber floats at 45-degree angles. Remove excess grout while still workable, then perform final cleaning with damp sponges, changing water frequently.
After grout curing (48-72 hours), apply penetrating sealers to natural stone—two coats of impregnating siloxane or fluoropolymer-based sealers that don’t alter surface appearance while providing water and oil repellency. Porcelain tiles don’t require sealing, but grout joints benefit from penetrating grout sealers that reduce moisture absorption and biological growth. For coastal installations, specify sealers with salt-inhibiting properties that prevent chloride penetration.
Phase 6: Expansion Joint Treatment and Final Protection (Day 15)
Install flexible polyurethane or silicone sealants in expansion joints, selecting products with minimum 25% movement capability and UV resistance for exterior applications. Tool joints to slightly concave profiles that shed water. Apply temporary surface protection using breathable materials that prevent construction damage while allowing moisture vapor transmission during final curing phases.
Cost Analysis and Project Timeline Considerations
Understanding the complete cost structure and realistic timelines for tile installation helps property owners make informed decisions for their Bali villa construction or renovation Bali projects.
Material Cost Comparison
Porcelain tiles in Bali range from IDR 150,000-800,000 per square meter depending on quality, size, and finish. Imported Italian or Spanish porcelain commands premium pricing but offers superior technical specifications. Natural stone varies more dramatically—local Javanese limestone starts at IDR 200,000/m², while premium imported granite reaches IDR 1,500,000/m². These figures exclude installation materials: adhesives (IDR 45,000-85,000/m²), grouts (IDR 25,000-50,000/m²), waterproofing membranes (IDR 75,000-120,000/m²), and sealers for stone (IDR 35,000-60,000/m²).
Labor and Installation Costs
Professional tile installation in Bali costs IDR 120,000-250,000 per square meter depending on tile size, pattern complexity, and site accessibility. Natural stone installation typically commands 20-30% premium due to specialized handling requirements and longer installation times. These rates assume experienced installers familiar with tropical climate protocols—cutting costs by employing inexperienced labor often results in failures requiring complete reinstallation within 2-3 years.
Long-Term Maintenance Cost Projections
Porcelain installations require minimal maintenance—periodic cleaning with pH-neutral detergents and grout resealing every 3-5 years (IDR 25,000-40,000/m²). Natural stone demands more intensive care: annual resealing (IDR 35,000-60,000/m²), periodic professional cleaning to remove salt deposits and biological growth (IDR 50,000-80,000/m²), and potential restoration work every 5-7 years including honing or polishing (IDR 150,000-300,000/m²). Over a 15-year period, natural stone maintenance costs can exceed the initial installation cost differential.
Project Timeline Expectations
For a typical 150m² villa floor installation, expect 3-4 weeks total duration: substrate preparation and waterproofing (1 week), tile installation (1-1.5 weeks), grouting and sealing (3-4 days), plus curing time before furniture installation (minimum 1 week). Bali’s rainy season (November-March) can extend timelines by 20-30% due to humidity-related curing delays. Complex patterns, large-format tiles, or chall
 164 m²7 month(s)from 79.000 USD
TALA TWO
 3124 m²6 month(s)from 123.000 USD
TALA 8
 4344 m²16 month(s)from 290.000 USD
Radha
 3127 m²9 month(s)from 177.000 USD
Mukunda
 3104 m²11 month(s)from 99.000 USD
TALA 100
 1from 198.000 USD
Private: Haridas Villas
 3180 m²7 month(s)from 142.000 USD
Vasudeva

Want to calculate?
 172 m²8 month(s)from 120.000 USD
Keshava
 3173 m²6 month(s)from 125.000 USD
TALA FOUR
 2144 m²11 month(s)from 104.000 USD
Narayana
164 m²7 month(s)from 79.000 USDPrivate: Haridas Villas, Tegallalang
Start With Real Numbers, Not Guesses
Before finalizing your finishing works plan, check realistic cost ranges for your Bali villa project.
Available lands
 610 m²10 min$ 165271Bali, Seminyak
 585 m²8 min$ 165702Bali, Mengwi
 2130 m²10 min$ 495776Bali, Pecatu
 3300 m²15 min$ 449889Bali, Tabanan
 5000 m²8 min$ 424877Bali, Ungasan
 1000 m²10 min$ 230911Bali, Kerobokan
 800 m²8 min$ 113300Bali, Ungasan
 1158 m²12 min$ 291996Bali, Mengwi
 1000 m²10 min$ 184729Bali, Kutuh South Bali
 2800 m²2 min$ 713793Bali, Kedungu
 500 m²10 min$ 107143Bali, Tabanan
 422 m²15 min$ 93547Bali, Kerobokan
 750 m²15 min$ 187038Bali, Kerobokan
 550 m²15 min$ 164594Bali, Mengwi
 1000 m²5 min$ 350431Bali, Drupadi
Planning a build in Bali?
Get a feasibility view, budget range and timeline from Teville.
Related guides

Concealed HVAC Duct Sealing QA Finish Repair Protocols Bali
Expert technical guide: Concealed HVAC Duct Sealing QA Finish Repair Protocols Bali
8 min read
Soft-Close Kitchen Hinge Failures in Bali: Quality Issues
Discover why modular kitchen cabinet soft-close hinges fail in Bali. Learn about quality risks, durability issues, and solutions for homeowners.
10 min read
Built-In Wardrobe Installation Termite Protection in Bali
Learn effective termite protection methods for custom built-in wardrobes in Bali. Expert installation tips to safeguard your furniture from pest damage.
10 min read