Payment Milestone Verification: Tile Installation Quality Checks
# Payment Milestone Verification: Tile Installation Quality Checks Bali
The Hidden Risk in Bali’s Tile Installation Payment Structure
When renovating your Bali villa or completing interior finishing work, tile installation represents one of the most visible and permanent elements of your project. Yet many property owners release milestone payments before proper quality verification, only to discover hollow tiles, lippage issues, or grout failures months later when tropical humidity takes its toll. In Bali’s construction landscape, where tile work can account for 15-25% of total renovation costs, the absence of structured payment milestone verification creates significant financial exposure. Without technical quality checks tied to each payment stage, you’re essentially funding work that may require complete removal and reinstallation—doubling your costs and extending timelines by 4-6 weeks in a market where skilled tile installers are increasingly scarce.
Technical Framework for Tile Installation Payment Milestones
Payment milestone verification for tile installation in Bali villa construction requires a systematic approach that aligns financial disbursements with measurable quality benchmarks. Unlike structural work where defects may be hidden, tile installation quality is immediately visible—yet the technical standards for assessment remain poorly understood by most property owners.
The Four-Stage Payment Verification Model
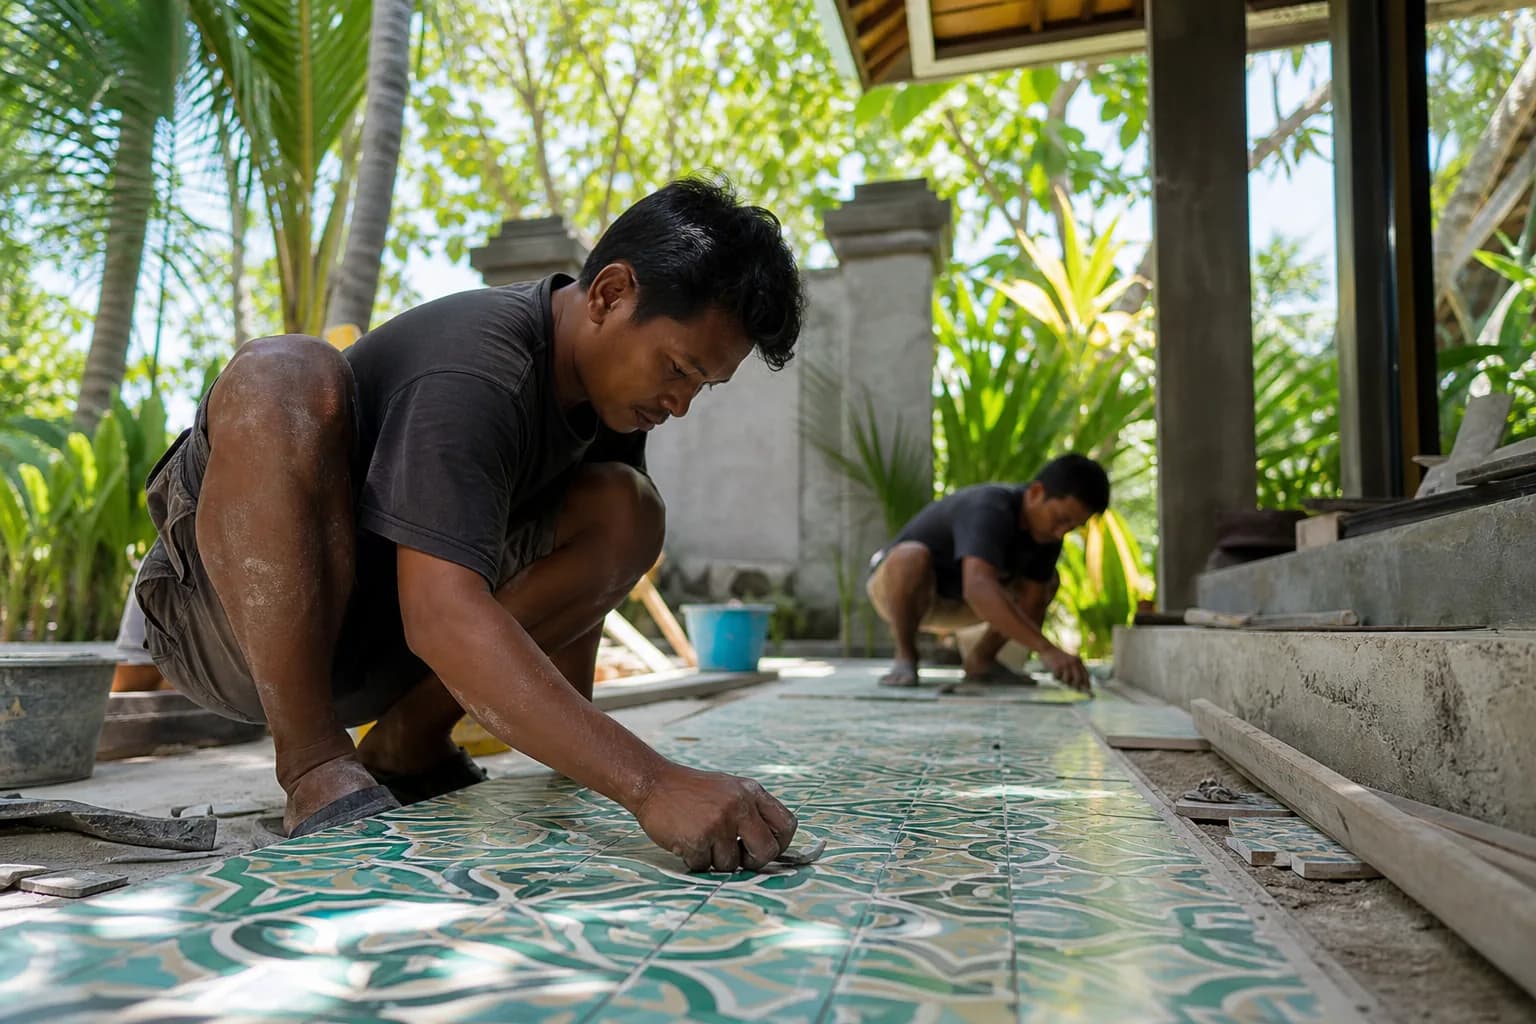
Professional tile installation in Bali’s tropical climate demands a payment structure divided into four distinct milestones, each with specific quality checkpoints. The first milestone (25% payment) covers substrate preparation and waterproofing verification. Before releasing this payment, you must confirm that concrete surfaces are properly leveled within 3mm variance per 2 meters, that waterproofing membranes have been applied with minimum 100mm overlaps at joints, and that all penetrations are properly sealed. In Bali’s high-humidity environment, substrate moisture content must not exceed 4% before tile adhesive application—a critical checkpoint often overlooked that leads to adhesion failure within 12-18 months.
The second milestone (35% payment) corresponds to tile layout approval and initial installation of the first 30% of area. This stage requires verification of tile layout patterns, ensuring symmetrical cuts at room perimeters, proper fall gradients of 1:80 for wet areas, and adhesive coverage verification. Using the “back-buttering” technique, installers should achieve minimum 95% adhesive contact on tiles larger than 300x300mm. Quality checks at this stage include tapping tiles with a rubber mallet to detect hollow sounds indicating insufficient adhesive coverage—a defect that becomes catastrophic when Bali’s temperature fluctuations cause differential expansion.
The third milestone (30% payment) covers completion of tile installation across 100% of the designated area. Verification focuses on lippage control, joint width consistency, and plane flatness. Industry standards require lippage not exceeding 1mm for rectified tiles and 2mm for non-rectified tiles when measured with a straightedge. Joint widths should maintain consistency within 0.5mm variance, typically 2-3mm for wall tiles and 3-5mm for floor tiles in Bali villa construction. At this stage, inspect for tile alignment using laser levels, checking that floor planes don’t deviate more than 3mm over 3 meters—essential for proper water drainage in bathroom and pool deck installations.
The final milestone (10% payment) is released only after grouting completion, cleaning, and sealing verification. This includes checking grout depth (minimum two-thirds of tile thickness), grout color consistency, and proper curing time of 72 hours before sealing. For Bali’s outdoor applications and wet areas, verify that penetrating sealers have been applied to natural stone tiles and that grout joints in shower areas have received appropriate water-repellent treatment. The retention of 10% until final verification provides leverage to address any punch-list items discovered during the 7-day post-installation inspection period.
Climate-Specific Quality Verification Points
Bali’s tropical climate introduces unique verification requirements absent from temperate construction standards. Tile installations must accommodate thermal expansion coefficients ranging from 5-9 x 10⁻⁶/°C, requiring movement joints every 3-4 meters for internal floors and every 2-3 meters for external applications exposed to direct sunlight. During payment verification, confirm that expansion joints are positioned at doorway thresholds, room perimeter edges, and where tiling meets different materials. These joints should be filled with flexible sealant, not rigid grout—a common deficiency in Bali renovation projects that leads to tile cracking within the first wet season.
Humidity-related verification extends to adhesive selection and application timing. In Bali’s 70-85% relative humidity environment, cement-based adhesives require extended open time management. Verify that installers are not exceeding the 20-minute open time before tile placement, and that they’re using modified thin-set adhesives with polymer additives for improved flexibility and water resistance. For pool surrounds and outdoor terraces common in Bali villa construction, confirm the use of exterior-grade adhesives with minimum C2TE classification (improved adhesion with extended open time and transverse deformation capability).
Material Standards and Specification Verification
Payment milestone verification must include confirmation that specified materials match what’s actually installed—a critical checkpoint where substitutions frequently occur in Bali’s construction market. Tile quality verification begins with checking manufacturer certifications and technical datasheets against your approved specifications.
Tile Classification and Performance Standards
For Bali villa construction and interior finishing projects, tiles must meet specific performance criteria based on application area. Floor tiles require minimum PEI (Porcelain Enamel Institute) rating of Class 3 for residential areas and Class 4 for high-traffic zones and commercial villa spaces. Verify water absorption rates: porcelain tiles should demonstrate less than 0.5% absorption (Group I classification), while ceramic tiles for dry internal walls may accept up to 10% (Group III). In Bali’s climate, using higher absorption tiles in wet areas or exteriors guarantees premature failure through freeze-thaw damage during air-conditioned space temperature cycling and moisture penetration.
Surface finish verification matters significantly for safety and maintenance. Pool decks, outdoor terraces, and bathroom floors require minimum R10 slip resistance rating (preferably R11 for wet areas), verified through the ramp test method or dynamic coefficient of friction (DCOF) measurement of ≥0.42. Before releasing payments, physically test tile surfaces with water application—polished porcelain that appears elegant in showrooms becomes dangerously slippery when wet, a liability issue for villa rental operations.
Adhesive and Grout Material Compliance
Adhesive specifications must align with tile size, substrate type, and exposure conditions. For tiles exceeding 400x400mm—increasingly popular in Bali villa construction—verify the use of S1 or S2 classified flexible adhesives that accommodate substrate movement. Large-format tiles (600x1200mm and above) require S2 classification with deformability ≥5mm. Check adhesive packaging for batch numbers and manufacturing dates; adhesives older than 12 months lose bonding effectiveness, particularly in Bali’s humid storage conditions.
Grout selection verification should confirm epoxy grout usage for wet areas, pool surrounds, and kitchen backsplashes where staining and moisture penetration are concerns. Cement-based grouts, while more economical, require polymer modification and should never be used in continuously wet applications. Verify grout color stability ratings and UV resistance for outdoor applications—standard cement grouts fade noticeably within 6-12 months under Bali’s intense tropical sun exposure.
Step-by-Step Payment Verification Process
Implementing a structured verification process protects your investment while maintaining positive contractor relationships. This systematic approach, refined through Teville’s construction process methodology, ensures quality standards without creating adversarial payment disputes.
Pre-Installation Verification (Milestone 1 – 25%)
Step 1: Substrate Assessment – Before any tile work begins, conduct moisture testing using a digital moisture meter. Concrete substrates must register below 4% moisture content. Check surface flatness using a 2-meter straightedge; variations exceeding 3mm require leveling compound application. Verify that all substrate cracks wider than 0.5mm have been repaired with flexible crack isolation membranes.
Step 2: Waterproofing Verification – For bathrooms, kitchens, and outdoor areas, confirm waterproofing membrane application extends minimum 150mm beyond wet area boundaries. Conduct flood testing for shower areas: fill to 50mm depth and monitor for 24 hours with zero water level drop. Verify that membrane corners are reinforced with fabric strips and that all pipe penetrations are sealed with compression collars. Document this verification photographically before releasing the first milestone payment.
Step 3: Material Delivery Inspection – Upon tile delivery, verify quantities include 10% overage for cuts and future repairs. Check that all boxes display identical batch numbers—color variations between batches are visually apparent and cannot be corrected. Inspect random samples from multiple boxes for chips, warping (maximum 0.5% deviation from specified dimensions), and color consistency. Reject any delivery with more than 5% defective tiles.
Installation Progress Verification (Milestone 2 – 35%)
Step 4: Layout Approval – Before adhesive application, require dry layout of the entire room or a representative 4-square-meter section. Verify that layout minimizes cuts smaller than half-tile width at room perimeters, that patterns are centered on focal points, and that tile joints align with architectural features. For Bali villa construction featuring open-plan spaces, ensure tile layout creates visual continuity across connected areas. Approve layout in writing before installation proceeds.
Step 5: Adhesive Application Monitoring – During initial installation, verify proper trowel size usage: 6mm notched trowel for tiles up to 300x300mm, 10mm for tiles up to 600x600mm, and 12mm for larger formats. Check that installers are back-buttering tiles larger than 400x400mm. Randomly lift a tile within 10 minutes of placement to verify 95% adhesive coverage—visible substrate indicates insufficient coverage requiring technique correction before proceeding.
Step 6: Initial Quality Inspection – Once 30% of area is installed and adhesive has cured for 24 hours, conduct comprehensive quality inspection. Use a straightedge to check lippage at tile edges. Tap every tile with a rubber mallet listening for hollow sounds indicating voids. Check joint width consistency using a gauge. Verify plane flatness with a 2-meter level. Any deficiencies discovered at this stage require correction before releasing the second milestone payment and continuing installation.
Completion Verification (Milestone 3 – 30%)
Step 7: Full Installation Inspection – With 100% of tiles installed, conduct room-by-room inspection using a detailed checklist. Verify all cut edges are smooth and positioned in low-visibility areas. Check that movement joints are positioned correctly and that tiles don’t bridge these joints. For floor installations, verify proper drainage slopes using a digital level—wet areas require minimum 1:80 fall toward drains. Inspect tile alignment across doorway thresholds and transitions between rooms.
Step 8: Cleaning and Preparation Verification – Before grouting, confirm that all tile surfaces are clean and that joints are free of adhesive residue. Joint depth should be consistent at two-thirds of tile thickness. Verify that spacers have been removed and that joint edges are clean. For natural stone installations common in Bali villa projects, confirm that pre-grouting sealer has been applied to prevent grout staining.
Final Verification (Milestone 4 – 10%)
Step 9: Grouting Quality Assessment – After grout application and initial cleaning, inspect for color consistency, complete joint filling, and proper tooling. Grout lines should be slightly concave, not flush or recessed. Check for grout haze on tile surfaces—this should be minimal and easily removed. Verify that movement joints have been filled with flexible sealant, not grout. Allow 72-hour curing time before final sealing.
Step 10: Final Acceptance Inspection – Conduct comprehensive final inspection under various lighting conditions to identify any defects. Test floor surfaces with water to verify drainage and slip resistance. For natural stone, verify that penetrating sealer has been applied and that water beads on the surface. Document the installation with detailed photographs. Create a punch-list of any minor deficiencies requiring correction before final payment release. Retain 10% payment for 7 days post-completion to ensure any latent defects are addressed.
Cost Structure and Timeline Expectations
Understanding the financial framework for tile installation in Bali villa construction helps establish realistic payment milestones and prevents disputes. Costs vary significantly based on tile selection, area complexity, and quality standards, but structured payment verification adds minimal overhead while providing substantial risk mitigation.
Tile Installation Cost Breakdown
For standard ceramic tile installation in Bali renovation projects, expect costs ranging from IDR 150,000-250,000 per square meter for materials and labor combined. This includes mid-range ceramic tiles (IDR 80,000-120,000/m²), adhesive and grout (IDR 25,000-35,000/m²), and installation labor (IDR 45,000-95,000/m²). Premium porcelain tiles increase material costs to IDR 200,000-500,000/m², while natural stone installations for luxury villa projects can reach IDR 800,000-1,500,000/m² incl
 3173 m²6 month(s)from 125.000 USD
TALA FOUR
 164 m²7 month(s)from 79.000 USD
TALA TWO
164 m²7 month(s)from 79.000 USDPrivate: Haridas Villas, Tegallalang
 3124 m²6 month(s)from 123.000 USD
TALA 8
 172 m²8 month(s)from 120.000 USD
Keshava
 4344 m²16 month(s)from 290.000 USD
Radha

Want to calculate?
 2144 m²11 month(s)from 104.000 USD
Narayana
 3127 m²9 month(s)from 177.000 USD
Mukunda
 3104 m²11 month(s)from 99.000 USD
TALA 100
 3180 m²7 month(s)from 142.000 USD
Vasudeva
 1from 198.000 USD
Private: Haridas Villas
Start With Real Numbers, Not Guesses
Before finalizing your finishing works plan, check realistic cost ranges for your Bali villa project.
Available lands
 615 m²15 min$ 113608Bali, Tabanan
 500 m²15 min$ 124692Bali, Kaba Kaba
 204 m²5 min$ 40899Bali, Kedungu
 700 m²20 min$ 90517Bali, Cepaka
 2680 m²10 min$ 1732759Bali, Pererenan
 610 m²10 min$ 165271Bali, Seminyak
 1430 m²5 min$ 209862Bali, Klungkung
 250 m²15 min$ 40025Bali, Munggu
 1700 m²10 min$ 632257Bali, Kuta
 660 m²10 min$ 175567Bali, Mengwi
 3100 m²15 min$ 257697Bali, Tegallalang
 8313 m²15 min$ 716670Bali, Buduk
 3254 m²5 min$ 631800Bali, All
 1410 m²15 min$ 390702Bali, Tabanan
 2000 m²15 min$ 110837Bali, Karangasem
Planning a build in Bali?
Get a feasibility view, budget range and timeline from Teville.
Related guides

Concealed HVAC Duct Sealing QA Finish Repair Protocols Bali
Expert technical guide: Concealed HVAC Duct Sealing QA Finish Repair Protocols Bali
8 min read
Soft-Close Kitchen Hinge Failures in Bali: Quality Issues
Discover why modular kitchen cabinet soft-close hinges fail in Bali. Learn about quality risks, durability issues, and solutions for homeowners.
10 min read
Built-In Wardrobe Installation Termite Protection in Bali
Learn effective termite protection methods for custom built-in wardrobes in Bali. Expert installation tips to safeguard your furniture from pest damage.
10 min read