Electrical Conduit Routing Through Bali Villa Concrete Walls
Electrical Conduit Routing Through Bali Villa Concrete Walls: A Technical Guide to Proper Installation
The Specific Challenge: Why Conduit Routing Matters in Bali Villa Construction
When constructing or renovating a villa in Bali, electrical conduit routing through concrete walls represents one of the most critical finishing works decisions you’ll make. Unlike standard residential construction in temperate climates, Bali’s tropical environment—characterized by high humidity, salt air corrosion, and intense UV exposure—demands a fundamentally different approach to electrical infrastructure. The problem isn’t simply running wire through walls; it’s ensuring that your electrical systems remain safe, compliant, and functional for decades despite environmental stressors that accelerate degradation. Many villa owners and contractors underestimate this challenge, leading to corroded conduit, compromised safety, and costly remediation work. At Teville, our construction process prioritizes proper conduit routing as a foundational element of villa finishing quality, recognizing that electrical infrastructure directly impacts both safety and long-term durability of your property.
Technical Deep Dive: Understanding Conduit Routing in Bali Villa Concrete Walls
Electrical conduit routing through concrete walls in Bali villas requires understanding several interconnected technical considerations that distinguish this work from standard construction practices. The concrete itself in Bali presents unique characteristics—tropical concrete often experiences accelerated carbonation due to high CO2 levels and moisture penetration, which can compromise the protective alkaline environment that prevents rebar and embedded metal from corroding. When you route conduit through this concrete, you’re essentially creating pathways that must resist both the internal corrosive environment and external moisture infiltration.
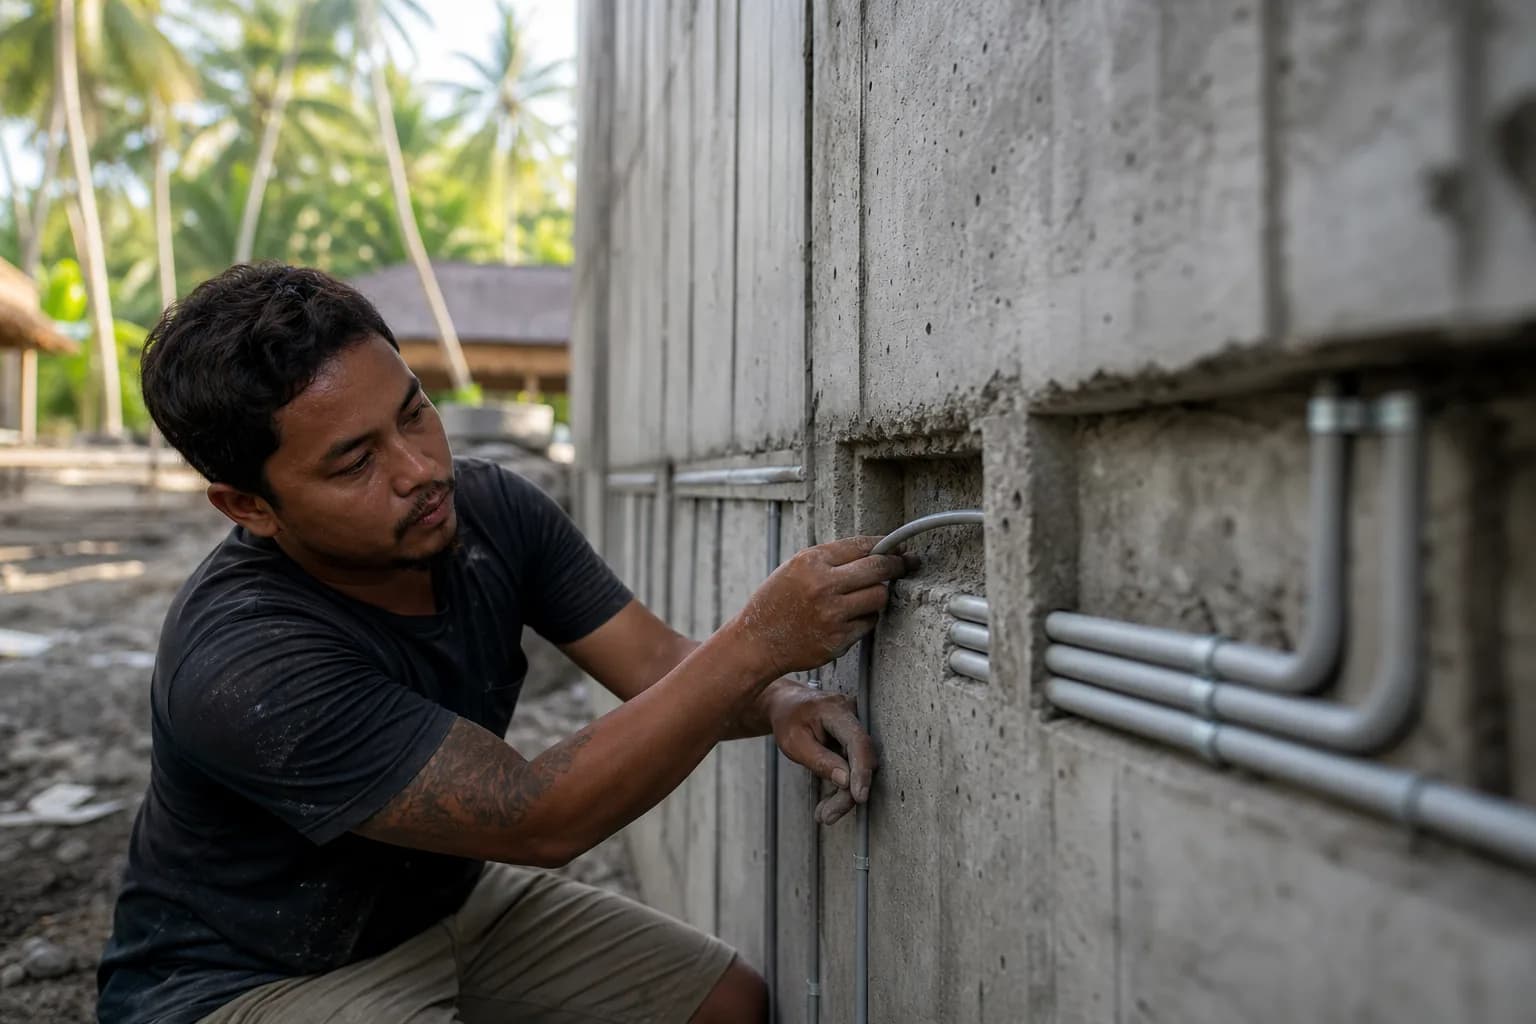
The routing methodology depends on your construction phase. If you’re routing conduit before the concrete pour, you’ll embed conduit sleeves or stubs directly into the formwork, ensuring they remain plumb and properly positioned. This pre-pour method is superior for Bali villa construction because it eliminates post-installation cutting, which creates fresh concrete surfaces vulnerable to moisture penetration. The embedded conduit becomes an integral part of the concrete matrix, providing superior protection compared to surface-mounted or post-cut installations.
For post-pour routing—common in renovation projects—you must cut channels or grooves into existing concrete using specialized equipment. This method introduces significant challenges in Bali’s climate. Every cut exposes fresh concrete surfaces that haven’t developed the protective carbonation layer. In Bali’s humid environment, these exposed surfaces rapidly absorb moisture, creating pathways for water infiltration that can reach embedded conduit and electrical components. The cutting process itself generates concrete dust containing silica, which requires proper containment and respiratory protection for workers.
Conduit material selection becomes critical in Bali’s corrosive environment. Rigid metallic conduit (RMC) or intermediate metallic conduit (IMC) offers superior protection compared to PVC in certain applications, but only if properly protected from corrosion. Galvanized steel conduit provides better corrosion resistance than bare steel, though even galvanized surfaces can deteriorate in Bali’s salt-laden air, particularly in coastal villa locations. PVC conduit, while corrosion-resistant, becomes brittle under intense UV exposure and can crack during thermal cycling between hot days and cooler nights. The optimal solution for Bali villas typically involves PVC-coated metallic conduit or schedule 80 PVC, which combines corrosion resistance with structural integrity.
Fastening conduit to concrete walls requires fasteners specifically designed for tropical environments. Standard concrete anchors can corrode, causing conduit straps to loosen over time. Stainless steel Tapcon® screws or hammer drive anchors rated for corrosive environments are essential. These fasteners must be installed at proper spacing—typically 18 to 24 inches for rigid conduit—to prevent sagging and ensure the conduit remains plumb throughout its run. In Bali’s heat, metal expands and contracts daily, so fastening systems must accommodate this thermal movement without compromising structural integrity.
Moisture management represents perhaps the most critical technical consideration. Conduit routing must incorporate drip loops at low points to prevent water from traveling along the conduit into electrical boxes or equipment. In Bali, where monsoon rains can be intense, these drip loops aren’t optional—they’re essential infrastructure. Additionally, all conduit terminations must include proper sealing with marine-grade sealants that remain flexible in Bali’s temperature extremes. Standard caulking compounds harden and crack, creating gaps where moisture infiltrates.
Materials and Standards for Bali Villa Electrical Conduit Installation
Selecting appropriate materials for electrical conduit routing in Bali villas requires understanding both international electrical codes and local Indonesian building standards. The Indonesian National Standard (SNI) for electrical installations provides baseline requirements, but Bali’s specific environmental conditions often demand exceeding these minimums.
Conduit Types and Specifications: For Bali villa construction, we recommend schedule 80 PVC conduit as the primary choice for most interior applications. Schedule 80 offers superior wall thickness (approximately 40% thicker than schedule 40), providing better protection against physical damage and UV degradation. For areas exposed to direct sunlight, UV-stabilized PVC formulations are essential—standard PVC degrades rapidly under Bali’s intense tropical sun. Metallic conduit should be hot-dip galvanized steel meeting ASTM A123 specifications, with a minimum zinc coating of 85 microns. For coastal villa locations within 5 kilometers of the ocean, stainless steel 304 or 316 conduit provides superior corrosion resistance, though at significantly higher cost.
Fastening Systems: All conduit fasteners must be stainless steel or hot-dip galvanized. Tapcon® screws (size #10 or #12, minimum 1.5 inches length) are preferred for concrete applications. Hammer drive anchors provide alternative fastening without pre-drilling, valuable when routing through existing concrete in renovation projects. Conduit straps should be stainless steel or nylon-coated steel, never bare steel. Spacing requirements: rigid conduit requires support every 18 inches horizontally and 24 inches vertically; flexible conduit requires support every 12 inches.
Sealing and Protection Materials: All conduit terminations require marine-grade polyurethane sealants (not standard silicone caulk, which fails in tropical heat). Conduit entry seals at electrical boxes should use compression glands rated for tropical environments. Drip loop materials should be UV-stabilized PVC or stainless steel, never copper or aluminum which corrode in Bali’s environment.
Compliance Standards: Installation must comply with SNI 04-6989.2-2000 (electrical installation safety), Indonesian electrical code requirements, and international best practices for tropical construction. Our villa projects consistently exceed these minimums, incorporating additional protective measures specific to Bali’s climate.
Step-by-Step Process: Installing Electrical Conduit Through Bali Villa Concrete Walls
Phase 1: Pre-Construction Planning and Design
Before any concrete is poured, electrical routing must be precisely planned. This involves creating detailed electrical drawings showing every conduit run, junction box location, and termination point. In Bali villa construction, this planning phase should account for future renovation possibilities—oversizing some conduit runs to accommodate additional circuits without requiring wall cutting later. Coordinate with structural engineers to identify optimal routing paths that avoid rebar, post-tension cables, and structural elements. Mark all planned conduit routes on concrete formwork using chalk or spray paint, ensuring visibility for concrete workers. Verify that all planned routes comply with Indonesian electrical codes and local Bali building regulations.
Phase 2: Conduit Stub Installation Before Concrete Pour
For pre-pour conduit routing, install conduit stubs or sleeves into the formwork at precisely marked locations. Use schedule 80 PVC conduit cut to appropriate lengths—typically extending 2-3 inches beyond the finished concrete surface on both sides. Secure stubs to formwork using conduit clamps or strapping, ensuring they remain perfectly plumb and aligned. This is critical: any deviation from plumb creates installation difficulties later and can trap water. Use temporary caps on conduit ends to prevent concrete from entering during the pour. Verify stub depth and alignment against electrical drawings immediately before concrete placement. In Bali’s construction environment, where weather delays are common, inspect stubs daily to ensure they haven’t shifted or become damaged.
Phase 3: Concrete Pouring and Curing
During concrete placement, monitor conduit stubs continuously to ensure they remain plumb and properly positioned. Concrete vibration can shift stubs if they’re not adequately secured. After concrete sets (typically 24-48 hours in Bali’s warm climate), carefully remove temporary caps and inspect conduit interiors for concrete intrusion. If concrete has entered the conduit, flush it out using pressurized water before it hardens completely. Allow concrete to cure fully (minimum 7 days in Bali’s climate, though 14 days is preferable) before beginning electrical rough-in work. This extended curing period allows the concrete to develop sufficient strength and allows initial carbonation to begin, creating a more protective environment for embedded conduit.
Phase 4: Post-Pour Conduit Routing (Renovation Projects)
For renovation projects or situations requiring post-pour routing, use a rotary hammer with a concrete cutting bit to create channels in existing concrete walls. Plan the routing path to minimize cutting—every cut weakens the concrete and creates moisture infiltration pathways. Cut channels approximately 1.5 inches deep and 1.5 inches wide, slightly larger than the conduit diameter to allow for thermal expansion. Use dust collection equipment during cutting to minimize silica dust exposure. After cutting, allow the concrete to dry completely (24-48 hours minimum in Bali’s climate, though longer is preferable) before installing conduit. Clean channels thoroughly to remove all concrete dust and debris.
Phase 5: Conduit Installation and Fastening
Install schedule 80 PVC conduit into prepared channels or through embedded stubs. For horizontal runs, maintain slight downward slope (minimum 1/8 inch per 10 feet) toward drain points to facilitate water drainage. Install conduit straps every 18 inches for rigid conduit, using stainless steel Tapcon® screws or hammer drive anchors. Ensure straps are snug but not over-tightened—over-tightening can crack PVC in Bali’s heat cycles. At all low points in the conduit run, install drip loops by creating a downward bend in the conduit, allowing water to drip away rather than traveling along the conduit toward electrical equipment.
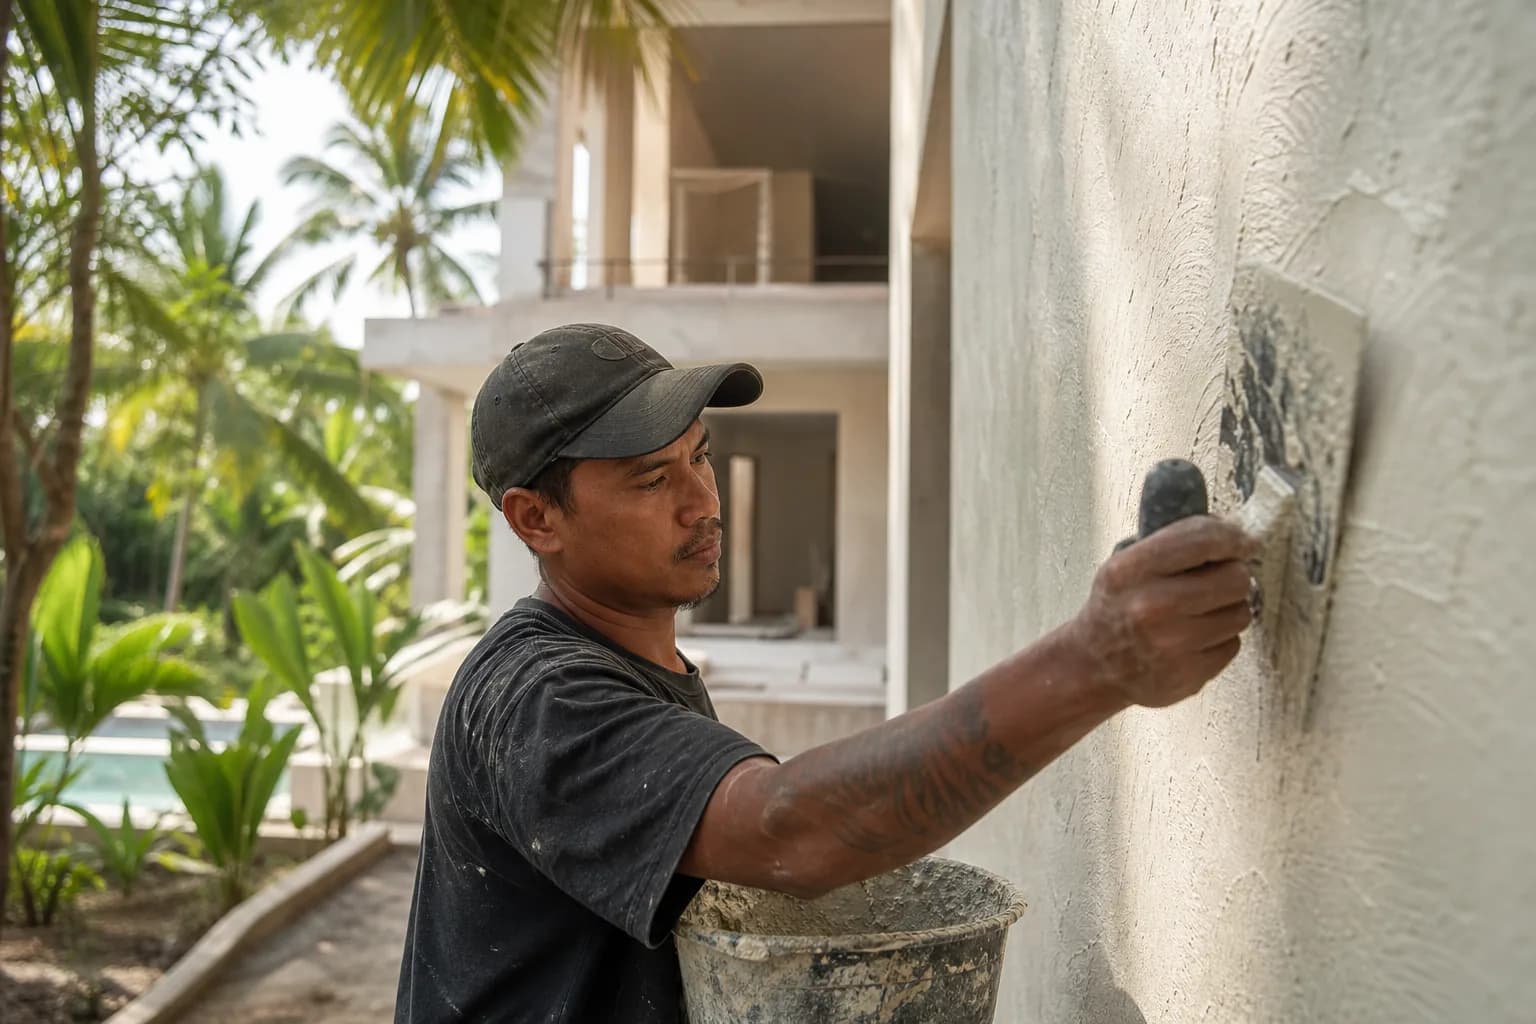
Phase 6: Sealing and Weatherproofing
After conduit installation, seal all gaps between conduit and concrete using marine-grade polyurethane sealant. This is non-negotiable in Bali’s climate—gaps allow moisture infiltration that will eventually reach electrical components. At all conduit terminations (electrical boxes, equipment connections), use compression glands or conduit entry seals rated for tropical environments. These seals must accommodate thermal expansion without creating gaps. Apply sealant generously around all terminations, creating a continuous moisture barrier. Allow sealant to cure fully (typically 24-48 hours) before energizing circuits.
Phase 7: Final Inspection and Testing
Before closing walls or finishing surfaces, conduct thorough inspection of all conduit routing. Verify that all conduit is properly supported, all fasteners are secure, all drip loops are functional, and all sealing is complete. Test conduit continuity using appropriate electrical testing equipment to ensure no damage occurred during installation. Document all routing with photographs and updated electrical drawings for future reference. This documentation is invaluable if future renovations require conduit modifications.
Costs and Timeline for Electrical Conduit Routing in Bali Villas
The cost of electrical conduit routing through concrete walls in Bali villas varies significantly based on project scope, conduit material selection, and whether routing occurs during initial construction or renovation. For pre-pour conduit installation during new construction, costs are typically lower because the work integrates with the concrete pouring process. Budget approximately IDR 150,000-250,000 per linear meter for schedule 80 PVC conduit installation with proper fastening and sealing in new construction. This includes materials, labor, and quality assurance testing.
Post-pour conduit routing in renovation projects costs significantly more—typically IDR 300,000-500,000 per linear meter—because concrete cutting, dust management, and extended curing periods increase labor requirements. If metallic conduit is specified (galvanized steel or stainless steel), add 40-60% to material costs. Coastal villa locations requiring stainless steel conduit can see costs increase by 80-120% compared to standard PVC installations.
Timeline considerations are equally important. Pre-pour conduit installation requires 2-3 days for planning and stub installation, then integrates with concrete pouring. Post-pour routing requires 1-2 days for cutting and channel preparation, 2-3 days for concrete drying, 1-2 days for conduit installation, and 2-3 days for sealing and curing. Total project timeline for a typical villa’s electrical conduit routing ranges from 2-3 weeks for new construction to 4-
 2144 m²11 month(s)from 104.000 USD
Narayana
 4344 m²16 month(s)from 290.000 USD
Radha
 164 m²7 month(s)from 79.000 USD
Private: Haridas Villas, Tegallalang

Want to calculate?
 172 m²8 month(s)from 120.000 USD
Keshava
 3180 m²7 month(s)from 142.000 USD
Vasudeva
164 m²7 month(s)from 79.000 USDTALA TWO
 1from 198.000 USD
Private: Haridas Villas
 3173 m²6 month(s)from 125.000 USD
TALA FOUR
 3124 m²6 month(s)from 123.000 USD
TALA 8
 3104 m²11 month(s)from 99.000 USD
TALA 100
 3127 m²9 month(s)from 177.000 USD
Mukunda
Start With Real Numbers, Not Guesses
Before finalizing your finishing works plan, check realistic cost ranges for your Bali villa project.
Available lands
 3100 m²15 min$ 257697Bali, Tegallalang
 444 m²10 min$ 111000Bali, Tabanan
 420 m²15 min$ 41897Bali, Tabanan
 2000 m²15 min$ 110837Bali, Karangasem
 2130 m²10 min$ 495776Bali, Pecatu
 300 m²55 min$ 32475Bali, Tegelalang
 615 m²15 min$ 113608Bali, Tabanan
 911 m²15 min$ 248217Bali, Pererenan
 3800 m²15 min$ 100616Bali, Pererenan
 2500 m²5 min$ 609606Bali, Kedungu
 7000 m²36 min$ 284483Bali, Gianyar
 700 m²15 min$ 109052Bali, Buduk
 500 m²10 min$ 107143Bali, Tabanan
 928 m²15 min$ 910123Bali, Pererenan
 2700 m²30 min$ 314224Bali, Sidemen
Planning a build in Bali?
Get a feasibility view, budget range and timeline from Teville.
Related guides
Resin-Infused Plaster Finishes: Anti-Salt Systems Bali
Expert technical guide: Resin-Infused Plaster Finishes: Anti-Salt Systems Bali
8 min read
Prefinished Timber Joinery: Silicone Seals Fixings Bali
Professional prefinished timber joinery installation in Bali with silicone seals and fixings for durable weatherproof performance and a premium finish.
10 min read
Polished Concrete Microtopping: Surface Prep Sealants Bali
Discover Bali s polished concrete microtopping: expert surface prep, durable sealants, and a flawless finish for modern floors with minimal maintenance.
9 min read