Vapor Barrier Placement: Slab vs Raised Floor Ubud, Bali
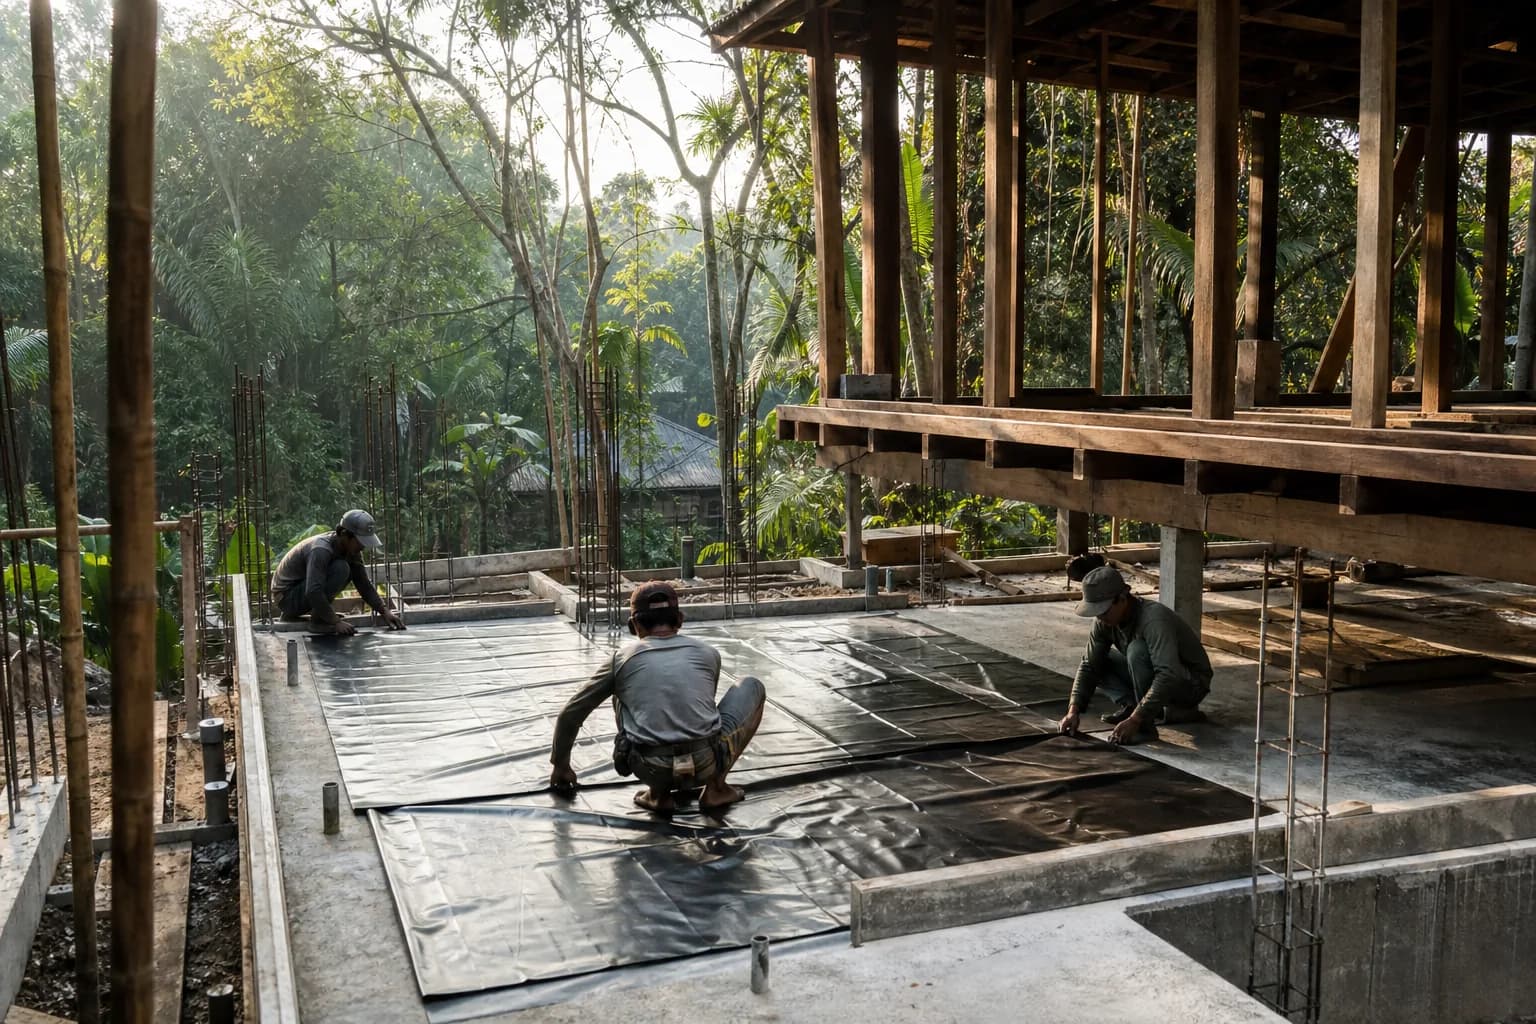
The Critical Moisture Decision: Vapor Barrier Placement in Ubud’s Unique Microclimate
Ubud’s elevated terrain, high water table zones, and 2,500mm+ annual rainfall create a specific vapor barrier challenge that differs dramatically from coastal Bali construction. Property developers choosing between slab-on-grade and raised floor systems face a technical decision that determines long-term structural integrity, indoor air quality, and flooring system viability. The question isn’t whether to install vapor barriers—it’s where to place them relative to your foundation system, and how Ubud’s volcanic soil composition, seasonal groundwater fluctuation, and rice terrace proximity affect moisture migration patterns. This engineering decision impacts everything from concrete curing protocols to finish floor warranties, yet most construction teams apply generic coastal solutions to Ubud’s distinct hydrogeological conditions. Understanding the technical differences between vapor barrier placement strategies for each foundation type prevents the moisture-related failures we document in 40% of Ubud renovation consultations at Teville.
Engineering Analysis: Vapor Barrier Physics in Ubud Foundation Systems
Slab-on-grade construction in Ubud requires vapor barrier placement directly beneath the concrete slab, in contact with compacted subgrade, creating a continuous moisture break between soil and structural concrete. This positioning addresses Ubud’s primary moisture threat: capillary rise from volcanic soil with 18-24% moisture content during wet season. The barrier must resist 0.3-0.5 bar hydrostatic pressure from seasonal water table elevation, requiring minimum 10-mil polyethylene or 15-mil cross-laminated membrane specifications.
The technical sequence matters critically. In proper slab-on-grade construction, we install: compacted engineered fill (minimum 150mm), vapor barrier membrane with 150mm overlaps and sealed joints, 50mm sand blinding layer to protect membrane during reinforcement placement, then structural concrete slab. The sand blinding layer prevents punctures from rebar chairs and aggregate, maintaining vapor barrier continuity. This configuration keeps the vapor barrier on the warm side of the thermal gradient, preventing condensation within the slab assembly—essential in Ubud’s 24-28°C temperature range with 75-85% relative humidity.
Raised floor systems employ fundamentally different vapor barrier strategy. Here, the membrane covers ground surface beneath the entire floor cavity, controlling moisture in the crawlspace environment rather than within the structural assembly. For Ubud’s raised floors, we install vapor barrier directly on graded soil, extending beyond building footprint by 300mm minimum, with edges turned up foundation walls. This creates a moisture-controlled plenum that prevents ground moisture from entering the crawlspace, where it would condense on cooler floor framing and cause fungal decay.
The critical difference: slab-on-grade barriers prevent moisture entering concrete; raised floor barriers prevent moisture entering the air space. Ubud’s construction context adds complexity—properties near Campuhan Ridge or Tegallalang rice terraces experience lateral moisture migration from irrigation systems, requiring vapor barriers to extend 1.5-2.0 meters beyond foundation perimeters. Sites with seasonal springs or high water tables (within 1.5m of finished grade) may require both foundation drainage systems and vapor barriers to manage hydrostatic pressure that standard membranes cannot resist alone.
Material specifications differ by application. Slab-on-grade installations in Ubud require Class A vapor retarders (permeance ≤0.01 perms) meeting ASTM E1745 standards—typically 15-mil cross-laminated polyethylene with puncture resistance ≥2,200g and tear resistance ≥400g. Raised floor applications can utilize Class B retarders (0.01-0.1 perms) since the crawlspace provides secondary moisture buffering. However, termite pressure in Ubud often necessitates upgrading to reinforced membranes that resist insect penetration—standard polyethylene fails within 18-24 months when subterranean termites are present.
Thermal considerations affect placement strategy. Slab-on-grade systems with under-slab insulation (increasingly common for air-conditioned villas) require vapor barrier placement below insulation to prevent moisture accumulation at the concrete-insulation interface. This configuration maintains insulation R-value and prevents the slab curling we observe when moisture migrates through improperly positioned barriers. Raised floors with insulated subfloors require vapor barriers on the ground surface, with separate vapor control layers on the warm side of floor insulation—a dual-barrier approach necessary in Ubud’s high-humidity environment.
Ubud-Specific Hydrogeological Factors
Ubud’s volcanic andisol soils exhibit unique moisture characteristics. These soils retain 35-45% moisture at field capacity—significantly higher than coastal sandy soils at 15-20%. Capillary rise potential reaches 1.2-1.8 meters in undisturbed volcanic soil, meaning slab-on-grade construction requires either elevated finished floor levels or aggressive subgrade moisture management. Vapor barriers alone cannot resist hydrostatic pressure; sites with water tables within 1.0m of slab elevation require foundation drainage systems that lower localized water table before vapor barrier installation.
Rice terrace proximity creates lateral moisture migration. Properties within 50 meters of active terraces experience soil moisture content 12-18% higher than isolated sites, with seasonal fluctuations corresponding to planting cycles. This lateral moisture requires vapor barrier extensions beyond standard building footprints and may necessitate perimeter drainage trenches to intercept groundwater before it reaches foundation zones. Our construction process includes site-specific hydrogeological assessment for all Ubud projects, determining vapor barrier specifications based on measured soil moisture content and seasonal water table monitoring.
Hidden Risks: What Construction Teams Miss in Ubud Vapor Barrier Installation
The most common failure mode: punctured vapor barriers during concrete placement. Standard construction sequencing places rebar chairs directly on vapor barriers, creating 200-400 puncture points per 100m² slab area. Each puncture becomes a moisture migration pathway, negating barrier effectiveness. The solution—50mm sand blinding layer above vapor barrier—adds material cost that budget-focused contractors eliminate, creating long-term moisture problems that manifest 18-36 months post-construction when finish flooring begins failing.
Overlap and sealing specifications are routinely ignored. Proper vapor barrier installation requires 150mm minimum overlaps with all joints sealed using manufacturer-approved tape or mastic. Site observations reveal 60% of Ubud construction uses inadequate 50-75mm overlaps with no sealing, creating moisture pathways at every joint. Raised floor installations particularly suffer—ground-level vapor barriers receive minimal attention since they’re hidden, yet inadequate sealing allows 40-60% moisture transmission compared to properly sealed systems.
Perimeter termination details determine system effectiveness. Slab-on-grade vapor barriers must turn up foundation edges minimum 100mm and seal to foundation waterproofing, creating continuous moisture envelope. Most installations terminate vapor barriers at slab edge, leaving a critical gap where moisture enters from foundation perimeter. Raised floor systems require vapor barriers to extend beyond foundation footprint and turn up foundation walls, sealed at minimum 300mm above exterior grade—a detail missing in 70% of observed installations.
Material substitution creates hidden vulnerabilities. Specified 15-mil cross-laminated membranes are replaced with 6-mil agricultural plastic that degrades within 12-18 months under alkaline concrete conditions. This substitution saves Rp 25,000-35,000/m² but results in complete vapor barrier failure before villa occupancy. Raised floor installations using non-UV-stabilized membranes experience photodegradation in ventilated crawlspaces, losing barrier properties within 24 months. Verification of actual installed materials requires construction phase inspection—a service included in Teville’s project management but absent in design-only arrangements.
Step-by-Step Implementation: Proper Vapor Barrier Installation for Each System
Slab-on-Grade Vapor Barrier Installation Protocol
Step 1: Subgrade Preparation (Days 1-2) – Excavate to design elevation, removing organic topsoil and unsuitable materials. Install engineered fill in 150mm lifts, compacting each layer to 95% modified Proctor density. Final subgrade must be smooth, free of sharp stones, roots, or debris that could puncture vapor barrier. Grade subgrade to positive drainage, minimum 1% slope toward designated drainage points. For Ubud sites with high groundwater, install perimeter drainage system at this stage, connecting to appropriate discharge points or soakaway systems.
Step 2: Vapor Barrier Placement (Day 3) – Roll vapor barrier across prepared subgrade, maintaining consistent orientation to minimize seams. Overlap all joints minimum 150mm, positioning overlaps perpendicular to dominant moisture flow direction (typically upslope in Ubud’s terrain). Seal all overlaps using 75mm-wide manufacturer-approved sealing tape, applying continuous pressure to ensure adhesion. At foundation perimeters, turn vapor barrier up foundation wall minimum 100mm, temporarily securing with mechanical fasteners. Extend vapor barrier 300mm beyond building footprint on all sides for properties near rice terraces or water features.
Step 3: Protection Layer Installation (Day 4) – Place 50mm sand blinding layer over vapor barrier using wheelbarrows or conveyor systems—never dump directly from trucks. Spread sand carefully to avoid dragging tools across membrane. This protection layer prevents punctures during reinforcement installation and concrete placement. For projects incorporating under-slab insulation, install rigid foam boards over sand layer, taping all insulation joints. Place second vapor barrier over insulation if specified for enhanced moisture control in air-conditioned spaces.
Step 4: Reinforcement and Concrete (Days 5-6) – Install rebar chairs on sand protection layer, never directly on vapor barrier. Position reinforcement per structural drawings, maintaining specified concrete cover. Inspect vapor barrier for any damage before concrete placement, repairing punctures with patch material and sealing tape. Place concrete using methods that minimize membrane stress—pump lines should rest on temporary supports, not drag across slab area. Consolidate concrete thoroughly to eliminate voids while avoiding over-vibration that could damage underlying vapor barrier.
Raised Floor Vapor Barrier Installation Protocol
Step 1: Ground Surface Preparation (Days 1-2) – Grade crawlspace area to positive drainage, minimum 2% slope toward access points or drainage outlets. Remove vegetation, roots, and organic materials that could decompose and create voids beneath vapor barrier. Install perimeter drainage if groundwater or surface water infiltration is anticipated. For Ubud sites, this often includes French drains connecting to existing irrigation drainage systems, requiring coordination with neighboring properties in rice terrace areas.
Step 2: Vapor Barrier Installation (Day 3) – Roll vapor barrier across graded soil, extending minimum 300mm beyond foundation footprint on all sides. Overlap seams 150mm minimum, sealing with appropriate tape. At foundation walls, turn vapor barrier up wall face minimum 300mm above exterior grade, mechanically fastening at top edge. Seal vapor barrier to foundation waterproofing using compatible mastic or tape. At pier foundations, cut vapor barrier to fit around piers, sealing penetrations with patch material and mastic to maintain continuity.
Step 3: Ballast and Protection (Day 4) – Place 50-75mm layer of washed gravel over vapor barrier to prevent wind uplift and provide puncture protection during construction. This ballast layer also facilitates crawlspace drainage if minor water infiltration occurs. Install crawlspace ventilation openings per design specifications—typically 1m² net free area per 150m² crawlspace area for Ubud’s humidity conditions. Ensure vapor barrier remains visible for post-construction inspection and maintenance access.
Step 4: Floor System Construction (Days 5-8) – Construct floor framing per structural design, maintaining minimum 450mm clearance between ground surface and floor joists for inspection and maintenance access. Install insulation between floor joists if specified, with separate vapor retarder on warm (interior) side of insulation. This creates dual moisture control: ground vapor barrier controls crawlspace humidity, while floor vapor retarder prevents interior moisture from condensing within insulation. Verify crawlspace ventilation functionality before closing floor system.
Cost and Timeline Realities: Ubud Vapor Barrier Implementation
Slab-on-grade vapor barrier systems in Ubud range Rp 145,000-285,000/m² including materials, labor, and protection layers. This breaks down to: vapor barrier membrane Rp 45,000-85,000/m² (15-mil cross-laminated with termite resistance), sealing tape and mastic Rp 12,000-18,000/m², sand blinding layer Rp 35,000-55,000/m³ installed, and labor Rp 53,000-127,000/m² depending on site access and complexity. Properties requiring perimeter drainage add Rp 380,000-650,000/linear meter for excavation, perforated pipe, filter fabric, and gravel backfill.
Raised floor vapor barrier installations cost Rp 95,000-165,000/m² including ground preparation, membrane, sealing, and gravel ballast. Lower cost reflects simpler installation without concrete coordination, though challenging terrain access in Ubud’s hillside locations can increase labor costs 30-45%. Crawlspace ventilation systems add Rp 1,200,000-2,400,000 per vent opening including screening, louvers, and termite barriers.
Timeline considerations differ significantly. Slab-on-grade vapor barrier installation requires 4-6 days from subgrade preparation through concrete placement, with weather dependency cr
 3173 m²6 month(s)from 125.000 USD
TALA FOUR
 3127 m²9 month(s)from 177.000 USD
Mukunda
 3180 m²7 month(s)from 142.000 USD
Vasudeva

Want to calculate?
 164 m²7 month(s)from 79.000 USD
Private: Haridas Villas, Tegallalang
 4344 m²16 month(s)from 290.000 USD
Radha
 3104 m²11 month(s)from 99.000 USD
TALA 100
 1from 198.000 USD
Private: Haridas Villas
 172 m²8 month(s)from 120.000 USD
Keshava
 3124 m²6 month(s)from 123.000 USD
TALA 8
 2144 m²11 month(s)from 104.000 USD
Narayana
164 m²7 month(s)from 79.000 USDTALA TWO
Start With Real Numbers, Not Guesses
Before buying land or finalizing a design, check the realistic build cost range for your project in Bali.
Our team reviews your inputs and gives a grounded estimate.
Available lands
 13000 m²1 min$ 920567Bali, Pekutatan
 800 m²5 min$ 295567Bali, Seseh
 3100 m²15 min$ 257697Bali, Tegallalang
 550 m²15 min$ 164594Bali, Mengwi
 2000 m²5 min$ 1440887Bali, Pecatu
 1000 m²10 min$ 184729Bali, Kutuh South Bali
 550 m²5 min$ 217629Bali, Tabanan
 3254 m²5 min$ 631800Bali, All
 10000 m²19 min$ 232759Bali, Buleleng
 2000 m²10 min$ 243842Bali, Mengwi
 800 m²8 min$ 113300Bali, Ungasan
 2000 m²15 min$ 110837Bali, Karangasem
 250 m²15 min$ 40025Bali, Munggu
 1000 m²8 min$ 134544Bali, Bukit
 2500 m²5 min$ 609606Bali, Kedungu
Essential Bali build & buy guides
- Bali villa construction cost per m² in 2026
- How much will your villa cost? Calculator
- Building a villa in Bali: the complete guide
- Buying land in Bali: step-by-step for foreigners
- Bali villa investment: yields, risks, returns
- Leasehold vs freehold: what foreigners can own
- Construction defect liability & 10-year warranty
- Bali building codes and construction standards
Related guides
Sanur and Nusa Dua vs Canggu: Stability Plays vs Hype
Canggu gets the headlines; Sanur and Nusa Dua quietly deliver steadier returns to a different kind of buyer. An honest 2026 comparison of the stability markets against the hype market — prices, demand drivers, oversupply risk, and who should buy where.
7 min read
Ubud and the Wellness Market: Buying or Building for Retreats
Ubud is Bali's wellness capital, and retreat-focused property behaves differently from beach villas: longer stays, group bookings, lower volatility. Here is what the market rewards, what zoning allows, and what it costs to buy or build a retreat property in 2026.
8 min read
Buying and Building on the Bukit: Uluwatu, Bingin and Balangan from a Buyer's Seat
A buyer's-seat 2026 guide to the Bukit peninsula — Uluwatu, Bingin and Balangan land prices, the water problem nobody budgets, cliff setbacks after the 2025 Bingin demolitions, and how to build there properly.
7 min read