Underfloor Heating Installation Bali: Tile Adhesive Guide
# Underfloor Heating Installation in Bali: Tile Adhesive Compatibility
The Critical Challenge of Adhesive Selection for Heated Floors in Tropical Climates
Installing underfloor heating systems in Bali presents a unique technical challenge that many villa construction and renovation projects overlook: selecting tile adhesive that can withstand both the thermal cycling of heating elements and Bali’s intense tropical humidity. The wrong adhesive choice leads to tile debonding, cracking along grout lines, and complete system failure within months of installation. As Bali’s luxury villa market increasingly demands underfloor heating for bathroom comfort and spa-like amenities, understanding the specific compatibility requirements between heating systems, substrates, and adhesive products becomes essential for achieving durable interior finishing that performs reliably in this demanding environment.
Understanding Thermal Movement and Adhesive Performance in Bali’s Climate
Underfloor heating systems create continuous thermal expansion and contraction cycles that standard tile adhesives cannot accommodate. When heating elements activate, the screed substrate expands, transferring stress directly to the tile layer above. In Bali’s climate, this thermal stress compounds with ambient humidity fluctuations between 70-95%, creating a particularly challenging environment for adhesive bonds.
The fundamental requirement for underfloor heating compatibility is adhesive flexibility. Standard cement-based adhesives have minimal elastic properties, typically rated S1 class with less than 2.5mm deformation capability. These rigid adhesives crack under thermal stress, allowing moisture penetration that accelerates debonding. For heated floor applications in Bali villa construction, only S2-class flexible adhesives with deformation values exceeding 5mm provide adequate performance.
Temperature differential is the critical factor. Underfloor heating systems in Bali typically operate between 27-35°C surface temperature, creating a 10-15°C differential from ambient room temperature. This differential causes the screed to expand approximately 0.5-0.8mm per linear meter. Across a typical 4×5-meter bathroom installation, this translates to 2-4mm total movement that the adhesive layer must absorb without transferring stress to tiles.
Bali’s tropical humidity adds another dimension to adhesive selection. High-performance flexible adhesives must maintain bond strength in constantly humid conditions while resisting moisture-driven alkaline leaching from cement screeds. Products specifically formulated for underfloor heating incorporate polymer modifications that create hydrophobic characteristics, preventing moisture from compromising the adhesive matrix during thermal cycling.
The substrate preparation phase critically impacts adhesive performance. Cement-based screeds used in Bali villa construction require minimum 28-day curing before heating system commissioning, though many contractors mistakenly begin heating after just 7-10 days. Premature heating drives residual moisture into the adhesive layer, creating steam pressure that destroys bond integrity. Proper moisture testing using calcium carbide meters should confirm screed moisture content below 2% before any adhesive application.
Heating system commissioning must follow graduated protocols. The system should operate at 15°C for 3 days, then increase 5°C daily until reaching maximum operating temperature. This gradual heating allows the adhesive to cure under progressively increasing thermal stress, developing optimal bond strength. Rushing this process—common in renovation Bali projects with tight deadlines—causes micro-cracking in the adhesive layer that propagates into visible tile damage within months.
Recommended Adhesive Products and Technical Specifications
For underfloor heating installations in Bali’s tropical environment, specific adhesive formulations provide proven performance. BAL Supercover Rapidset Flex offers S2-class flexibility with rapid 3-hour setting time, ideal for renovation projects requiring quick turnaround. This single-component adhesive provides 6mm deformation capability and maintains bond strength at temperatures up to 70°C, well above typical underfloor heating operating ranges.
BAL Max Flex Fibre incorporates synthetic fiber reinforcement that enhances crack-bridging capability to 10mm, making it suitable for installations over expansion joints or areas with significant thermal movement. The fiber matrix distributes stress across larger surface areas, preventing localized failure points common in standard flexible adhesives.
For large-format tile installations increasingly popular in Bali villa construction, SikaTile-410 Secure Set provides extended open time of 30 minutes with full S2 flexibility. This product’s thixotropic properties prevent tile slippage on vertical applications while maintaining workability in Bali’s heat, where standard adhesives can skin over within 10-15 minutes.
SikaCeram FLX 441 represents the premium specification for underfloor heating compatibility, offering C2TE S2 classification—high bond strength, extended open time, and superior flexibility. Its polymer-modified formulation resists alkaline attack from cement screeds while providing excellent adhesion to both ceramic and natural stone tiles common in luxury villa finishing.
All recommended products must meet EN 12004 standards for deformable adhesives (S2 class) and demonstrate compatibility with heating systems through manufacturer testing. Verify that adhesive technical datasheets specifically list underfloor heating approval, as generic “flexible” adhesives may lack the thermal cycling resistance required for reliable long-term performance in Bali’s demanding climate conditions.
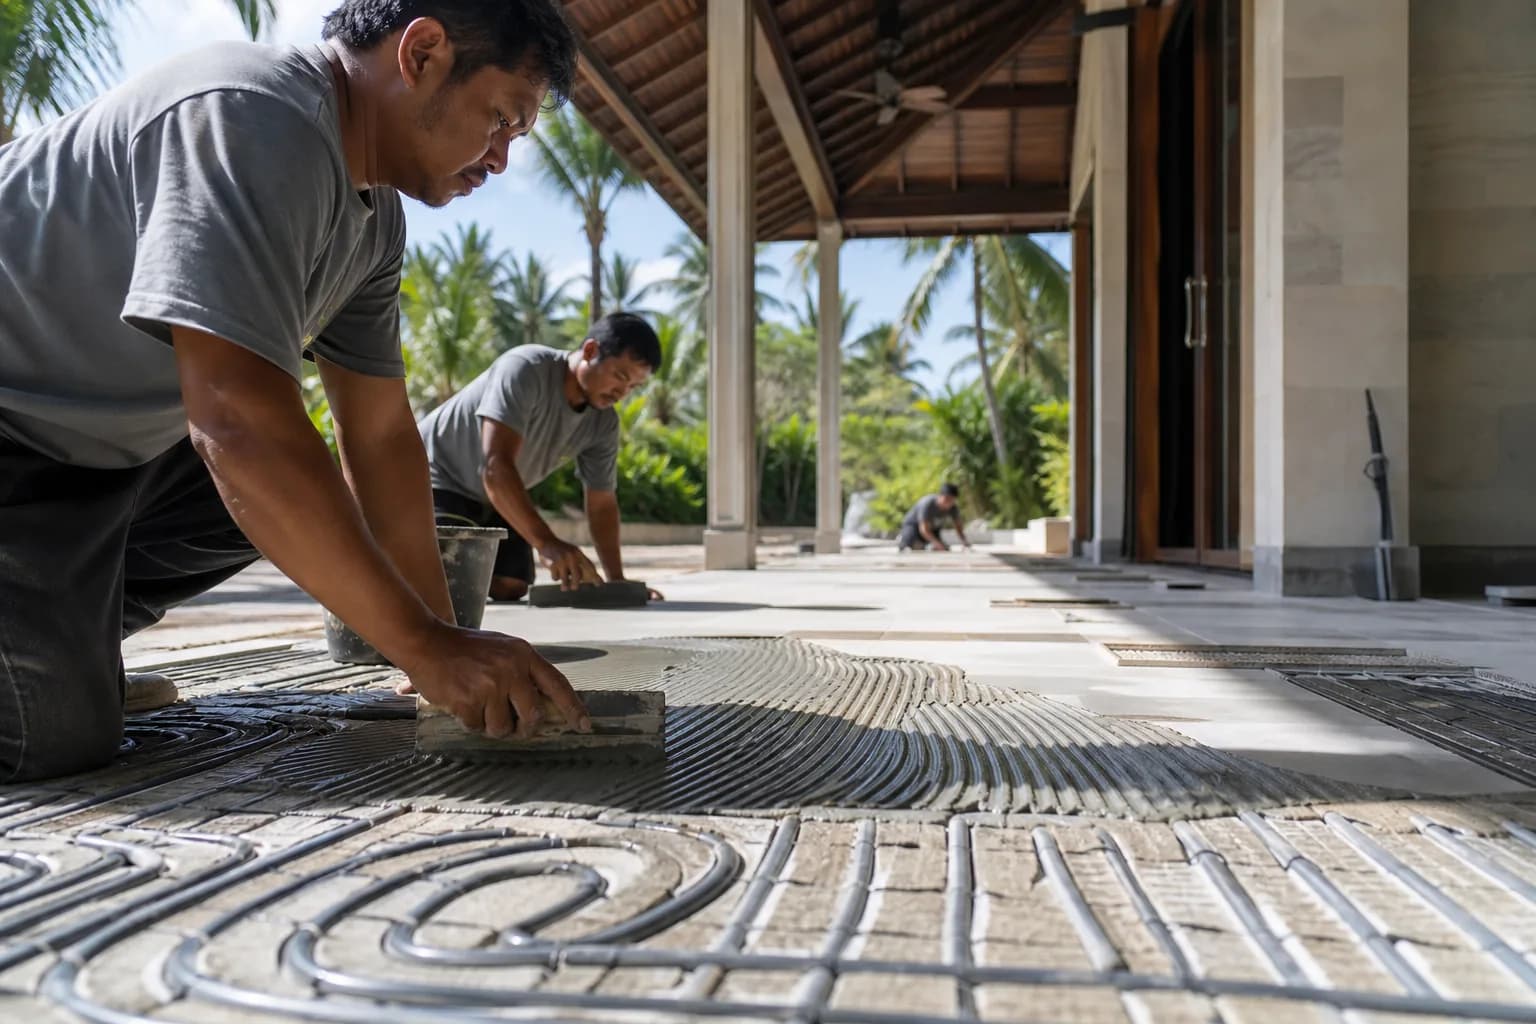
Step-by-Step Installation Process for Heated Floor Tiling
Phase 1: Substrate Preparation and Verification
Begin by confirming the heating screed has cured for minimum 28 days. Test moisture content using a calcium carbide moisture meter at multiple locations, ensuring readings below 2% throughout. Surface preparation requires mechanical grinding to remove laitance and create 3-5mm surface profile for optimal adhesive keying. Vacuum thoroughly to remove all dust particles that compromise bond strength.
Verify heating system functionality by running a complete test cycle before any tiling work. Document heating cable or mat layout with photographs and measurements, creating a permanent record that prevents accidental damage during future renovation work. Mark heating element locations on walls to guide fixture installation that might require floor penetrations.
Phase 2: Priming and Adhesive Application
Apply appropriate primer based on substrate porosity. High-porosity screeds common in Bali villa construction require acrylic-based primers that regulate suction and prevent rapid moisture loss from adhesive. Allow primer to dry completely—typically 2-4 hours in Bali’s humidity—before adhesive application. Attempting to tile onto wet primer causes adhesive dilution and bond failure.
Mix flexible adhesive according to manufacturer specifications using clean water and mechanical mixing equipment. Hand-mixing cannot achieve the homogeneous consistency required for optimal polymer activation. Allow mixed adhesive to slake for 5-10 minutes, then re-mix briefly before application. This slaking period allows polymer chains to fully hydrate, maximizing flexibility and bond strength.
Apply adhesive using notched trowels sized appropriately for tile format. Large-format tiles (600x600mm and above) require 10-12mm notch trowels to achieve minimum 80% coverage. Spread adhesive in sections manageable within the product’s open time—typically 20-30 minutes in Bali’s heat. Back-butter large tiles with additional adhesive to ensure complete coverage and eliminate voids that create weak points under thermal stress.
Phase 3: Tile Installation and Grouting
Install tiles using consistent pressure and slight twisting motion to collapse adhesive ridges and achieve full contact. Use tile leveling systems to maintain consistent grout joint width and prevent lippage, which becomes more pronounced as thermal movement occurs. Check adhesive transfer regularly by lifting test tiles—minimum 80% coverage is essential for underfloor heating applications.
Maintain expansion joints at room perimeters and at 4-5 meter intervals in larger installations. These joints accommodate thermal movement without transferring stress to the tile field. Fill expansion joints with flexible silicone sealant, never rigid grout, to preserve their movement-absorbing function.
Allow adhesive to cure for minimum 48 hours before grouting—longer in high-humidity conditions. Select flexible grout formulations (CG2 class minimum) that complement the adhesive’s movement capability. Rigid grouts crack under thermal cycling, creating moisture pathways that undermine the entire installation. Apply grout using rubber floats, working material fully into joints and removing excess promptly to prevent haze formation on tile surfaces.
Phase 4: System Commissioning
Wait minimum 14 days after grouting before activating the heating system. This curing period allows both adhesive and grout to achieve full strength before thermal stress introduction. Begin heating at 15°C, increasing 5°C daily until reaching operating temperature. Monitor tile installation during this commissioning phase for any signs of movement or cracking that indicate installation defects requiring immediate remediation.
Cost Considerations and Project Timeline for Bali Installations
Premium flexible adhesives suitable for underfloor heating cost approximately IDR 350,000-550,000 per 20kg bag, compared to IDR 150,000-200,000 for standard tile adhesives. A typical 20-square-meter bathroom installation requires 8-10 bags of adhesive, representing an additional investment of IDR 1,600,000-2,800,000 over standard products. This cost differential is insignificant compared to the expense of complete reinstallation following adhesive failure.
Professional installation labor for heated floor tiling in Bali ranges from IDR 200,000-350,000 per square meter, depending on tile size and complexity. This rate includes substrate preparation, priming, adhesive application, and grouting. Complex installations with multiple tile formats or intricate patterns command premium rates of IDR 400,000-500,000 per square meter.
Project timeline for a standard 20-square-meter heated bathroom floor spans 18-21 days from substrate preparation to system commissioning. This includes 2 days substrate preparation, 1 day priming, 2-3 days tiling, 2 days adhesive curing, 1 day grouting, 14 days final curing, and 3-4 days graduated heating commissioning. Renovation Bali projects often face pressure to compress this timeline, but eliminating proper curing periods guarantees installation failure.
Material costs for complete installation include flexible adhesive (IDR 2,800,000-4,400,000), primer (IDR 400,000-600,000), flexible grout (IDR 800,000-1,200,000), and expansion joint sealant (IDR 300,000-500,000). Total material investment for quality underfloor heating tile installation ranges from IDR 4,300,000-6,700,000 for a 20-square-meter area, excluding tiles themselves.
For comprehensive cost estimation specific to your villa construction or renovation project, detailed material specifications and labor requirements should be evaluated based on actual site conditions and tile selections.
Frequently Asked Questions About Heated Floor Tile Adhesive
Can I use standard flexible adhesive for underfloor heating in Bali?
Standard flexible adhesives rated S1 class lack sufficient deformation capability for underfloor heating applications. Only S2-class adhesives with minimum 5mm deformation capacity provide adequate thermal movement accommodation. Additionally, products must specifically list underfloor heating compatibility in technical documentation, as thermal cycling resistance requires specialized polymer formulations beyond basic flexibility. Using inappropriate adhesives in Bali villa construction leads to debonding within 6-12 months as thermal stress accumulates.
How long must I wait before turning on underfloor heating after tiling?
Minimum 14 days curing time is essential before heating system activation, allowing both adhesive and grout to achieve full strength. Premature heating drives residual moisture from these materials, creating steam pressure that destroys bond integrity. After the curing period, commission the system gradually, starting at 15°C and increasing 5°C daily. This graduated approach allows materials to adapt to thermal stress progressively, preventing shock damage common in rushed installations.
What tile types work best with underfloor heating in Bali’s climate?
Porcelain tiles offer optimal performance for heated floors in tropical environments due to superior thermal conductivity and minimal moisture absorption. Natural stone tiles like marble or travertine also perform well but require sealing to prevent moisture-related staining. Large-format tiles (600x600mm or larger) reduce grout joint quantity, minimizing potential failure points, but require meticulous adhesive coverage to prevent hollow spots that crack under thermal stress. Avoid tiles thicker than 12mm, as excessive thickness impedes heat transfer efficiency.
Do I need expansion joints in heated floor installations?
Expansion joints are mandatory for underfloor heating installations, positioned at room perimeters and at 4-5 meter intervals in larger areas. These joints accommodate thermal expansion without transferring stress to the tile field. Fill joints with flexible silicone sealant that maintains elasticity through temperature cycling. Omitting expansion joints—a common error in renovation Bali projects—causes tiles to compress against fixed perimeters, resulting in tent-cracking or complete debonding as thermal stress accumulates.
Can existing tile floors be retrofitted with underfloor heating?
Retrofitting underfloor heating beneath existing tiles is technically possible but rarely advisable. The process requires complete tile removal, heating system installation, new screed application, and complete retiling—essentially a full renovation. Attempting to install ultra-thin heating mats over existing tiles and retile directly above creates excessive floor h
 3124 m²6 month(s)from 123.000 USD
TALA 8
 3180 m²7 month(s)from 142.000 USD
Vasudeva
 172 m²8 month(s)from 120.000 USD
Keshava
 3173 m²6 month(s)from 125.000 USD
TALA FOUR
 164 m²7 month(s)from 79.000 USD
Private: Haridas Villas, Tegallalang
 3127 m²9 month(s)from 177.000 USD
Mukunda
 2144 m²11 month(s)from 104.000 USD
Narayana
 4344 m²16 month(s)from 290.000 USD
Radha
 3104 m²11 month(s)from 99.000 USD
TALA 100

Want to calculate?
 1from 198.000 USD
Private: Haridas Villas
164 m²7 month(s)from 79.000 USDTALA TWO
Start With Real Numbers, Not Guesses
Before finalizing your finishing works plan, check realistic cost ranges for your Bali villa project.
Available lands
 18900 m²2 min$ 6912931Bali, Pecatu
 2400 m²7 min$ 496552Bali, Canggu
 2115 m²5 min$ 1139547Bali, Pererenan
 3000 m²15 min$ 1246921Bali, Tabanan
 700 m²15 min$ 162500Bali, Tabanan
 500 m²10 min$ 107143Bali, Tabanan
 7000 m²36 min$ 284483Bali, Gianyar
 1000 m²10 min$ 280788Bali, Pecatu
 1700 m²10 min$ 392549Bali, Nusadua
 3100 m²15 min$ 257697Bali, Tegallalang
 6000 m²10 min$ 1330049Bali, Kutuh South Bali
 2800 m²2 min$ 713793Bali, Kedungu
 2850 m²15 min$ 315887Bali, Tabanan
 2200 m²15 min$ 508005Bali, Canggu
 7900 m²25 min$ 413485Bali, Tabanan
Planning a build in Bali?
Get a feasibility view, budget range and timeline from Teville.
Related guides
Resin-Infused Plaster Finishes: Anti-Salt Systems Bali
Expert technical guide: Resin-Infused Plaster Finishes: Anti-Salt Systems Bali
8 min read
Prefinished Timber Joinery: Silicone Seals Fixings Bali
Professional prefinished timber joinery installation in Bali with silicone seals and fixings for durable weatherproof performance and a premium finish.
10 min read
Polished Concrete Microtopping: Surface Prep Sealants Bali
Discover Bali s polished concrete microtopping: expert surface prep, durable sealants, and a flawless finish for modern floors with minimal maintenance.
9 min read