Timber Staircase Installation: Fixings, Sealants Moisture Bali
Timber Staircase Installation in Bali: The Fixings, Sealants & Moisture Problem
In Bali’s tropical, salt-laden, and humidity-rich environment, timber staircases fail prematurely when fixings corrode, sealants crack, and moisture swells treads and stringers. The core question for renovation Bali projects and interior finishing Bali is simple: how do we select and install the right screws, adhesives, and sealants—and control moisture—so a staircase remains quiet, safe, and beautiful for years? As a finishing-focused contractor, Teville (PT. The Haridas Villas) addresses this exact challenge daily in Bali villa construction. This Bali area guide distills our method so you can plan a durable, serviceable staircase.
Technical Deep Dive: Fixings, Sealants, Adhesives, and Moisture Control
1) Fixings that last in tropical/coastal Bali
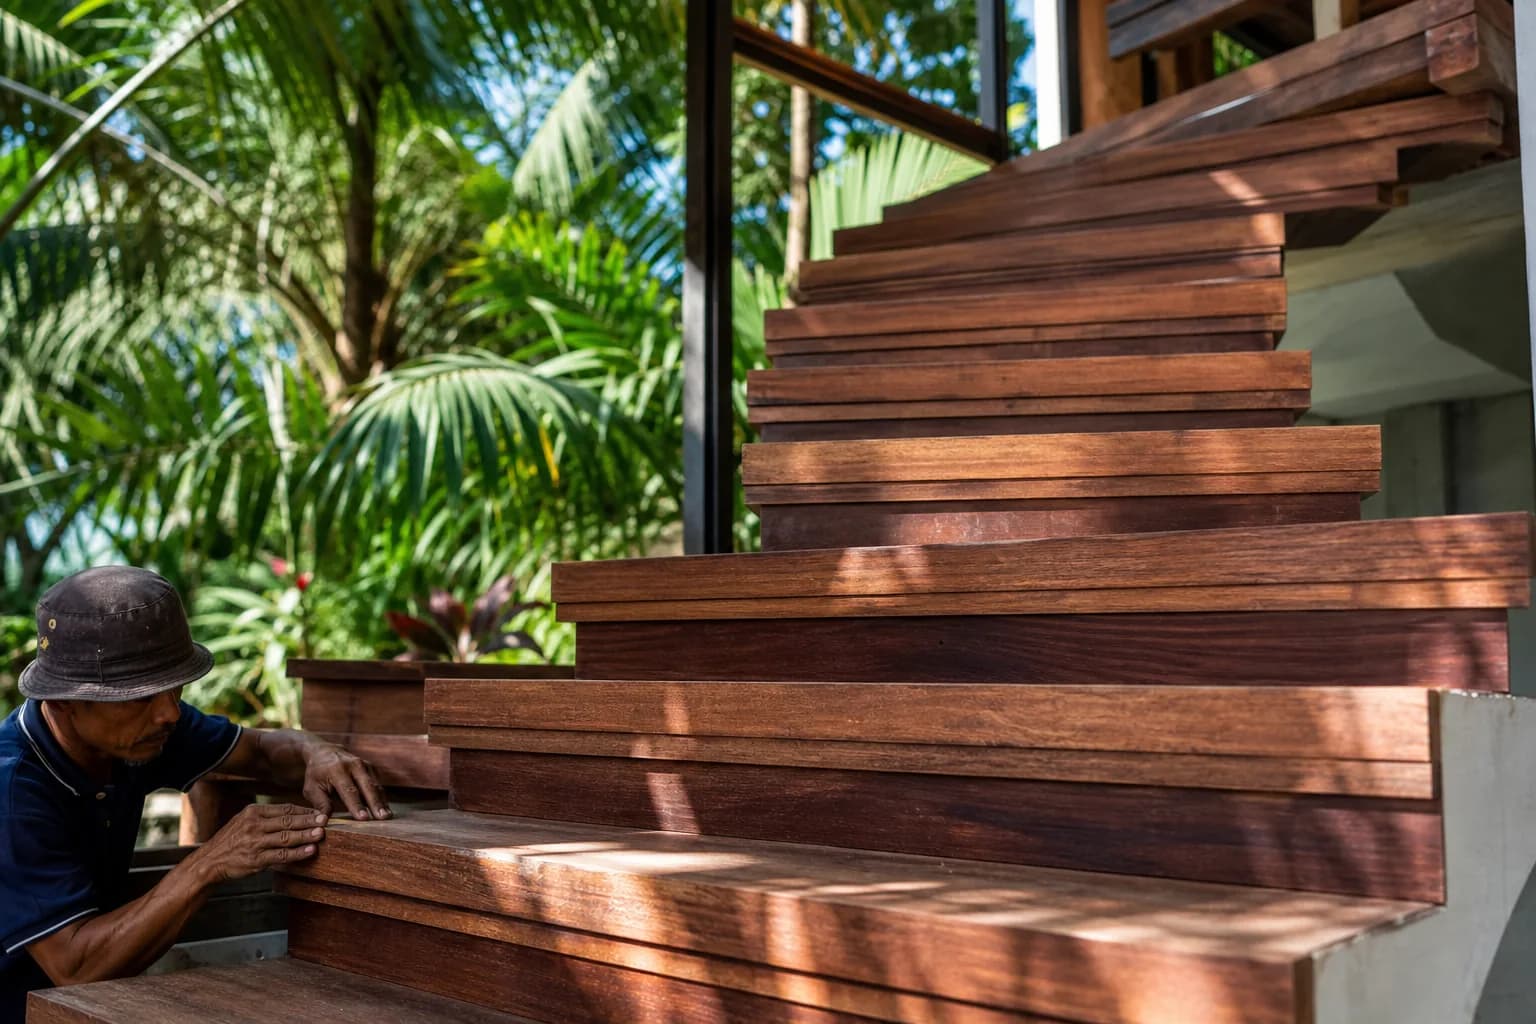
In Bali’s marine-influenced microclimates, ordinary carbon-steel screws rust quickly, staining timber and losing clamping force. We specify stainless steel fixings as standard: A2 (304) for inland interiors and A4 (316) for coastal villas or areas exposed to sea breeze. For visible tread-to-stringer or handrail fix-offs where splitting is a risk, trim head screws are preferred; their smaller heads reduce splitting and sit flush for easy plugging. Purpose-made trim head screws (e.g., products in the SPAX stairs & railings range) offer sharp points, self-countersinking ribs, and thread designs that reduce cam-out and provide reliable pull-down in dense hardwoods.
We pre-drill pilot and clearance holes matched to species density (hardwoods such as Merbau, Teak, or Bangkirai require precise pilots). A typical sequence: mark and dry-fit, drill pilot through tread, clearance in the upper piece, countersink 2–3 mm for plugs, apply adhesive bead, drive screws to specified torque. Spacing is set to avoid end-grain splitting and to control vibration—often two to three screws per bearing point, staggered. Where steel substructures exist, we isolate dissimilar metals and use stainless or non-conductive washers to avoid galvanic corrosion.
2) Structural bonding: polyurethane construction adhesive
A key reason stairs squeak is micro-movement at interfaces. A moisture-resistant polyurethane construction adhesive adds a continuous bond line, filling minor gaps, damping vibration, and resisting Bali’s humidity swings. It is our default for tread-to-stringer, riser-to-tread, and wedge blocks. An example category reference is the polyurethane adhesives recommended for stair treads. We use controlled beads (6–10 mm) or zig-zag ribbons; too little leads to hollow spots, too much causes hydraulic “float” and squeeze-out. Open time and clamp pressure must match the product data sheet; we avoid solvent-based mastics that embrittle or creep in heat.
3) Sealants for movement joints and acoustic damping
Sealant is not structural; it controls air and moisture ingress, reduces creak at trim interfaces, and creates a clean finish. For interior timber, flexible acrylic latex caulk adheres well, accepts paint, and remains serviceable under daily temperature/humidity changes. See general guidance such as acrylic latex caulk for stair treads. We use it at skirt board joints, trim returns, and hairline gaps between risers and stringers. In wet-adjacent zones (near open-air entries), we substitute a high-modulus hybrid polymer (MS) with mildew resistance. Pure silicone is reserved for non-paintable joints with high water exposure and compatible finishes, but we avoid it where future refinishing is planned.
4) Moisture, EMC, and acclimation in Bali
Uncontrolled moisture is the primary failure driver. Interior equilibrium moisture content (EMC) in air-conditioned Bali villas typically stabilizes around 10–14%; in naturally ventilated spaces it can rise to 14–18% or higher in the rainy season. We insist on kiln-dried timber delivered near the target EMC of the actual environment and acclimated on site (stickered, shaded, ventilated) for 7–14 days. We measure with a calibrated pin meter and log readings. Installing timber that is too dry (e.g., 8%) in a humid villa invites swelling; installing at 18–20% in an air-conditioned interior invites shrinkage and gaps. Both produce stress at fixings and sealants.
5) Edge and end-grain protection
End grain behaves like a bundle of straws and drinks moisture. We seal the underside and all end grain before installation: two coats of a compatible sealer or the first two coats of the chosen finish, with extra attention to notches and housings. This equalizes vapor exchange across faces and minimizes cupping. Cut edges made during site trimming are re-sealed immediately, before fix-off.
6) Creak control: interface design, not just more screws
Creaks often originate at dry timber-on-timber contact or loose wedges. Our method: structural adhesive at bearing, stainless screws at staggered spacing, adhesive-backed acoustic tape or thin neoprene isolators in select trim-to-wall contacts, and glue blocks under treads where detailing allows. We avoid over-driving screws, which crush fibers and later loosen as fibers rebound.
7) Corrosion and finish compatibility
Tannic hardwoods (Teak, Merbau) can blacken around reactive metals. Stainless fasteners and inert fillers prevent stains. Sealants must be paint/finish compatible: acrylic latex accepts most paints; silicones do not. Polyurethane adhesives should not be smeared onto finished faces; squeeze-out is removed while green with mineral spirits (check finish compatibility) or carefully chiseled after cure.
8) Integration with villa utilities and furniture installation
Stair lighting, smart sensors, and concealed conduits should be coordinated before fix-off. Drilling after sealing re-opens moisture pathways. We coordinate with villa utilities during construction sequencing to keep finishes intact. Where handrails integrate with custom cabinetry or balustrade joinery, furniture installation tolerances and movement joints are planned in parallel.
Materials & Standards: What to Specify in Bali
- Timber species (interior): Teak, Merbau, Bangkirai, or engineered hardwood treads rated for tropical interiors. For AC interiors, aim for 10–14% MC; for naturally ventilated interiors, 12–16% at install. Avoid undersized, flat-sawn stock without proper sealing.
- Fixings: Stainless steel A2 (304) for inland interior; A4 (316) within coastal influence. Trim head screws for treads/handrails; wafer or pan head for framing. Use matching stainless anchors for concrete, or isolation sleeves when attaching to steel to prevent galvanic action. Refer to reputable trim screw families such as SPAX.
- Adhesives: Polyurethane construction adhesive with water resistance classification comparable to EN 204 D4; gap-filling, flexible, and suitable for wood-to-wood and wood-to-concrete interfaces. Reference category: PU stair tread adhesives.
- Sealants: Interior acrylic latex caulk meeting common performance benchmarks (e.g., flexibility and paintability similar to ASTM C834). For higher moisture, a neutral-cure hybrid (MS) with fungicide. Avoid acetic-cure silicones that corrode metals or stain stone.
- Finishes: 2K waterborne polyurethane for abrasion resistance and low VOC, or penetrating oil with regular maintenance. Always seal underside and end grain first.
- Moisture controls: Vapor-open coatings where trapped moisture is a risk, damp-proof membranes below landings over ground-bearing slabs, and site humidity control during finishing.
- Standards & compliance: Align with applicable Indonesian SNI and local permitting for stair geometry and safety. For reference values only (not legal requirements), we consider ISO 3506 for stainless classifications and EN 204 for adhesive durability when evaluating product data.
Teville validates every product for compatibility and long-term service in Bali’s climate. Our portfolio and villa projects show how these specifications translate into quiet, movement-tolerant stair assemblies.
Step-by-Step Process: Teville’s Installation Method
1) Survey, measurement, and moisture mapping
- Confirm structure (stringers, landings, substrates), check plumb/level, and plan fixing points with edge distances that prevent splitting.
- Measure timber MC with a calibrated pin meter; record ambient RH/temperature for 3–5 days to define EMC target.
- Coordinate penetrations for villa utilities (lighting, sensors) and furniture installation interfaces (balustrade posts, wall rails).
2) Acclimation and pre-finishing
- Sticker stacks in the install room for 7–14 days; avoid direct sun and wet trades.
- Seal underside and all end grain with two coats of the specified system; sand lightly between coats.
- Mock-up finish sheen and slip resistance (add clear anti-slip aggregate at nosings where required).
3) Dry-fit and markout
- Dry-fit treads/risers; confirm reveals and nosing projections.
- Mark pilot, clearance, and countersink points; verify screw lengths and avoid piercing finished faces below.
- Prepare isolation pads or acoustic tape for select trim-to-wall interfaces.
4) Adhesive application and fix-off
- Apply polyurethane adhesive beads (6–10 mm) to stringer housings and riser interfaces; maintain continuous bond lines at load paths.
- Set tread, clamp or weight evenly; drive stainless trim head screws in a staggered pattern, stopping just shy of crushing fibers.
- Install glue blocks under treads where detailing allows; remove green squeeze-out neatly.
5) Plugging, sealing, and detailing
- Plug countersinks with matching timber dowels aligned to grain; trim flush and spot-seal.
- Apply acrylic latex caulk at trim joints and micro-gaps; tool to concave profile. Use hybrid sealant at higher-moisture thresholds.
- Re-seal any freshly cut edges immediately.
6) Finish coats and cure
- Apply final finish coats per manufacturer’s film-build and recoat windows; maintain stable RH and temperature.
- Protect with breathable coverings; prevent foot traffic until cured. Avoid plastic films that trap moisture.
7) Commissioning, QC, and handover
- Re-check fixings torque, joint lines, and sealant continuity; tap-test for voids or squeaks.
- Document MC, adhesive lot numbers, and cure times; create a maintenance plan (inspection, cleaning, and re-seal intervals).
- Handover care instructions tailored to AC vs naturally ventilated villas.
Costs & Timeline in Bali
Costs vary with species, coastal exposure, and detailing. The figures below are indicative for a 14–18 tread interior staircase on a prepared structure, focusing on finishing, fixings, sealants, and moisture controls (excludes structural fabrication):
- Materials: Stainless fixings and anchors: IDR 3.5–8.5 million; polyurethane adhesive and sealants: IDR 2.5–5.0 million; plugging stock, isolation pads, abrasives: IDR 1.5–3.0 million; finishes and consumables: IDR 4.0–9.0 million.
- Labor (finishing team): IDR 12–28 million depending on species hardness, access, and complexity (balustrades, integrated lighting).
- Total (finishing scope only): Typically IDR 23–45 million for high-quality installation excluding new structural stringers or glass/metal balustrades.
Timeline (working days):
Before finalizing your finishing works plan, check realistic cost ranges for your Bali villa project.Available lands
 1660 m²10 min$ 343448Bali, Kerobokan
 10000 m²19 min$ 232759Bali, Buleleng
 1000 m²10 min$ 230911Bali, Kerobokan
 260 m²5 min$ 51872Bali, Kedungu
 608 m²15 min$ 310377Bali, Seminyak
 8313 m²15 min$ 716670Bali, Buduk
 585 m²8 min$ 165702Bali, Mengwi
 700 m²20 min$ 90517Bali, Cepaka
 2115 m²5 min$ 1139547Bali, Pererenan
 13000 m²1 min$ 920567Bali, Pekutatan
 2230 m²15 min$ 410573Bali, Padonan
 3900 m²10 min$ 432266Bali, Tabanan
 1300 m²10 min$ 348214Bali, Tabanan
 660 m²10 min$ 175567Bali, Mengwi
 5815 m²5 min$ 815740Bali, Tabanan
Planning a build in Bali?
Get a feasibility view, budget range and timeline from Teville.
Related guides
Resin-Infused Plaster Finishes: Anti-Salt Systems Bali
Expert technical guide: Resin-Infused Plaster Finishes: Anti-Salt Systems Bali
8 min read
Prefinished Timber Joinery: Silicone Seals Fixings Bali
Professional prefinished timber joinery installation in Bali with silicone seals and fixings for durable weatherproof performance and a premium finish.
10 min read
Polished Concrete Microtopping: Surface Prep Sealants Bali
Discover Bali s polished concrete microtopping: expert surface prep, durable sealants, and a flawless finish for modern floors with minimal maintenance.
9 min read