Shower Niche Waterproofing in Bali: Membrane Application
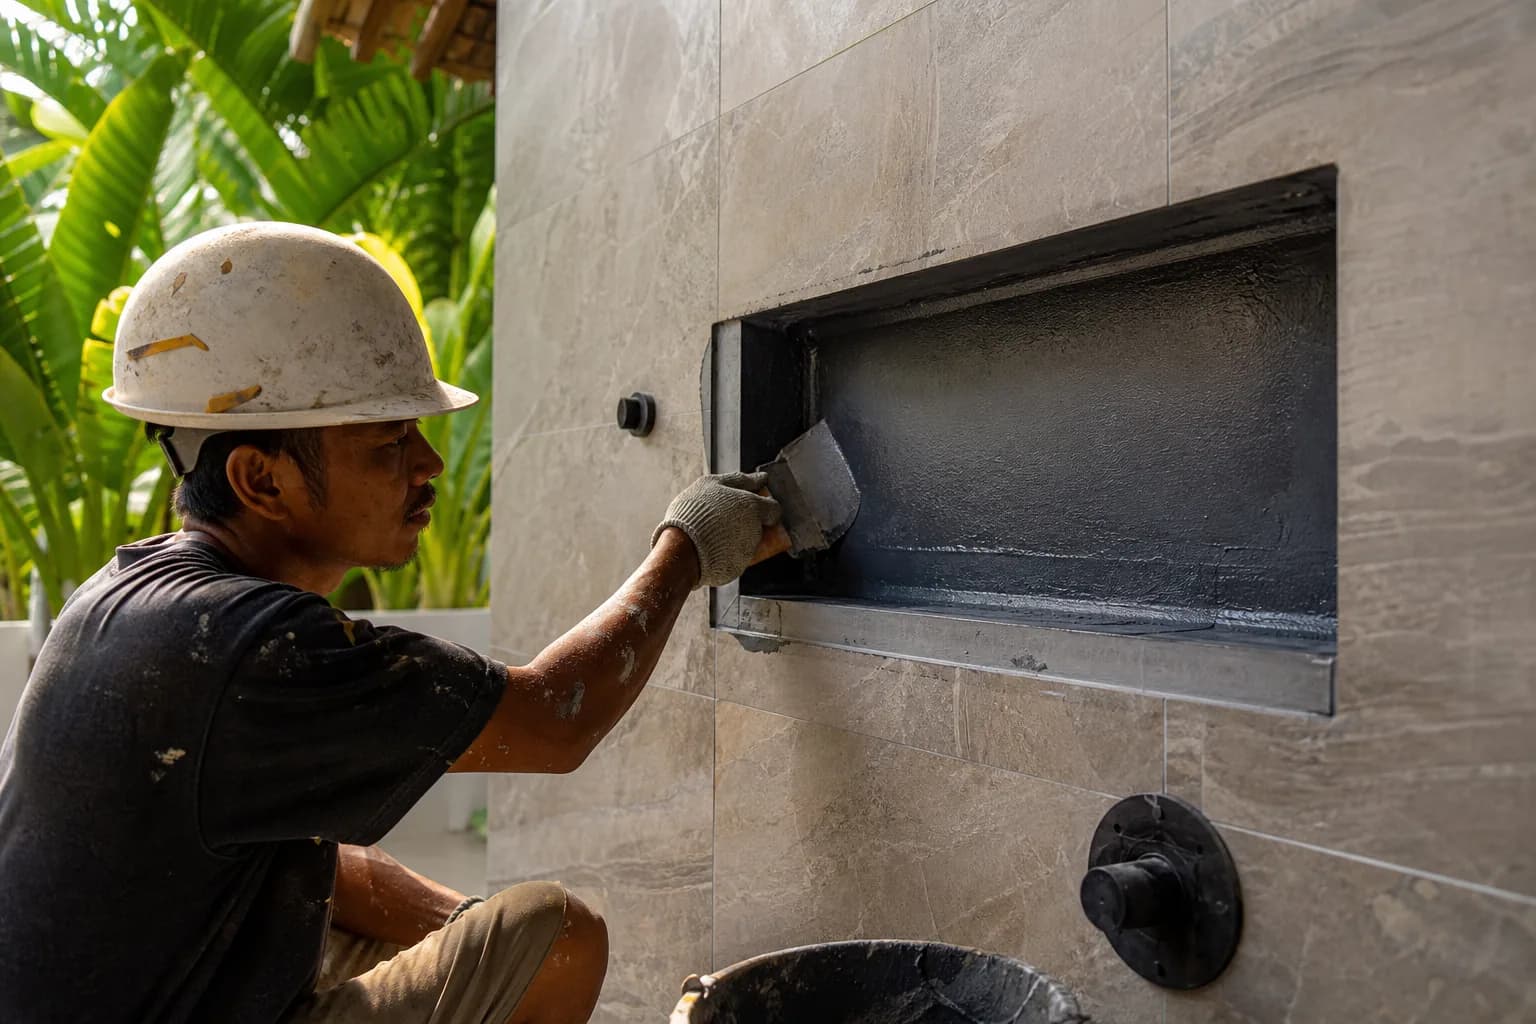
# Shower Niche Waterproofing: Membrane Application in Bali Bathrooms
The Hidden Vulnerability in Bali’s Luxury Bathroom Renovations
Shower niches have become a signature feature in modern Bali villa construction, offering elegant storage for toiletries while maintaining clean lines. However, these recessed alcoves represent one of the most critical waterproofing challenges in tropical bathroom design. Without proper membrane application, shower niches become entry points for moisture penetration, leading to tile delamination, mold growth behind walls, and structural damage to timber framing—problems amplified by Bali’s 80-90% humidity levels and intense monsoon seasons. The question isn’t whether to waterproof your shower niche, but how to execute membrane application with the precision required for long-term durability in Indonesia’s demanding climate.
Understanding Membrane Waterproofing Technology for Tropical Applications
Waterproofing membranes create a continuous barrier between water and substrate materials, but their performance in renovation Bali projects depends entirely on proper selection and installation technique. In Bali’s tropical environment, membranes must withstand not just direct water exposure but constant humidity, temperature fluctuations between air-conditioned interiors and hot exteriors, and the unique challenges of local construction materials.
Sheet membranes, such as Schluter KERDI or similar polyethylene-based systems, arrive as pre-manufactured rolls with consistent thickness (typically 0.5-1mm). These membranes bond to substrates using thin-set mortar, creating a mechanical and chemical bond. The primary advantage lies in their uniform thickness and immediate readiness for tile installation—critical factors when coordinating interior finishing Bali schedules. Sheet membranes excel in geometrically complex niches because pre-formed corners and transitions eliminate the most vulnerable failure points.
Liquid-applied membranes, conversely, consist of polymer-modified compounds brushed or rolled onto surfaces. Products like Laticrete Hydro Ban or Mapei Mapelastic create seamless barriers that conform to any substrate irregularity. In Bali applications, liquid membranes offer distinct advantages when working with locally-sourced materials or non-standard niche dimensions common in custom villa projects. The liquid format allows installers to build thickness in vulnerable areas—a technique particularly valuable around penetrations for shower fixtures or shelving supports.
The critical distinction for Bali bathrooms centers on substrate compatibility. Local construction often utilizes red brick or hebel block substrates rather than cement board, requiring membranes with superior adhesion to masonry surfaces. Liquid membranes typically demonstrate better penetration into porous substrates, while sheet membranes demand perfectly flat, defect-free surfaces—a specification that requires additional preparation when working with traditional Balinese construction methods.
Temperature sensitivity during application presents another tropical consideration. Most membranes specify application temperatures between 10-35°C, but Bali’s bathroom surfaces frequently exceed this range when exposed to afternoon sun. Professional villa utilities installation requires scheduling membrane work during cooler morning hours and ensuring adequate ventilation to prevent premature curing or incomplete adhesion.
Membrane selection must also account for tile adhesive compatibility. Not all thin-set mortars bond effectively to all membrane surfaces, particularly when using large-format porcelain tiles popular in contemporary Bali villa design. The membrane manufacturer’s technical data sheet should explicitly approve the planned tile adhesive system—a verification step that prevents delamination failures months after project completion.
Material Specifications and Quality Standards for Bali Climate
Selecting appropriate materials for shower niche waterproofing in Bali requires understanding both international standards and local availability. The Australian Standard AS 3740 provides the most relevant waterproofing guidelines for tropical climates, specifying membrane performance requirements that align with Indonesia’s environmental conditions.
Quality sheet membranes should meet minimum standards including tensile strength above 10 MPa, elongation capacity exceeding 300%, and water vapor permeability below 0.5 perms. These specifications ensure the membrane can accommodate substrate movement—inevitable in Bali’s temperature and humidity cycles—without cracking or delaminating. Brands like Schluter, Wedi, and Laticrete offer products meeting these criteria with established distribution in Indonesia.
For liquid-applied systems, look for single-component formulations that eliminate mixing errors during application. The membrane should cure to a minimum thickness of 1mm (typically requiring 2-3 coats) and demonstrate crack-bridging capability across gaps up to 3mm. This flexibility proves essential when waterproofing niches constructed in older villas undergoing renovation Bali projects, where substrate movement and settling cracks commonly appear.
Substrate preparation materials deserve equal attention. Cement-based waterproof backer boards like Hardie Backer or Durock provide ideal substrates, but availability in Bali sometimes necessitates alternatives. When using local hebel block or brick construction, specify a polymer-modified render coat to create a suitable bonding surface. This render should cure for minimum 7 days before membrane application—a timeline often compressed in rushed projects, leading to adhesion failures.
Seam treatment products—waterproof tapes, corner pieces, and pipe collars—must come from the same manufacturer as the primary membrane. Mixing systems from different brands creates compatibility risks that void warranties and compromise waterproofing integrity. For Teville’s villa projects, we maintain relationships with suppliers ensuring complete system availability, eliminating the temptation to substitute incompatible products mid-installation.
Professional Installation Process: Step-by-Step Membrane Application
Proper shower niche waterproofing begins days before membrane application, with substrate preparation determining ultimate success. The niche structure must be framed to proper dimensions—typically 300-400mm wide, 150-200mm deep, and positioned between 900-1200mm above the shower floor. In Bali villa construction, we frequently encounter niches framed with insufficient backing support, creating flex that eventually cracks grout and compromises waterproofing.
Surface Preparation Phase: Clean all surfaces thoroughly, removing dust, oils, and loose particles. For masonry substrates common in Bali, apply a bonding primer 24 hours before membrane installation. This primer penetrates porous surfaces, creating a stable base that prevents the membrane adhesive from being absorbed unevenly. Check that all surfaces are plumb and level—deviations exceeding 3mm over 1 meter should be corrected with leveling compound before proceeding.
Sheet Membrane Installation: Mix thin-set mortar to a creamy consistency, avoiding lumps that create voids beneath the membrane. Apply mortar to the niche back wall using a 3mm notched trowel, then immediately embed the pre-cut membrane sheet, pressing firmly to eliminate air pockets. The membrane should extend beyond the niche opening by minimum 100mm on all sides, lapping onto surrounding wall surfaces. Install pre-formed inside corners at all niche edges, ensuring these pieces overlap the main membrane by at least 50mm. Apply additional thin-set over the membrane surface, filling the fabric weave completely—this layer provides the bonding surface for tile adhesive.
Liquid Membrane Installation: Begin with corners and edges, applying the first coat generously to ensure complete coverage. Embed reinforcing mesh tape into wet membrane at all inside corners and the niche-to-wall transition, then apply additional membrane over the tape. Allow the first coat to cure per manufacturer specifications (typically 2-4 hours in Bali’s climate), then apply the second coat perpendicular to the first, ensuring uniform 1mm minimum thickness. A third coat may be necessary in high-exposure areas or when working with particularly porous substrates.
Critical Detail Work: Any penetrations for shelving supports, shower fixtures, or lighting require special attention. For sheet membranes, use pre-formed pipe seals that bond to both the membrane and the penetrating element. With liquid membranes, build up thickness around penetrations with additional coats, creating a gasket effect. These details represent the most common failure points in furniture installation and fixture mounting within shower niches.
Quality Verification: Before proceeding to tile installation, conduct a flood test. Dam the shower threshold and fill the pan to a depth covering the niche bottom by 50mm. Mark the water level and monitor for 24 hours—any drop indicates membrane failure requiring remediation. This test, while time-consuming, prevents discovering leaks after tile installation when repairs become exponentially more expensive and disruptive.
Investment Requirements and Project Timeline
Waterproofing a standard shower niche (single alcove, approximately 0.5 square meters total surface area) in Bali typically requires an investment of IDR 2,500,000-4,500,000 for materials and professional installation. This range reflects membrane type selection, substrate condition, and detail complexity. Sheet membrane systems generally cost 20-30% more than liquid-applied alternatives, but reduce installation time by approximately 40%.
Material costs break down as follows: quality sheet membrane systems run IDR 350,000-500,000 per square meter, while liquid membranes cost IDR 250,000-400,000 per square meter including reinforcing materials. Substrate preparation materials (primers, leveling compounds, backer board if required) add IDR 500,000-1,000,000 depending on existing conditions. Professional installation labor in Bali ranges from IDR 1,200,000-2,000,000 for a single niche, reflecting the specialized skills required for proper membrane application.
Timeline considerations prove equally important for renovation Bali project scheduling. Substrate preparation requires 1-2 days including drying time. Sheet membrane installation can be completed in one day with tile installation possible the following day. Liquid membrane systems require 2-3 days for multiple coats and curing before tile work begins. The mandatory flood test adds another 24 hours. Total timeline from bare substrate to tile-ready surface: 3-5 days for sheet systems, 4-7 days for liquid applications.
These timelines assume ideal conditions—Bali’s rainy season can extend curing times significantly. Professional contractors schedule waterproofing work during dry periods when possible, or provide temporary environmental control (dehumidifiers, fans) to maintain proper curing conditions. Rushing these timelines to meet project deadlines represents false economy, as waterproofing failures discovered months later require complete niche demolition and reconstruction.
Frequently Asked Questions About Shower Niche Waterproofing
Can I waterproof a shower niche myself, or should I hire professionals?
While DIY waterproofing is technically possible, the consequences of improper installation in Bali’s climate make professional installation strongly advisable. Membrane application requires specific techniques—proper mortar consistency, complete air pocket elimination, correct overlap dimensions, and seamless corner transitions—that come from experience. A professional installer completes the work in one-third the time with warranty-backed results. For our villa portfolio, we’ve remediated numerous failed DIY waterproofing attempts, with repair costs typically exceeding 3-4 times the original professional installation investment.
How long does shower niche waterproofing last in Bali’s tropical climate?
Properly installed waterproofing membranes should provide 20-25 years of protection, matching the expected lifespan of the tile installation itself. However, this longevity depends on correct installation, appropriate material selection, and proper maintenance. Bali’s humidity and temperature extremes don’t significantly degrade quality membranes, but they mercilessly expose installation defects. Regular inspection of grout joints and prompt repair of any cracks prevents water from reaching the membrane-substrate interface where damage occurs.
What’s the difference between waterproofing the niche and waterproofing the entire shower?
The shower niche requires the same waterproofing system as the shower walls and floor—it’s not a separate or optional element. The membrane must be continuous from floor to ceiling and across all surfaces including the niche interior. The niche presents additional complexity because of its corners, edges, and the transition from recessed to flat wall surface. These geometric changes create stress points where membranes can fail if not properly detailed. Professional interior finishing Bali specialists treat the niche as an integral part of the complete shower waterproofing envelope.
Can waterproofing be added to an existing shower niche that’s leaking?
Unfortunately, no. Once tile is installed, there’s no way to add waterproofing behind it. If a shower niche is leaking, the only proper solution involves complete demolition—removing all tile, removing failed waterproofing, repairing any substrate damage, and reinstalling the complete waterproofing and tile system. This reality makes initial proper installation critical. Some contractors offer “topical sealers” claiming to waterproof over existing tile, but these products only slow water penetration temporarily and don’t address the underlying membrane failure.
Do different tile types require different waterproofing approaches?
The waterproofing membrane itself remains the same regardless of tile selection, but tile type affects the adhesive system used over the membrane. Large-format porcelain tiles (popular in modern Bali villa design) require modif
 172 m²8 month(s)from 120.000 USD
Keshava
 1from 198.000 USD
Private: Haridas Villas
 164 m²7 month(s)from 79.000 USD
TALA TWO

Want to calculate?
 3124 m²6 month(s)from 123.000 USD
TALA 8
164 m²7 month(s)from 79.000 USDPrivate: Haridas Villas, Tegallalang
 4344 m²16 month(s)from 290.000 USD
Radha
 2144 m²11 month(s)from 104.000 USD
Narayana
 3104 m²11 month(s)from 99.000 USD
TALA 100
 3173 m²6 month(s)from 125.000 USD
TALA FOUR
 3180 m²7 month(s)from 142.000 USD
Vasudeva
 3127 m²9 month(s)from 177.000 USD
Mukunda
Start With Real Numbers, Not Guesses
Before finalizing your finishing works plan, check realistic cost ranges for your Bali villa project.
Available lands
 750 m²15 min$ 187038Bali, Kerobokan
 600 m²12 min$ 101970Bali, Mengwi
 500 m²10 min$ 107143Bali, Tabanan
 700 m²15 min$ 90517Bali, Central Bali
 600 m²10 min$ 206897Bali, Canggu
 2000 m²15 min$ 523000Bali, Canggu
 1158 m²12 min$ 291996Bali, Mengwi
 2400 m²7 min$ 496552Bali, Canggu
 585 m²8 min$ 165702Bali, Mengwi
 4270 m²10 min$ 394397Bali, Ubud
 1375 m²10 min$ 447044Bali, Canggu
 700 m²8 min$ 165517Bali, Umalas
 2200 m²3 min$ 183842Bali, Berawa
 1700 m²10 min$ 392549Bali, Nusadua
 1600 m²32 min$ 266010Bali, Tabanan
Essential Bali build & buy guides
- Bali villa construction cost per m² in 2026
- How much will your villa cost? Calculator
- Building a villa in Bali: the complete guide
- Buying land in Bali: step-by-step for foreigners
- Bali villa investment: yields, risks, returns
- Leasehold vs freehold: what foreigners can own
- Construction defect liability & 10-year warranty
- Bali building codes and construction standards
Related guides
Sanur and Nusa Dua vs Canggu: Stability Plays vs Hype
Canggu gets the headlines; Sanur and Nusa Dua quietly deliver steadier returns to a different kind of buyer. An honest 2026 comparison of the stability markets against the hype market — prices, demand drivers, oversupply risk, and who should buy where.
7 min read
Ubud and the Wellness Market: Buying or Building for Retreats
Ubud is Bali's wellness capital, and retreat-focused property behaves differently from beach villas: longer stays, group bookings, lower volatility. Here is what the market rewards, what zoning allows, and what it costs to buy or build a retreat property in 2026.
8 min read
Buying and Building on the Bukit: Uluwatu, Bingin and Balangan from a Buyer's Seat
A buyer's-seat 2026 guide to the Bukit peninsula — Uluwatu, Bingin and Balangan land prices, the water problem nobody budgets, cliff setbacks after the 2025 Bingin demolitions, and how to build there properly.
7 min read