Moisture-Resistant Skim Coat: Lime-Based Plaster for Bali Homes
Moisture-Resistant Skim Coat: Lime-Based Plaster for Bali
Specific Problem/Question
How do you achieve a durable, mold-resilient, matte-finish skim coat for Bali’s humid, salt-laden climate—without trapping moisture or telegraphing hairline cracks into your final paint? In many Bali villa construction and renovation Bali projects, gypsum skim or dense cement putty behaves poorly: blistering paint, efflorescence, and persistent damp patches return after the first wet season. This Bali area guide explains why a moisture-resistant, lime-based skim coat—paired with proper substrate prep, sequencing with furniture installation and villa utilities, and vapor-open topcoats—delivers a superior, longer-lasting interior finishing solution.
Technical Deep Dive: Why Lime-Based Skim Coats Excel in Bali
Breathability vs. Humidity: Managing Vapor, Not Blocking It
Bali’s climate cycles high humidity, wind-driven rain, and thermal swings from air-conditioned interiors to hot exteriors. Dense, impermeable finishes trap moisture in walls; lime-based skim coats do the opposite. Lime plaster is vapor-permeable, allowing moisture to pass through and evaporate, minimizing blistering, mold growth, and salt crystallization at the surface. In practice, that means fewer callbacks after monsoon season and a stable substrate for paint.
Unlike many gypsum skim coats that soften with prolonged humidity, lime finishes harden by carbonation and remain resilient. Lime’s high alkalinity naturally discourages mold, and its low shrinkage reduces hairline cracking—critical for high-touch areas in premium Bali villa interiors.
Material Behavior on Typical Bali Substrates
- Cast-in-place concrete: Dense, often smooth; requires mechanical keying (light scabbling) and mineral primer for adhesion. Lime skim remains vapor-open, helping off-gas construction moisture.
- Clay/red brick and AAC block: Variable suction; lime skim over a compatible lime-rich base coat equalizes absorption, reducing patchy drying and staining.
- Existing cement putty layers: Often too impervious and brittle; remove where hollow or debonded. Rebuild with a lime base and lime skim for system compatibility.
Tropical Risks a Lime Skim Solves
- Trapped moisture from rain and plumbing: Breathable build-up releases moisture without blistering paint or efflorescence blooms.
- Salt air near coast: Vapor-open, low-shrinkage lime reduces salt crystallization stresses at the surface that cause flaking.
- AC-related condensation: Lime buffers humidity; with correct detailing at cold bridges and penetrations, it reduces weeping and mold at thermal breaks.
Texture and Finish Control
Lime skims deliver a soft, matte, hand-troweled look prized in interior finishing Bali. Local specialist blends—such as lime and clay-based plasters developed for warm, humid climates by Altarize—provide tactile finishes that remain breathable. For more impact-resistant environments (corridors, schools, clinics), specialized lime-based skim coats like Limelite High Impact Finishing Plaster are designed to be moisture-managing, rapid-drying (≈24 hours), and low-shrinkage, suitable over compatible lime backings.
Compatibility with Utilities and Built-ins
A skim coat is often installed late—after rough-in MEP services but before final furniture installation. Lime systems adapt well around wall boxes, conduits, and recessed fixtures because they bond to mineral surrounds and can be feathered thin without a glossy, closed surface. For wardrobes, vanities, and wall-hung cabinets, maintaining a vapor-open paint system behind and around cabinetry reduces hidden mold risk by allowing trapped humidity to dissipate.
Renovation vs. New Build: Sequencing Differences
- Renovation Bali: Remove non-breathable coatings, desalinate salt-loaded walls (where needed), and rebuild with a lime base coat plus lime skim. Expect additional curing and desalination time.
- New Bali villa construction: Control substrate moisture early; use lime-friendly primers and base coats; skim after MEP pressure testing and AC commissioning to avoid damage.
Materials & Standards
Core Materials
- Lime binder: Natural hydraulic lime (NHL 2–3.5) or high-calcium hydrated lime with pozzolanic additives provides balanced strength, breathability, and workability.
- Aggregates: Fine marble dust or washed silica sands graded for 0–0.5 mm help achieve a 1–3 mm skim with tight pores yet high vapor openness.
- Reinforcement: Alkali-resistant fiberglass mesh for stress zones (junctions, chases, around door frames) to limit microcracking telegraphing to paint.
- Primers/Slurries: Mineral, silicate-based primers promote adhesion and preserve breathability on dense concrete or previously patched areas.
- Topcoats: Vapor-open paints (pure limewash, silicate/mineral paint) or breathable seal soaps/waxes for feature walls.
Reference Standards and Guidance
- EN 459-1 (Building Lime): Composition and classification for hydrated and hydraulic limes.
- EN 998-1 (Rendering and plastering mortars): Performance requirements for premixed lime plasters and finishing mortars.
- EN 13914 (Design and application of external rendering): Detailing, curing, and substrate prep principles applicable to interiors in humid climates.
- BBA certification for systems such as Limelite’s renovation plasters underpins moisture-management claims when used as a system.
- Local practice: Align with Indonesian SNI requirements for mortar and interior finishes, and coordinate with mechanical specs for AC/ventilation to minimize condensation risks.
Product Landscape
- Altarize: Bali-developed lime and clay-based plasters designed for warm, humid interiors—soft matte, breathable finishes suitable for living spaces.
- Limelite High Impact Finishing Plaster: Breathable, moisture-resistant skim with rapid drying and low shrinkage; compatible with lime backing coats.
- ProMason Supply and Alibaba suppliers: Various lime plasters emphasizing vapor permeability and moisture management for humid climates.
Teville specifies and tests materials for compatibility, finish quality, and lifecycle performance in Bali’s tropical environment before deployment on site.
Step-by-Step Process We Use at Teville
1) Diagnostic Survey
- Moisture mapping: Pin/probe and thermal imaging to locate damp, cold bridges, and AC condensation lines.
- Salt assessment: Visual efflorescence checks and conductivity tests in coastal zones.
- Adhesion audit: Hammer tap and pull-off testing of existing layers to decide removal scope.
- MEP coordination: Confirm plumbing pressure tests and AC drain slopes to prevent future leaks.
2) Substrate Preparation
- Removal: Strip hollow, gypsum-based, or impermeable cement putties; chase out loose edges to firm boundaries.
- Cleaning: HEPA vacuuming, damp wiping; biocidal wash for mold, followed by rinsing and drying period.
- Keying/Priming: Light scabble or sand dense concrete; apply mineral primer/slurry for bond while preserving breathability.
- Desalination (if needed): Sacrificial lime render poultice cycles on salt-loaded masonry until readings stabilize.
3) Base Coats (Where Required)
- Apply lime base plaster (NHL or lime-pozzolan) 8–12 mm, scratched to key. Integrate alkali-resistant mesh over junctions and chases.
- Curing: Protect from sun and drying winds; mist lightly to control shrinkage. Typical cure: 7–10 days before skim.
4) Skim Coat Mixing
- Batching: Mix per manufacturer spec; clean potable water; low-speed mixing to minimize entrained air.
- Consistency: Smooth, creamy; avoid over-watering which weakens surface and reduces cohesion.
- Pot life: 60–120 minutes typical; discard stiffened material—do not retemper.
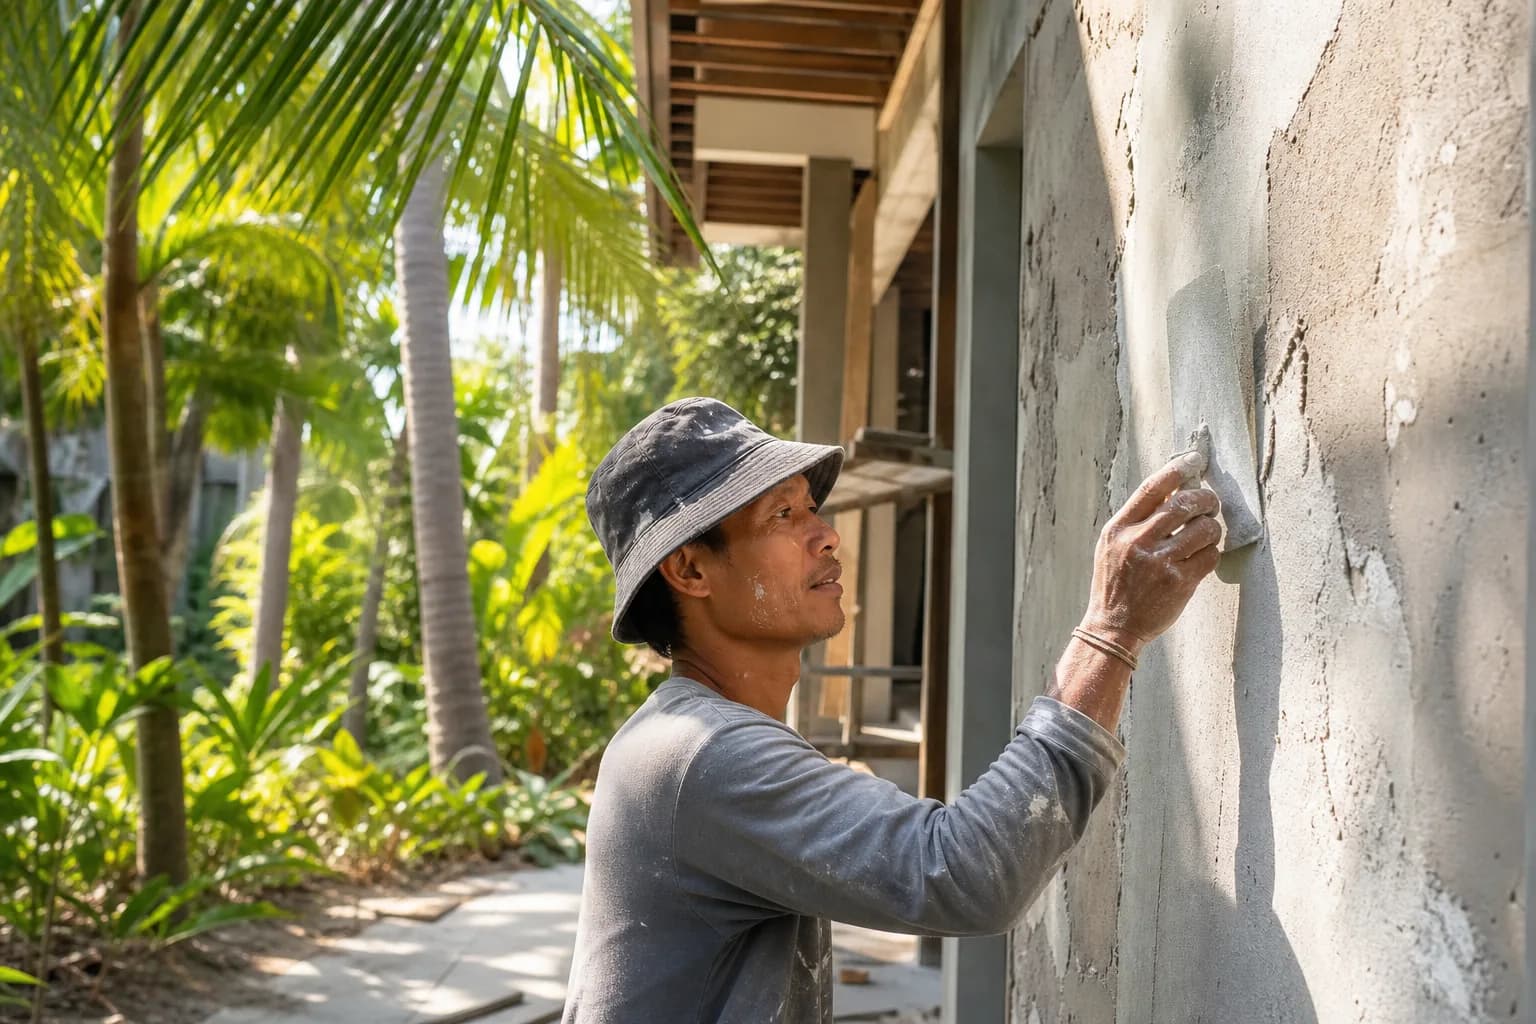
5) Application Technique
- First pass (≈1–1.5 mm): Stainless trowel, tight pressure to fill pores. Work in manageable panels.
- Second pass (≈0.5–1 mm): Cross-trowel while the first is firm but still green to close pores evenly.
- Edge control: Feather to adjacent finishes; pre-tape junctions with mesh to prevent hairline cracks.
- Finishing: Light sponge float to unify suction, then steel-trowel for a matte, compacted face without burnishing (maintain breathability).
6) Drying and Protection
- Environment: 18–30°C, RH 50–75%. Avoid direct sun or forced AC over new skim; dehumidify gently if RH >80%.
- Dry-to-paint: Typically 24–48 hours for impact-grade skims like Limelite; traditional lime may require longer. Check color uniformity and pH (>10 will need time before silicate paints).
- Carbonation: Full strength develops over weeks. Protect from rain spray and dust abrasion.
7) Vapor-Open Paint and Topcoats
- Primers: Mineral/silicate primers that do not seal the surface.
- Paints: Limewash or potassium silicate paints keep the system breathable. Avoid acrylics and vinyls that choke vapor.
- Feature finishes: Soap or wax for tactile lime surfaces in living rooms; use with awareness that sheen increases slightly.
8) Integration with Furniture Installation and Utilities
- Cabinet zones: Finish and paint walls fully before fixing carcasses; maintain 5–10 mm airflow behind large wardrobes against exterior walls.
- Plumbing/electrical penetrations: Seal with mineral, vapor-open fillers; avoid silicone skins that trap moisture in lime faces.
- Protection: Ram-board and corner guards during furniture installation; touch-up skim possible without visible patch lines if executed within the same paint system.
9) Handover and Maintenance
- Cleaning: Dry dusting; damp microfiber for marks. Avoid aggressive detergents that neutralize alkalinity.
- Repairs: Microcracks can be closed with a fresh skim rub and over-painted with mineral paint.
Costs & Timeline
Costs vary with substrate condition, access, and specification. For planning a Bali project:
- Diagnostic and prep: IDR 40,000–90,000/m² for removal, keying, desalination cycles where needed.
- Lime base coat (if required): IDR 120,000–220,000/m² including mesh at stress lines.
- Lime-based skim coat: IDR 110,000–190,000/m² depending on product (standard vs. impact-grade), finish level, and site logistics.
- Vapor-open paint system: IDR 80,000–160,000/m² for primer plus two coats mineral paint or limewash.
Timeline (example, 300 m² wall area):
- Survey and mock-ups: 2–3 days
- Removal and prep: 4–7 days
- Base coats + cure: 7–10 days
- Skim application: 3–5 days
- Drying and paint: 3–5 days
Expect 3–4 weeks total, allowing for weather and cure times. On live Bali villa construction sites, Teville sequences with MEP sign-off and joinery schedules to protect finishes and avoid rework. For tailored estimates, use Teville’s cost estimation tool.
FAQ: Lime-Based Moisture-Resistant Skim in Bali
Is lime skim better than gypsum skim for Bali?
Yes for humid, salt-exposed interiors. Lime is vapor-permeable and alkaline (mold-discouraging), while gypsum can soften and trap moisture under paint, leading to blistering and stains.
Can I use lime skim in bathrooms?
Yes on non-shower walls with a mineral paint. Inside showers or constant splash zones, use a waterproofed substrate with tile or a dedicated sealed microcement; keep adjacent lime areas vapor-open.
Will lime skim crack?
All mineral plasters move slightly. With proper substrate prep, mesh at stress points, controlled curing, and low-shrinkage mixes (e.g., Limelite High Impact Finishing Plaster), hairlines are minimized and rarely telegraph through mineral paints.
What paint should I use over a lime skim?
Mineral paints (silicate) or limewash. Avoid dense acrylic/vinyl films that block vapor.
How fast does it dry?
Impact-grade lime skims can be paint-ready in about 24–48 hours in good conditions; traditional lime may require longer. Always verify substrate dryness and pH before painting.
Can it go over existing cement put 164 m²7 month(s)from 79.000 USD
Private: Haridas Villas, Tegallalang
 172 m²8 month(s)from 120.000 USD
Keshava
 3180 m²7 month(s)from 142.000 USD
Vasudeva
 2144 m²11 month(s)from 104.000 USD
Narayana
 4344 m²16 month(s)from 290.000 USD
Radha

Want to calculate?
 3173 m²6 month(s)from 125.000 USD
TALA FOUR
 3124 m²6 month(s)from 123.000 USD
TALA 8
 1from 198.000 USD
Private: Haridas Villas
 3127 m²9 month(s)from 177.000 USD
Mukunda
164 m²7 month(s)from 79.000 USDTALA TWO
 3104 m²11 month(s)from 99.000 USD
TALA 100
Start With Real Numbers, Not Guesses
Before finalizing your finishing works plan, check realistic cost ranges for your Bali villa project.
Available lands
 1158 m²12 min$ 291996Bali, Mengwi
 2700 m²30 min$ 314224Bali, Sidemen
 250 m²15 min$ 40025Bali, Munggu
 600 m²12 min$ 101970Bali, Mengwi
 2800 m²2 min$ 713793Bali, Kedungu
 700 m²20 min$ 90517Bali, Cepaka
 2000 m²10 min$ 243842Bali, Mengwi
 660 m²10 min$ 175567Bali, Mengwi
 3300 m²15 min$ 449889Bali, Tabanan
 3800 m²15 min$ 100616Bali, Pererenan
 500 m²2 min$ 175862Bali, Cemagi
 1300 m²10 min$ 348214Bali, Tabanan
 1720 m²2 min$ 241478Bali, Tabanan
 2200 m²15 min$ 508005Bali, Canggu
 3900 m²10 min$ 432266Bali, Tabanan
Planning a build in Bali?
Get a feasibility view, budget range and timeline from Teville.
Related guides
Resin-Infused Plaster Finishes: Anti-Salt Systems Bali
Expert technical guide: Resin-Infused Plaster Finishes: Anti-Salt Systems Bali
8 min read
Prefinished Timber Joinery: Silicone Seals Fixings Bali
Professional prefinished timber joinery installation in Bali with silicone seals and fixings for durable weatherproof performance and a premium finish.
10 min read
Polished Concrete Microtopping: Surface Prep Sealants Bali
Discover Bali s polished concrete microtopping: expert surface prep, durable sealants, and a flawless finish for modern floors with minimal maintenance.
9 min read