Moisture-Resistant Plywood Subfloor: Fixing Sealants Bali
Moisture-Resistant Plywood Subfloor: Fixing & Sealants in Bali
1) Specific Problem/Question
In Bali’s tropical climate, we see the same renovation complaint again and again: musty odors, warped timber floors, grout cracking underfoot, or vinyl edges curling near bathrooms. The cause is often a subfloor that wasn’t built or sealed to handle persistent humidity, wind-driven rain, AC condensate, or occasional flooding. How do you correctly fix (or replace) a moisture-resistant plywood subfloor and choose the right sealants so your finish flooring, furniture installation, and villa utilities perform durably in Bali? This Bali area guide from Teville explains the process in technical detail.
2) Technical Deep Dive: Why Subfloors Fail in Bali and How to Build Them Right
Bali’s coastal humidity, saline air, and monsoon cycles drive moisture into buildings through multiple paths: capillary rise from ground, bulk water leaks from bathrooms and balconies, wind-driven rain at openings, and interior moisture from unvented kitchens or misrouted AC condensate. A moisture-resistant subfloor must control all of these, or the finish layers (tile, engineered wood, vinyl, carpet) will telegraph movement and fail prematurely.
Moisture-resistant plywood for subfloors typically uses phenolic WBP (weather- and boil-proof) glue lines and higher-density veneers. For villas, we specify 18–21 mm panels for typical spans, increasing thickness or introducing additional joists/plywood layering where deflection or acoustic targets demand it. Panels should arrive with a moisture content close to in-service equilibrium (often 10–14% in Bali with conditioned interiors), then acclimatize on site before fixing.
Subfloor performance depends as much on connections and sealing as on the panel itself:
- Structure and Deflection: Joist spacing, stiffness, and bridging govern how the plywood behaves under tile or engineered wood. For brittle finishes (stone/tile), deflection limits must be tight, and decoupling membranes may be required.
- Adhesion + Mechanical Fixing: A continuous bead of construction adhesive reduces squeaks and spreads load; screws lock panels. Stainless or polymer-coated screws resist corrosion in Bali’s marine atmosphere.
- Movement Gaps: 3 mm panel-to-panel and ~10 mm at perimeter allow expansion in high humidity. Skirtings and threshold details conceal these gaps.
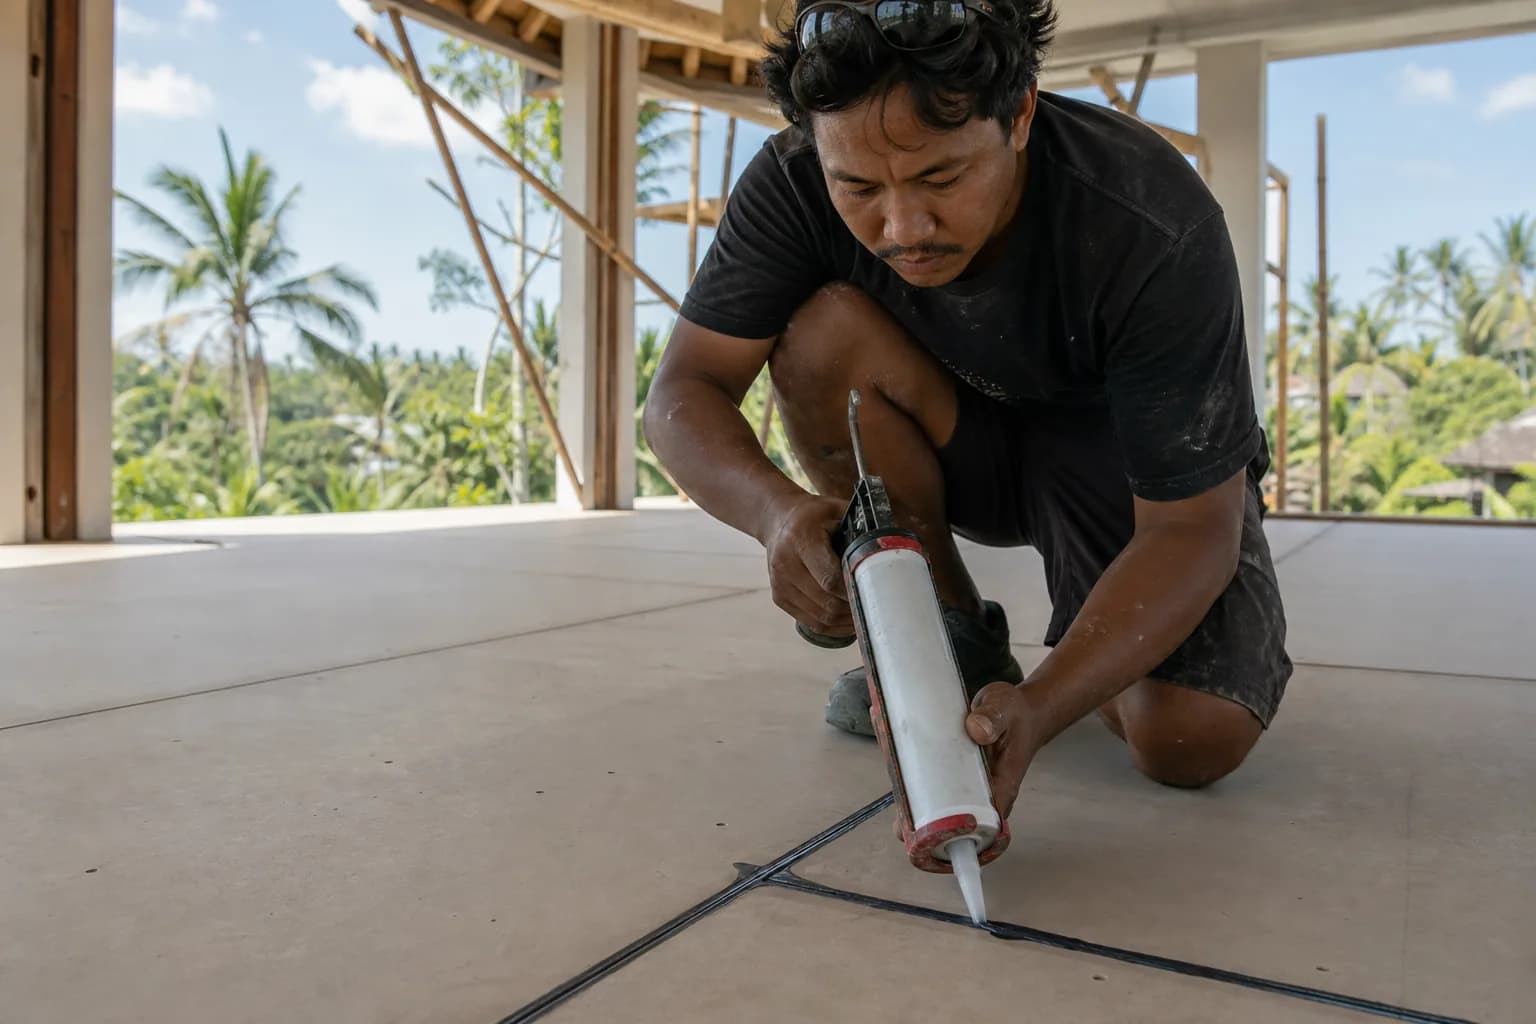
- Edge and Penetration Sealing: Cut edges, screw penetrations, and service cutouts are the weakest moisture paths. PU or epoxy sealers stop wicking and protect fibers.
- Vapor Control Strategy: In mixed-humidity environments, you must choose where the subfloor “breathes.” Over-sealing both faces can trap moisture; conversely, leaving a face unprotected in wet areas invites damage. Balance is based on finish selection and room function.
- Finish Compatibility: Tile demands flat, rigid, and decoupled planes; engineered wood needs stable moisture and appropriate underlays; LVT/vinyl requires a dry, smooth surface with primers that resist plasticizer migration.
- Wet-Area Detailing: Bathrooms, laundries, and kitchens need continuous liquid-applied waterproofing upturns, properly integrated with floor drains and terminations at thresholds.
- Utilities Integration: AC condensate lines must be positively drained; plumbing penetrations require grommets and sealant collars; electrical conduits need fire- and moisture-safe sealing.
For renovation Bali scenarios, we often encounter partially degraded panels from historic leaks. Removing and replacing only the damaged zones can work if joists are sound and moisture is controlled. Where systemic moisture was present, full panel replacement plus an upgraded vapor/waterproofing assembly is the safest route.
Finally, the microclimate of a villa matters. Oceanfront properties face saline spray and higher corrosion risk; jungle sites sit in perpetually damp air with slower drying. Interior conditioning (dehumidified AC vs. natural ventilation) changes equilibrium moisture content. Teville’s finishing teams factor these parameters into plywood specification, sealant chemistry, and fastening schedules during interior finishing in Bali and renovation Bali works.
3) Materials & Standards That Work in the Tropics
- Plywood: Moisture-resistant structural plywood with phenolic WBP glue lines; exterior-grade or marine-grade where exposure risk is high. Typical thickness 18–21 mm for single-layer subfloors; consider double-layer builds for stone or large-format tile.
- Fasteners: Stainless steel A2/A4 or polymer-coated subfloor screws. Length to achieve at least 3× shank diameter embedment into joists. Corrosion resistance is critical near coastlines.
- Construction Adhesive: Polyurethane or hybrid polymer adhesive meeting high-shear standards (e.g., ASTM D3498 for wood adhesives or manufacturer structural data). Continuous serpentine beads on joists reduce drumming and moisture channels.
- Sealants (surface and edges): Single- or two-part polyurethane, MS polymer, or epoxy sealers designed for wood. Use low-modulus PU for joints and a penetrating/film-forming epoxy or PU primer for faces and edges. Compatibility with finish adhesives is essential.
- Waterproofing Membranes: Liquid-applied, elastomeric membranes for wet rooms (e.g., products conforming to ANSI A118.10 or equivalent). Use reinforcing fabric at corners, penetrations, and shower perimeters.
- Vapor Barriers/Retarders: Where required under floors, use polyethylene sheets (approx. 200 microns) above slabs, with sealed laps, or employ vapor-retarding primers as part of the subfloor build-up.
- Primers and Self-Leveling Underlayments: Polymer-modified SLUs compatible with wood substrates; consult manufacturer for primer choice to ensure bond and moisture tolerance.
- Ancillaries: Backer rods, butyl/PE tapes for seams, corrosion-resistant washers where required, antimicrobial wood treatments at replaced joists.
Reference standards and best practices: EN 636-3 (exterior plywood classification), BS 1088 (marine plywood), EN 13986 (wood-based panels for use in construction), APA guidance for wood subfloors, ASTM F2170 (in-situ RH for slabs below), ASTM F1869 (MVER for slabs), and manufacturer technical datasheets. In Bali, Teville aligns to these and applicable local requirements while tailoring assemblies to site climate. See our villa projects for applied casework.
4) Step-by-Step Process Teville Uses in Bali Renovations
Step 1 — Diagnose and stop moisture. Identify sources: plumbing leaks, AC condensate misrouting, balcony door thresholds, failed sealants, or ground vapor. Pressure-test plumbing where needed, verify AC traps and slopes, and check external drainage. Do not proceed until the source is controlled.
Step 2 — Measure and condition. Record ambient RH/temperature and subfloor moisture. If over target, deploy dehumidifiers and airflow. In villas with slab-on-grade below timber, verify slab moisture with RH/MVER testing and decide on vapor control strategy.
Step 3 — Select repair scope. For localized water events, remove finish flooring and underlayments, then lift suspect plywood panels. Probe joists for decay and treat biologically affected zones. For extensive damage or chronic humidity, plan full-panel replacement and consider upgrading to marine-grade plywood and enhanced membranes in wet rooms.
Step 4 — Acclimatize new plywood. Store panels flat, stickered, and protected from direct rain. Condition for 48–72 hours (or per supplier guidance) to approach the villa’s in-service environment.
Step 5 — Prepare structure. Straighten and secure joists, add blocking/bridging where deflection or panel edges need support. Apply antimicrobial/termite treatment if required. Vacuum and dry-fit panels to confirm layout and staggering (offset end joints at least one joist bay).
Step 6 — Adhesive and fixing. Apply continuous PU/hybrid adhesive beads to joists. Lay panels with 3 mm gaps between sheets and ~10 mm at perimeter. Screw at 150 mm centers along edges and 200 mm in the field (adjust to engineer’s schedule and finish requirements). Use stainless or coated screws; set heads flush without breaking the face veneer.
Step 7 — Edge and penetration sealing. Immediately seal all cut edges and penetrations with epoxy or PU primer. Where services penetrate, fit tight grommets and tool a low-modulus PU sealant fillet. Tape seams with compatible butyl/PE tape if specified for vapor control.
Step 8 — Wet-room waterproofing. In bathrooms, laundries, and kitchens, apply a liquid-applied waterproofing membrane over the plywood per manufacturer wet-area specification: prime, first coat, embed fabric at corners/drains, second coat to achieve dry-film thickness, and turn up walls minimum 100–150 mm. Integrate with drain flanges and shower thresholds.
Step 9 — Flattening and underlays. For tile/stone, evaluate decoupling membranes to manage differential movement. For engineered timber, lay acoustic underlay as specified. For LVT/vinyl, apply smoothing compound and primer designed for wood substrates and plasticizers.
Step 10 — Drying and verification. Confirm membrane cure, adhesive set, and substrate moisture within the permissible window for the finish. Document with photos and readings for handover transparency.
Step 11 — Finish installation. Install the selected floor per manufacturer instructions. Coordinate with furniture installation to avoid point-loading fresh floors and maintain expansion gaps under cabinetry where needed. Protect surfaces during subsequent trades.
Step 12 — Maintenance briefing. Provide the villa team with care instructions: spill management, AC condensate checks, periodic grout/sealant audits, and humidity control recommendations.
This disciplined sequence is standard in our Bali villa construction and finishing workflows and is adapted for live-in renovations to reduce disruption.
5) Costs & Timeline in Bali Conditions
Budgets vary by extent of damage, finish type, access, and coastal exposure. The ranges below are indicative for urban South Bali and do not constitute a quote. For a project-specific estimate, use our cost estimation form.
- Assessment and drying: Moisture diagnostics and targeted drying typically 1–3 days, longer after major leaks.
- Selective replacement: Removing finishes, replacing damaged plywood panels, and resealing usually 2–5 days for 30–60 m², plus membrane cure time in wet rooms.
- Full replacement and upgrades: For whole-room subfloors with wet-area waterproofing and leveling, 5–10 days depending on size and complexity.
- Material costs (order-of-magnitude): Moisture-resistant plywood (18–21 mm), corrosion-resistant screws, PU/hybrid adhesive, epoxy/PU sealants, wet-area membranes, primers/SLU, tapes and ancillaries. Premium marine-grade panels and high-build membranes increase costs but add durability in Bali’s climate.
Timeline drivers include acclimatization, membrane curing, and coordination with utilities (e.g., rerouting AC condensate) to ensure problems are solved at the source. We prioritize quality finishing and correct sequencing over speed to protect long-term performance—particularly important for interior finishing Bali work under high humidity.
6) FAQ: Moisture-Resistant Plywood Subfloor Fixing & Sealants in Bali
Q1. Do I need marine-grade plywood?
A. Not always. Use exterior/WBP plywood for most dry areas; marine-grade is advisable in high-risk zones (bathrooms, laundries, near pool entries) or where chronic humidity and splash risk exist. The sealant and waterproofing system is equally decisive.
Q2. Should I seal both faces of the plywood?<
 3104 m²11 month(s)from 99.000 USD
TALA 100
 172 m²8 month(s)from 120.000 USD
Keshava

Want to calculate?
 3124 m²6 month(s)from 123.000 USD
TALA 8
 164 m²7 month(s)from 79.000 USD
TALA TWO
 2144 m²11 month(s)from 104.000 USD
Narayana
164 m²7 month(s)from 79.000 USDPrivate: Haridas Villas, Tegallalang
 1from 198.000 USD
Private: Haridas Villas
 4344 m²16 month(s)from 290.000 USD
Radha
 3173 m²6 month(s)from 125.000 USD
TALA FOUR
 3180 m²7 month(s)from 142.000 USD
Vasudeva
 3127 m²9 month(s)from 177.000 USD
Mukunda
Start With Real Numbers, Not Guesses
Before finalizing your finishing works plan, check realistic cost ranges for your Bali villa project.
Available lands
 1000 m²5 min$ 350431Bali, Drupadi
 1200 m²2 min$ 155172Bali, Klungkung
 600 m²12 min$ 101970Bali, Mengwi
 585 m²8 min$ 165702Bali, Mengwi
 2000 m²15 min$ 261700Bali, Babakan
 2680 m²10 min$ 1732759Bali, Pererenan
 515 m²7 min$ 570813Bali, Canggu
 3100 m²20 min$ 272968Bali, Tabanan
 700 m²8 min$ 165517Bali, Umalas
 10000 m²19 min$ 232759Bali, Buleleng
 1000 m²10 min$ 184729Bali, Kutuh South Bali
 29000 m²6 min$ 3857143Bali, Tabanan
 1950 m²7 min$ 150092Bali, Tabanan
 2115 m²5 min$ 1139547Bali, Pererenan
 700 m²7 min$ 400000Bali, Canggu
Essential Bali build & buy guides
- Bali villa construction cost per m² in 2026
- How much will your villa cost? Calculator
- Building a villa in Bali: the complete guide
- Buying land in Bali: step-by-step for foreigners
- Bali villa investment: yields, risks, returns
- Leasehold vs freehold: what foreigners can own
- Construction defect liability & 10-year warranty
- Bali building codes and construction standards
Related guides
Sanur and Nusa Dua vs Canggu: Stability Plays vs Hype
Canggu gets the headlines; Sanur and Nusa Dua quietly deliver steadier returns to a different kind of buyer. An honest 2026 comparison of the stability markets against the hype market — prices, demand drivers, oversupply risk, and who should buy where.
7 min read
Ubud and the Wellness Market: Buying or Building for Retreats
Ubud is Bali's wellness capital, and retreat-focused property behaves differently from beach villas: longer stays, group bookings, lower volatility. Here is what the market rewards, what zoning allows, and what it costs to buy or build a retreat property in 2026.
8 min read
Buying and Building on the Bukit: Uluwatu, Bingin and Balangan from a Buyer's Seat
A buyer's-seat 2026 guide to the Bukit peninsula — Uluwatu, Bingin and Balangan land prices, the water problem nobody budgets, cliff setbacks after the 2025 Bingin demolitions, and how to build there properly.
7 min read