Underfloor Conduit Layout Screed Prep in Bali Renovations
Underfloor Conduit Layout & Screed Prep for Bali Renovations
1) The Specific Problem / Question
In many renovation Bali projects, the underfloor space is the only clean route for new power, data, and plumbing to reach kitchens, wardrobes, island counters, and living areas without visible trunking. But poorly planned conduits inside a thin screed can cause tile cracks, damp migration, tripping of RCDs, and premature floor failures—especially in Bali’s humid, saline, termite-prone climate. How do we design and execute underfloor conduit layouts and screed preparation that deliver durable, flat, dry, and movement-tolerant floors suitable for premium interior finishing Bali and precise furniture installation?
2) Technical Deep Dive: What a Durable, Bali-Proven Build-Up Looks Like
Underfloor routing in renovation Bali settings must reconcile three constraints: limited build-up height, existing slab irregularities, and tropical moisture. Teville’s approach, developed through Bali villa construction and luxury fit-outs, organizes services and screed as a single system—planned with furniture, utilities, and final floor finishes in mind.
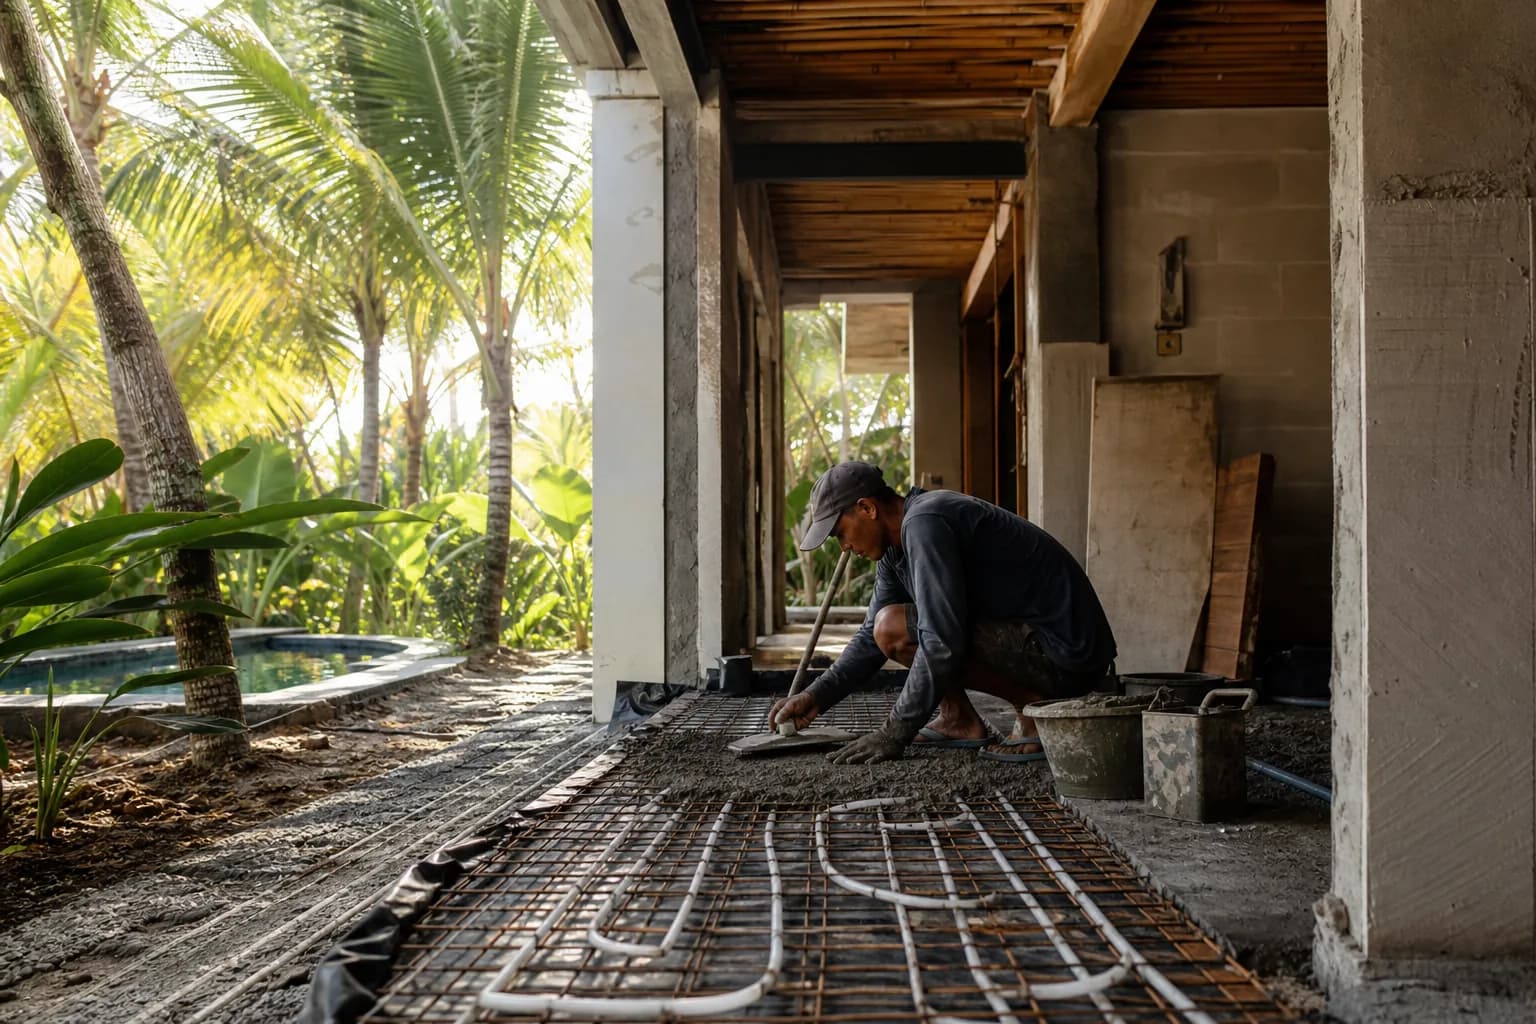
Zoning and separation. Power, low-voltage/data, and water lines are segregated to minimize interference and simplify maintenance. We maintain distinct corridors, use color-coded conduits, and enforce separation distances (typically 150–300 mm between power and data, greater where practical). Crossings are minimized and executed with sweeping bends rather than tight elbows, maintaining cable pull radii.
Conduit routing. In renovations, conduits are usually fixed above the structural slab but beneath the screed. Depth cover matters: the conduit crown should sit at least 25–30 mm below the finished screed surface to avoid trowel strikes and to provide compressive protection. For heavy traffic (kitchens, circulation paths) or where large-format tiles are specified, we increase cover and select higher rigidity conduits or protective capping.
Floor boxes and island feeds. Coordinate early with kitchen and wardrobe drawings. For island counters, we route power and data through protected conduits to floor boxes with IP-rated lids, checking hinge orientation relative to cabinet plinths. Where wet cleaning is common, lids use compressible gaskets and stainless trim; in wet zones we avoid floor boxes and bring services up through walls or plinth voids instead.
Bathroom and wet-zone strategy. In baths, we prioritize short, direct runs and sleeves to linear or point drains, keeping electrical out of wet zones per PUIL guidance. Screed falls are designed to 1:80 to drains (1:60 for textured or small-format tiles). We place decoupling membranes over waterproofed screeds to isolate finish tiles from substrate movements and thermal changes.
Moisture and termite barriers. Bali’s humidity and capillary rise make a continuous damp-proof membrane (DPM) essential when the existing slab lacks one. We use 200 µm PE sheet with taped laps and upturns at perimeters, and termite protection (chemical reticulation or stainless mesh interfaces) where we open joints or cut chases. Penetrations are sealed with compatible mastics and collars before screeding.
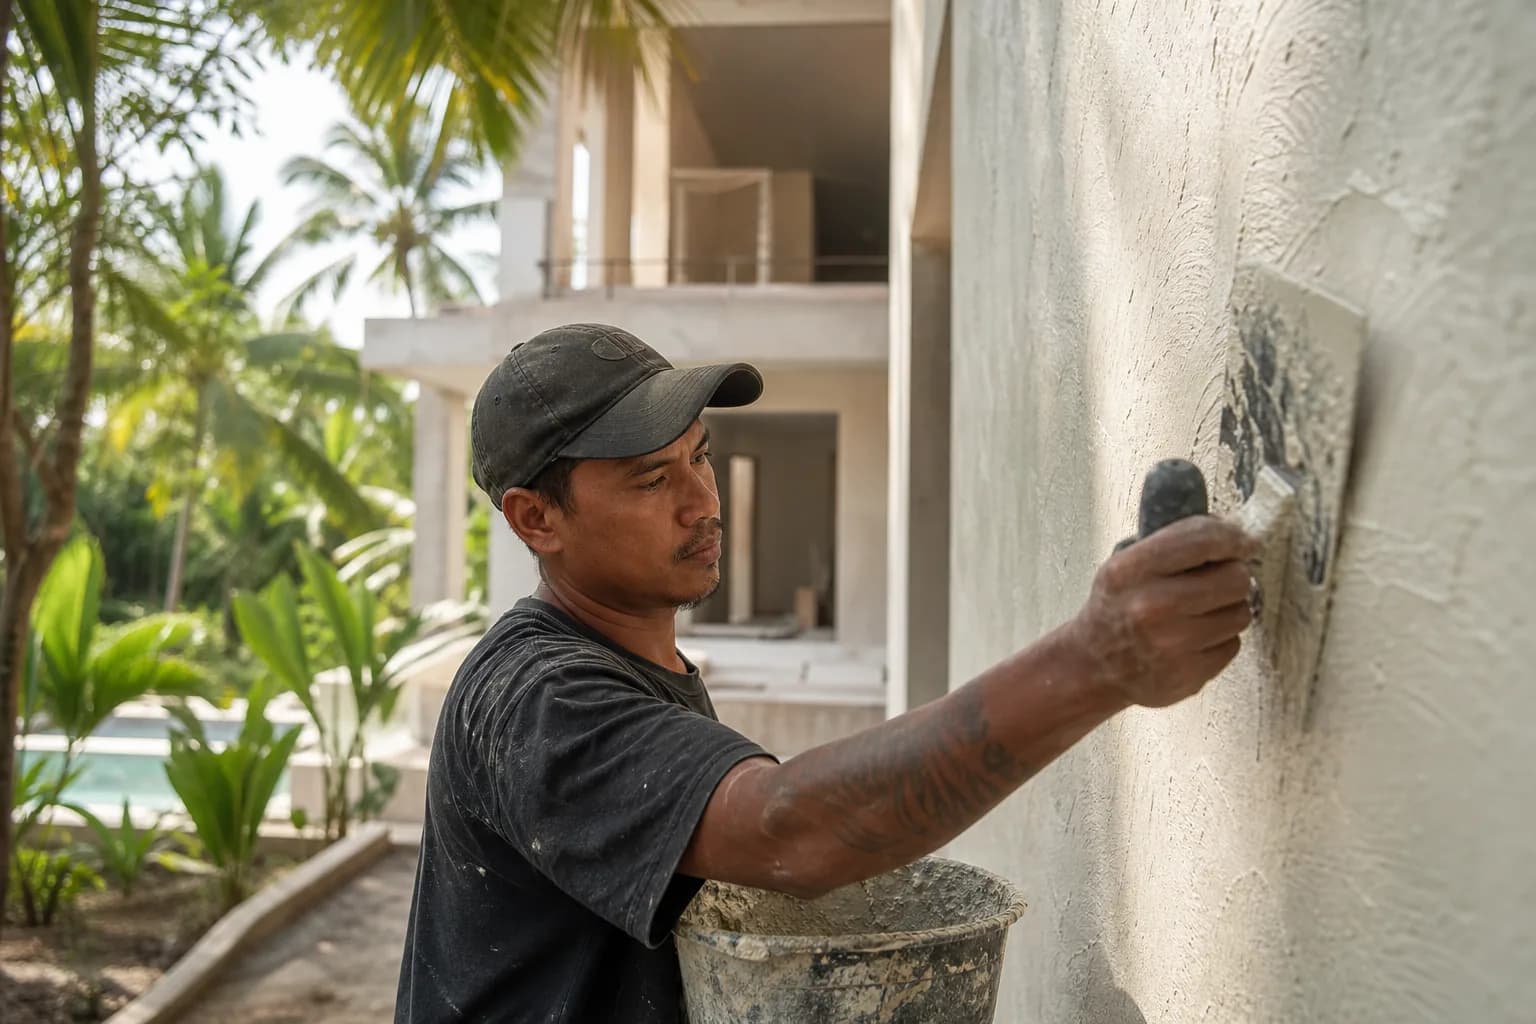
Screed composition and reinforcement. For typical 35–60 mm builds, a sand–cement screed (1:3 to 1:4.5 by volume) with polypropylene microfibers limits plastic shrinkage. In load or heat-exposed areas (sun-exposed terraces transitioning indoors), we may add light mesh or switch to polymer-modified screeds for higher flexural strength. Admixtures can accelerate set in humid conditions while controlling water content, improving internal cure and finish flatness.
Movement and decoupling. We respect existing structural joints by carrying them through the screed and finish. New movement joints are set at 4–6 m grids (or room breaks), at door thresholds, and where conduit clusters create stiffness discontinuities. Perimeter isolation strips (8–10 mm) prevent hard contact with walls and cabinetry plinths, lowering crack risk and improving acoustic comfort.
Flatness, levels, and thickness management. Large-format tiles and engineered timber demand tight flatness. We set rails/beacons with lasers, aiming for SR2 or better (max 5 mm deviation under a 2 m straightedge) and finish with a surface-tolerant trowel. Where the build-up is too low for robust conduit cover, we recess select conduits into the slab (safely, avoiding rebar) or switch to low-profile channels, then restore integrity with high-strength repair mortars.
Testing and documentation. Before screeding, we pressure-test water lines and megger-test electrical runs. After screed cure, we measure slab RH (in-situ probes) before wood flooring, and verify pull lines remain free in data conduits. As-built MEP drawings record conduit grids, junctions, and spare runs for future upgrades—critical in Bali villa utilities where clients often add features post-handover.
Tropical climate implications. Heat and trade winds accelerate skin drying while the core remains wet. We control evaporation with curing sheets for 48–72 hours and avoid forced airflow that induces curling. For beach-proximate sites, we select corrosion-resistant floor boxes, stainless drain components, and alkali-resistant mesh; in upland, cooler regions, we moderate accelerators to avoid differential set.
The result is a coordinated assembly—concealed services that support meticulous interior finishing Bali, furniture installation precision, and long-term durability suited to the island’s microclimates.
3) Materials & Standards We Specify for Bali Conditions
Conduits and fittings:
- uPVC rigid conduits (impact-rated), or HDPE corrugated for data; solvent-welded or gasketed couplings; metallic EMT only where required and protected from corrosion.
- Galvanized or stainless floor boxes with IP-rated lids; brass trims for dry interiors; stainless AISI 304/316 in coastal zones.
- Color coding: power (red), lighting (yellow), data (blue/green), plumbing sleeves (white/gray) for easy QA/QC.
Cables and electrical:
- NYA/NYM cables per Indonesian practice, sized for voltage drop and heat dissipation in enclosed runs.
- RCD/RCBO protection for sockets within living areas; equipotential bonding in baths and near pools per PUIL guidance.
Moisture management:
- 200 µm polyethylene DPM with 200 mm taped laps and perimeter upturns; compatible primers over existing slabs where membranes cannot be lifted continuously.
- Epoxy moisture barriers for high MVER slabs prior to wood or resilient flooring.
Screeds and toppings:
- Traditional sand–cement screed, 20–25 MPa target compressive strength; fibers at 0.9 kg/m³; W/C strictly controlled.
- Polymer-modified screeds for thinner sections (25–35 mm) or fast-track works; self-leveling underlayments (3–10 mm) to achieve final flatness.
Reinforcement and interfaces:
- Polypropylene microfibers for shrinkage control; light welded mesh selectively at transitions and doorways.
- Perimeter isolation strips (closed-cell foam) 8–10 mm; movement joint profiles aligned with tile layout.
Waterproofing and wet areas:
- Flexible cementitious waterproofing under screed (if falls below screed) or above screed (if falls in screed), tied into drain flanges; flood test per project spec.
Referenced standards and good practice:
- PUIL for electrical safety and separation; local SNI concrete guidance for substrate prep and curing; accepted international screed references (BS 8204, EN 13813) to classify and verify screed performance.
Where Indonesian standards do not explicitly prescribe screed practice, Teville aligns materials to international classifications while maintaining compatibility with Bali supply chains and serviceability in tropical environments.
4) Step-by-Step Process Teville Uses
1. Survey and coordination:
- Laser-scan/level survey of existing slabs; note highs, lows, and door clearances.
- Collect furniture and appliance layouts (wardrobes, kitchen island, vanities) to position floor boxes and service drops with millimetric accuracy.
- MEP workshop: align electrical loads, data points, and plumbing routes; lock separation corridors and joint positions.
2. Mark-out and substrate prep:
- Snap lines for conduit grids and movement joints; identify no-cut zones over primary beams.
- Scarify/shot-blast glossy or contaminated slab patches; vacuum clean; repair cracks with epoxy injection or polymer mortar, dowelled if active.
3. Conduit installation:
- Fix conduits with clips and spacers; use sweeping bends; route feeders to floor boxes with protective steel covers where loads will pass.
- Maintain minimum 25–30 mm cover above conduit crowns in final screed; reduce crossings with layered routing if required.
- Install pull cords in data conduits and label terminations; fit temporary caps to keep debris out.
- Megger-test electrical runs; pressure-test water sleeves; photograph and record as-built positions.
4. Moisture/termite barriers and edge isolation:
- Lay 200 µm PE DPM with taped laps; form upturns and seal at penetrations; integrate termite protection where the slab is penetrated or perimeter soils are accessible.
- Fix perimeter isolation strips to walls, columns, and fixed millwork bases.
5. Screed mixing and placing:
- Batch sand–cement with verified moisture; add fibers and approved admixtures per spec; avoid over-watering.
- Set screed rails/beacons using laser; place, compact, and rule to SR2 or better; close surface with steel trowel without over-burnishing.
- Form movement joints and carry through to tile layout; respect structural joints.
6. Curing and QA:
- Cover with curing sheets 48–72 hours; prevent drafts and direct sun; allow controlled hydration.
- After initial cure, check flatness; locally grind highs and fill lows with compatible repair mortars or self-leveling underlayment.
- Test slab RH/MVER before wood or resilient finishes; verify slope and drain performance in wet zones via water tests.
7. Finish readiness and installation:
 3180 m²7 month(s)from 142.000 USD
Vasudeva

Want to calculate?
 164 m²7 month(s)from 79.000 USD
Private: Haridas Villas, Tegallalang
 3104 m²11 month(s)from 99.000 USD
TALA 100
 3124 m²6 month(s)from 123.000 USD
TALA 8
 172 m²8 month(s)from 120.000 USD
Keshava
 2144 m²11 month(s)from 104.000 USD
Narayana
 4344 m²16 month(s)from 290.000 USD
Radha
164 m²7 month(s)from 79.000 USDTALA TWO
 3173 m²6 month(s)from 125.000 USD
TALA FOUR
 3127 m²9 month(s)from 177.000 USD
Mukunda
 1from 198.000 USD
Private: Haridas Villas
Start With Real Numbers, Not Guesses
Before finalizing your finishing works plan, check realistic cost ranges for your Bali villa project.
Available lands
 1000 m²8 min$ 134544Bali, Bukit
 3900 m²10 min$ 432266Bali, Tabanan
 1300 m²10 min$ 348214Bali, Tabanan
 1350 m²5 min$ 283467Bali, Pecatu
 889 m²15 min$ 145612Bali, Cepaka
 3700 m²15 min$ 738177Bali, Tabanan
 3000 m²15 min$ 1246921Bali, Tabanan
 220 m²2 min$ 66565Bali, Cemagi
 1000 m²10 min$ 303571Bali, Tabanan
 800 m²10 min$ 307882Bali, Tibubeneng
 325 m²15 min$ 44472Bali, Ungasan
 608 m²15 min$ 310377Bali, Seminyak
 2000 m²15 min$ 261700Bali, Babakan
 928 m²15 min$ 910123Bali, Pererenan
 200 m²11 min$ 89286Bali, Tabanan
Planning a build in Bali?
Get a feasibility view, budget range and timeline from Teville.
Related guides
Resin-Infused Plaster Finishes: Anti-Salt Systems Bali
Expert technical guide: Resin-Infused Plaster Finishes: Anti-Salt Systems Bali
8 min read
Prefinished Timber Joinery: Silicone Seals Fixings Bali
Professional prefinished timber joinery installation in Bali with silicone seals and fixings for durable weatherproof performance and a premium finish.
10 min read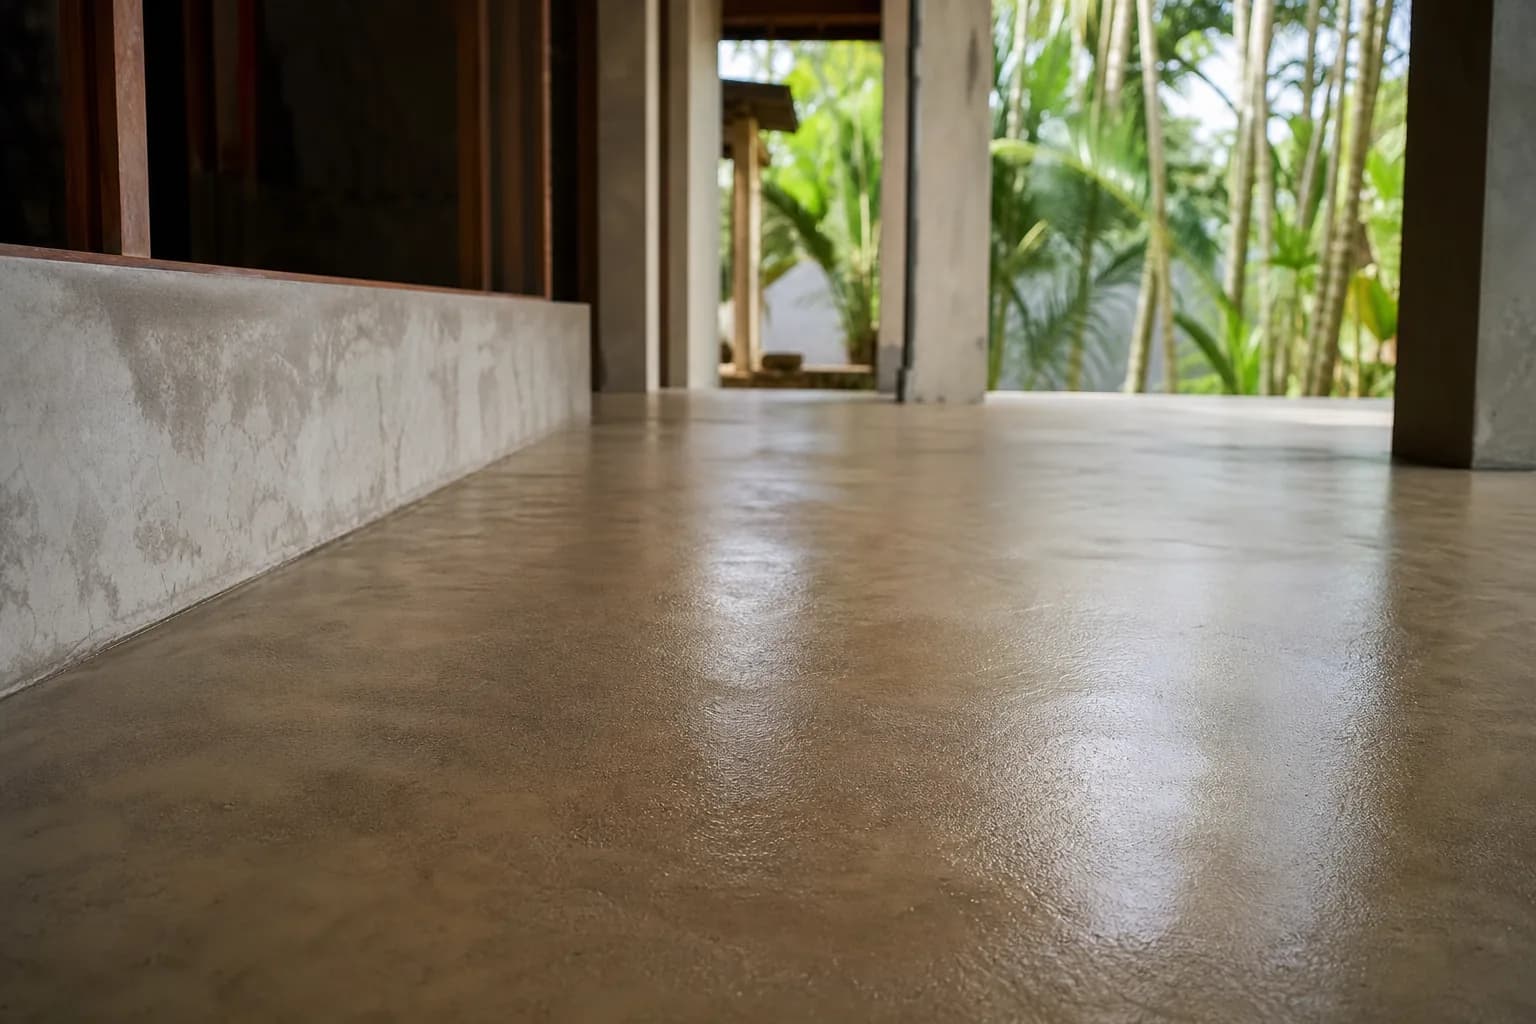
Polished Concrete Microtopping: Surface Prep Sealants Bali
Discover Bali s polished concrete microtopping: expert surface prep, durable sealants, and a flawless finish for modern floors with minimal maintenance.
9 min read