Acoustic Ceiling Cladding for Bali Villas: Install Seal
Acoustic Ceiling Cladding: Installation & Sealing for Bali Villas
1) Specific Problem/Question
Open-plan Bali villas often suffer from echo, AC hum, rain noise on lightweight roofs, and sound leakage between rooms. In humid, saline, and heat-cycled tropical conditions, many ceiling systems sag, delaminate, or mold—and poor perimeter sealing leaks sound and air. How do we correctly install and seal acoustic ceiling cladding in a Bali villa so it performs acoustically, resists humidity, integrates with lighting/HVAC, and achieves a clean, durable finish?
2) Technical Deep Dive: What Works in Bali’s Climate
As a finishing specialist in Bali villa construction, our priority is delivering a ceiling system that absorbs reverberation, isolates flanking noise paths, and withstands humidity and salt-laden air. Acoustic ceiling cladding is not a single product but a system: substrate, suspension, acoustic layer, finish, and airtight sealing—all coordinated with villa utilities (lighting, speakers, sprinklers, detectors, AC diffusers) and furniture installation plans.
Key performance concepts:
- Reverberation control (absorption): Measured by NRC/αw. For living areas, 0.60–0.85 is a common target; for bedrooms, quieter targets with ceiling absorption plus soft furnishings. Perforated MR gypsum with mineral wool, PET-felt panels, or timber-slat with felt backers are typical.
- Sound leakage control (sealing/decoupling): Sound bypasses panels via gaps. Perimeter joints, service penetrations, and unsealed cavities are the main culprits. Acoustic mastic, gaskets, and proper backer rods are essential.
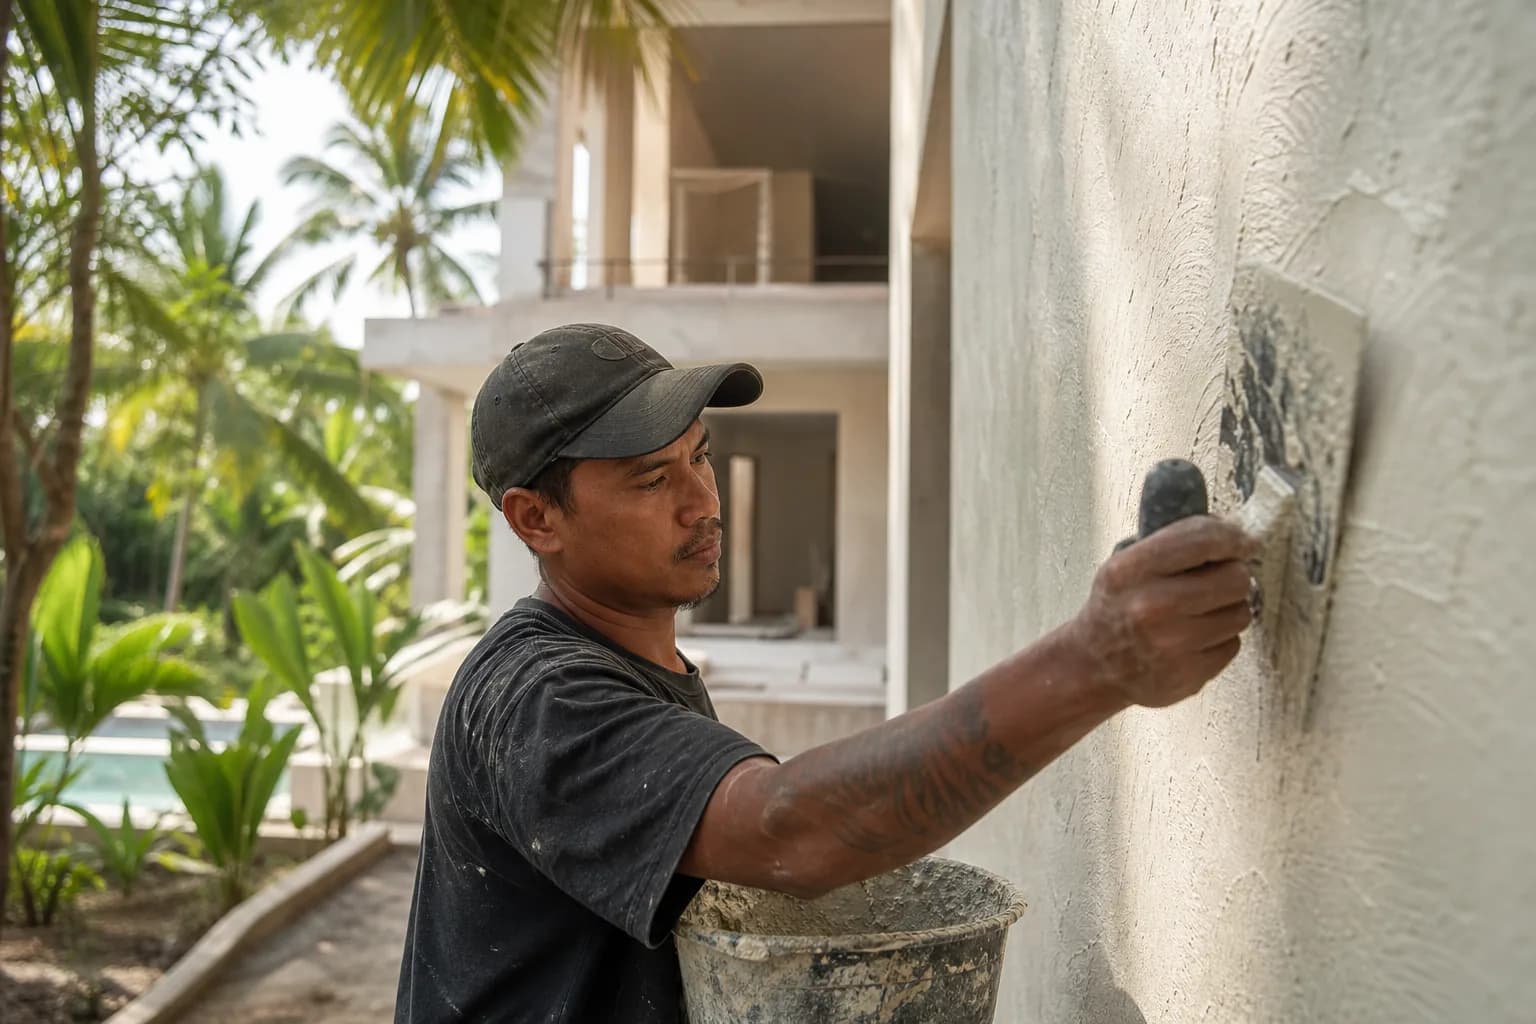
- Durability in tropics: High humidity, thermal cycling, condensation risk under roofs, and coastal air accelerate corrosion and microbial growth. Choose hydrophobic insulation, mold-resistant finishes, and corrosion-resistant fasteners and suspension (aluminum, stainless steel, or hot-dip galvanized with appropriate coating class).
System architecture considerations:
- Substructure: In Bali, we commonly use a light steel furring system (galvanized Z275+ or aluminum rails) suspended on anti-vibration hangers. Stainless steel (A2/A4) fixings are preferred near coasts. Timber battens can be used only if kiln-dried, moisture-checked, and isolated from roof condensation zones.
- Panels: Options include perforated moisture-resistant gypsum with acoustic tissue, PET-felt tiles/panels, timber-slat modules on PET/felt backers, or micro-perforated metal with fleece. For wet-adjacent spaces (spa edges), use moisture-tolerant panels and sealed edges.
- Insulation: Hydrophobic mineral wool (32–48 kg/m³) or polyester (PET) batts above the cladding boost low–mid frequency absorption and damp roof noise. Avoid open glass fiber in return-air plenums unless fully encapsulated.
- Adhesives & sealants: Use low-VOC, mildew-resistant MS polymer or hybrid construction adhesives approved for ceilings. For acoustic sealing, use non-shrinking, paintable acoustic sealant; for fire-resisting penetrations, use compatible fire-rated sealants/sleeves where required.
- Ventilation & vapor control: In a hot-humid climate, avoid sealing interstitial spaces without considering moisture. Maintain roof ventilation or conditioned plenum design. Acclimatize panels (24–72 hours) at site RH/temperature before installation.
- Details that matter: Shadow gaps need a backer rod + acoustic mastic behind the reveal. Recessed downlights require acoustic baffles/collars. AC diffusers should bear on gaskets to avoid leaks and rattles. Access panels must be gasketed and latched.
Finishing quality drivers:
- Flatness: String lines/laser for grid; panel tolerances; correct screw depth and pattern.
- Corrosion control: Avoid bare steel cuts; seal cut edges; use compatible metals.
- Seam control: Accurate joint alignment; controlled adhesive bead; sanding and paint systems that are breathable and anti-fungal.
Testing and verification include on-site reverberation checks, leakage checks at penetrations, and inspection after 7–14 days for early sag or joint telegraphing in Bali humidity.
3) Materials & Standards
Recommended material families for interior finishing Bali projects:
- Perforated MR gypsum panels (with black acoustic tissue), paired with 50 mm hydrophobic mineral wool above. Excellent absorption and clean painted finish. Use MR-rated boards and corrosion-protected framing.
- PET felt panels or tiles (9–24 mm), stable in humidity, good mid–high absorption, easy to service-penetrate with gasketed trims. Ideal for bedrooms, studies, studios.
- Timber slat on felt backer, sealed with marine-grade clear coat; combine with insulation above for broader-band absorption. Ensure acclimatization and UV-stable finish near glazing.
- Micro-perforated aluminum/steel with fleece and insulation; resilient in coastal zones, highly durable; requires correct perimeter sealing to prevent flutter echo.
Ancillaries:
- Suspension/grid: Aluminum or high-coating galvanized steel furring channels; stainless fixings in coastal exposure; anti-vibration hangers.
- Insulation: Hydrophobic mineral wool 32–48 kg/m³ or PET batts; foil-faced variants where radiant heat or condensation risk exists (design dependent).
- Adhesive: MS polymer/hybrid, ceiling-rated; do not substitute with brittle, high-VOC products.
- Sealants: Acoustic mastic (paintable), fire-rated sealant at required penetrations, gaskets for trims and diffusers, closed-cell backer rods.
- Coatings: Breathable, anti-fungal primers and topcoats; low sheen to hide joints; for timber, UV-stable marine-grade clear coats.
Standards guidance (select):
- Acoustic performance: ISO 354 / ASTM C423 (absorption), ISO 11654 (αw/NRC classification), ISO 717-1 (airborne sound rating, selection context).
- Reaction to fire/surface burning: ASTM E84/ISO 5660 class guidance (select materials with appropriate ratings for villa use).
- Indoor air quality: Low-VOC certifications where possible for adhesives and panels.
- Local compliance: Coordinate with Indonesian regulations and Bali authority requirements; Teville aligns international best practice with local approval pathways.
Teville sources materials vetted for the Bali climate and integrates them within the broader villa utilities and finishing system. See our portfolio and villa projects for context.
4) Step-by-Step Process: Installation & Sealing
This process is optimized for renovation Bali or new-build interiors and assumes a framed ceiling under a roof deck.
- 1. Acoustic brief and survey
- Confirm room function and target RT60/NRC. Note noise sources (rain on roof, AC, neighboring traffic).
- Scan for moisture ingress and measure ambient RH/temperature; review ventilation/condensation risks.
- Map villa utilities: lighting, sprinklers, detectors, speakers, diffusers, and access needs.
- 2. Material selection and mock-up
- Choose panel type (MR perforated gypsum, PET felt, timber slat, micro-perf metal) with compatible insulation and substructure.
- Produce a 1:1 mock-up panel with full edge sealing and a typical light diffuser penetration to validate detailing and finish.
- 3. Acclimatization and site prep
- Store panels flat, indoors, 24–72 hours prior; protect from spray and direct sun.
- Ensure substrate is clean, dry, level; confirm timber MC ≤16% if any timber battens are used.
- Strike level lines with laser; coordinate ceiling datum with doors, windows, and furniture installation elevations.
- 4. Suspension and framing
- Install hangers at manufacturer spacing; use anti-vibration elements to reduce structure-borne noise.
- Fix primary/secondary furring channels; check flatness within 2–3 mm over 2 m.
- Use corrosion-appropriate metals (aluminum or stainless near coastlines).
- 5. Services rough-in and leakage planning
- Pre-cut penetrations on templates; fit gaskets/trim rings sized for fixtures.
- Plan perimeter shadow gaps; specify backer rod size and acoustic sealant type.
- Place hydrophobic insulation above the acoustic layer; avoid compressing beyond specs.
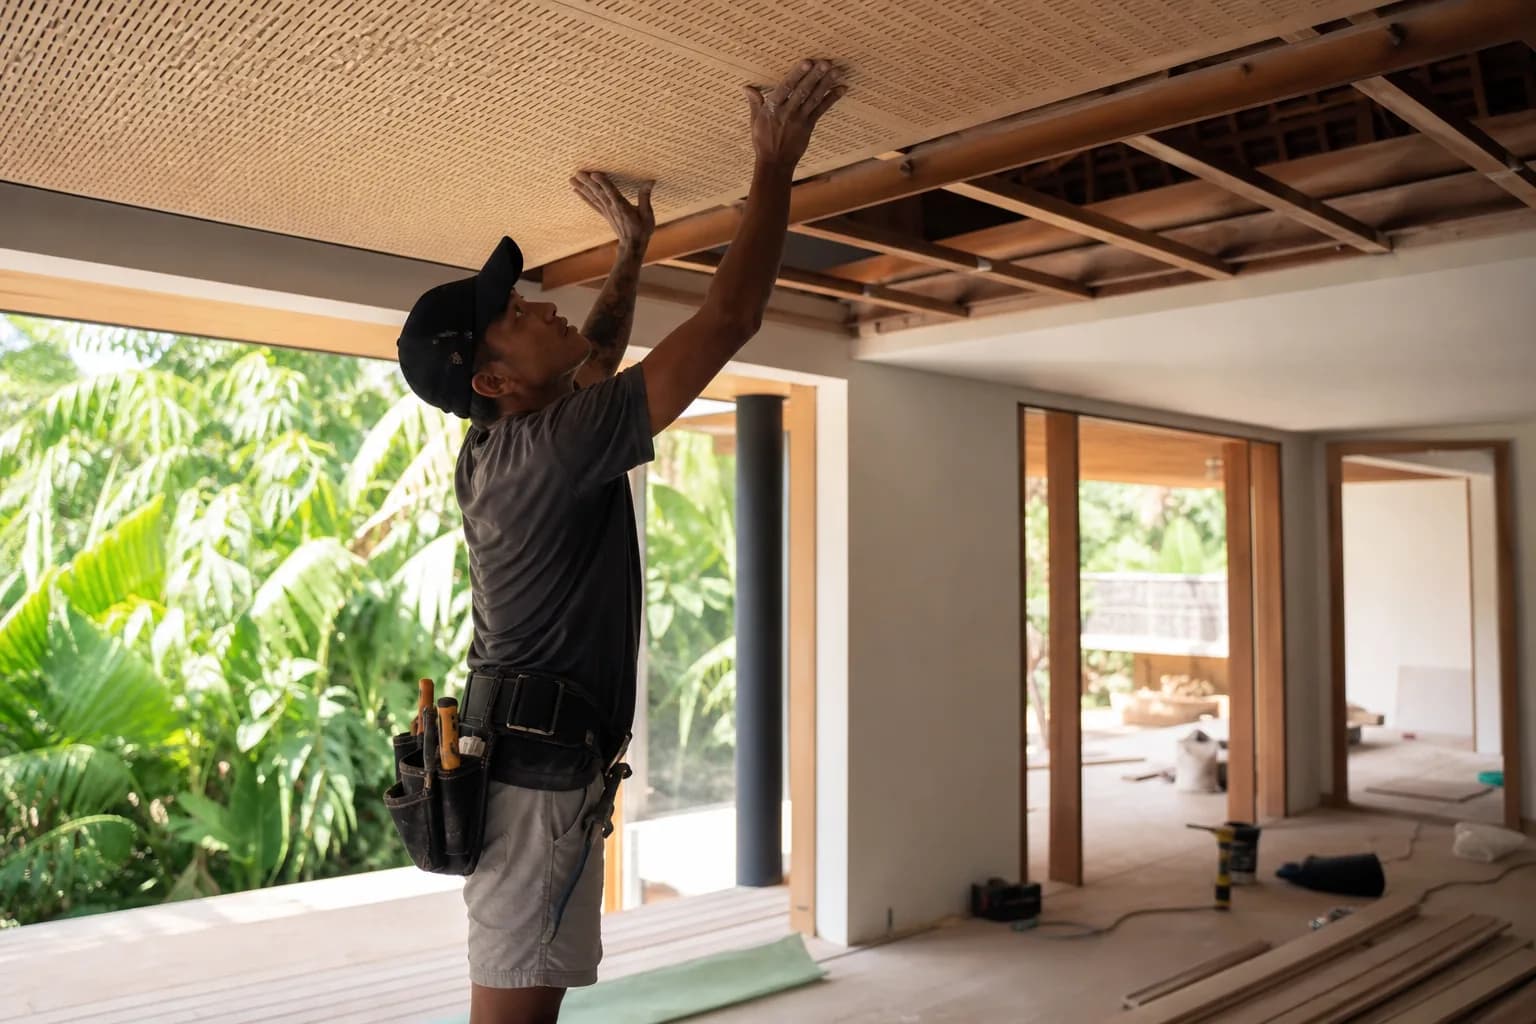
- 6. Panel installation
- Adhesive method: Apply MS polymer beads (perimeter + field serpentine). Press panel evenly; use temporary props until initial grab. Follow cure times extended for Bali humidity.
- Mechanical method: Use corrosion-resistant screws. Follow manufacturer spacing; for most ceiling panels, typical edge spacing 150–200 mm and field 200–300 mm. For narrow slat modules or specific systems, closer spacing (e.g., 60–100 mm along battens) may be required to prevent sag—always verify with the supplier.
- Stagger joints; keep consistent reveals; avoid overdriving screws that fracture faces.
- 7. Edge, joint, and penetration sealing
- At perimeters and shadow gaps: insert closed-cell backer rod to 2:1 width-to-depth ratio; apply non-shrinking acoustic mastic and tool to smooth finish behind any decorative reveal.
- At board-to-board joints: if system requires taping/jointing, use compatible joint compound; after finishing, perimeter-seal the ceiling-to-wall line to stop flanking leaks.
- At fixtures: fit acoustic collars/baffles for downlights; apply gaskets on diffusers/grilles; seal annular gaps with acoustic mastic; use fire-rated sealant where required by code.
- 8. Finishing
- Prime with anti-fungal, breathable primer; apply low-sheen topcoats. For timber slats, apply marine-grade UV-stable clear coats; reseal cut ends.
- Clean PET/micro-perf faces with soft brush/vacuum; avoid saturating with water.
- 9. Commissioning and inspection
- Check all joints, perimeters, and penetrations for gaps; reapply sealant where pinholes appear.
- Run HVAC; listen for rattles; verify no whistling at diffusers (adjust gaskets).
- Perform a simple RT check and speech clarity test; confirm access panels open smoothly and reseal against gaskets.
- 10. Handover documents
- Provide maintenance guide for cleaning, repainting, and sealant life.
- Record material datasheets and locations of concealed utilities for future renovation Bali works.
See how we structure sequencing with MEP on our construction process. For tailored scope, start a cost estimation.
5) Costs & Timeline
Indicative ranges for high-quality acoustic ceiling cladding in Bali (materials + installation), excluding complex structural works:
- PET felt panels with minimal penetrations: moderate cost; efficient to install; good for bedrooms and studies.
- Perforated MR gypsum + mineral wool: mid-range; excellent acoustic control for living/dining areas; paint-ready finish.
- Timber slat systems on felt: mid–high; superior aesthetic with broadband absorption; more detailing and finishing.
- Micro-perforated metal: higher initial material cost; durable near coasts; precision trims.
Accessories influencing cost:
- Corrosion-resistant suspension (aluminum/SS), acoustic gaskets, fire-rated seals, access panels, and bespoke trims.
- Integration density: number of downlights, speakers, diffusers, detectors; each penetration requires sealed detailing.
Typical timeline for a 60–120 m² villa ceiling zone:
- Design & shop drawings: 1–2 weeks (coordination with villa utilities and furniture installation heights).
- Procurement & acclimatization: 1–3 weeks depending on stock/import; acclimatization 1–3 days.
- Installation & sealing: 5–10 working days, contingent on penetration count and finish complexity.
- Curing & finishing: 2–4 days (adhesive/sealant cure extended in high humidity; paint or clear-coat cycles).
Note: We size suspension and sealants to the coastal exposure class where relevant. Teville never promises ROI; we prioritize performance, durability, and finishing quality suitable for Bali’s climate.
6) FAQ: Acoustic Ceiling Cladding in Bali 164 m²7 month(s)from 79.000 USD
TALA TWO
 2144 m²11 month(s)from 104.000 USD
Narayana
 172 m²8 month(s)from 120.000 USD
Keshava

Want to calculate?
 1from 198.000 USD
Private: Haridas Villas
 3124 m²6 month(s)from 123.000 USD
TALA 8
 3173 m²6 month(s)from 125.000 USD
TALA FOUR
 3104 m²11 month(s)from 99.000 USD
TALA 100
 3180 m²7 month(s)from 142.000 USD
Vasudeva
 3127 m²9 month(s)from 177.000 USD
Mukunda
164 m²7 month(s)from 79.000 USDPrivate: Haridas Villas, Tegallalang
 4344 m²16 month(s)from 290.000 USD
Radha
Start With Real Numbers, Not Guesses
Before finalizing your finishing works plan, check realistic cost ranges for your Bali villa project.
Available lands
 500 m²2 min$ 175862Bali, Cemagi
 250 m²15 min$ 40025Bali, Munggu
 1950 m²7 min$ 150092Bali, Tabanan
 204 m²5 min$ 40899Bali, Kedungu
 2680 m²10 min$ 1732759Bali, Pererenan
 1300 m²10 min$ 312192Bali, Kutuh South Bali
 2000 m²15 min$ 261700Bali, Babakan
 615 m²15 min$ 113608Bali, Tabanan
 260 m²5 min$ 51872Bali, Kedungu
 1362 m²15 min$ 335468Bali, Tumbak
 422 m²15 min$ 93547Bali, Kerobokan
 8313 m²15 min$ 716670Bali, Buduk
 200 m²11 min$ 89286Bali, Tabanan
 10000 m²19 min$ 232759Bali, Buleleng
 18900 m²2 min$ 6912931Bali, Pecatu
Planning a build in Bali?
Get a feasibility view, budget range and timeline from Teville.
Related guides
Resin-Infused Plaster Finishes: Anti-Salt Systems Bali
Expert technical guide: Resin-Infused Plaster Finishes: Anti-Salt Systems Bali
8 min read
Prefinished Timber Joinery: Silicone Seals Fixings Bali
Professional prefinished timber joinery installation in Bali with silicone seals and fixings for durable weatherproof performance and a premium finish.
10 min read
Polished Concrete Microtopping: Surface Prep Sealants Bali
Discover Bali s polished concrete microtopping: expert surface prep, durable sealants, and a flawless finish for modern floors with minimal maintenance.
9 min read